Integrations
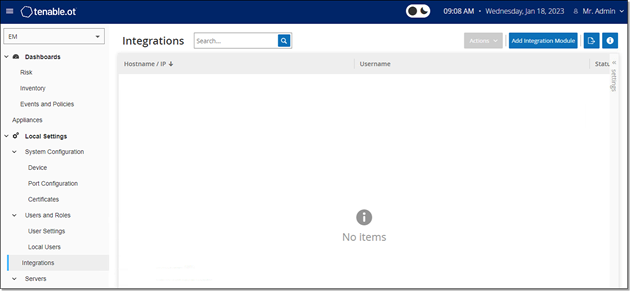
You can set up integrations for Tenable One OT Exposure EM with other Tenable products — Tenable Security Center and Tenable One Vulnerability Management. This enables Tenable One OT Exposure to send data to Tenable Security Center and Tenable One Vulnerability Management. The data from Tenable One OT Exposure EM includes Tenable One OT Exposure vulnerabilities as well as data discovered by IT-type Tenable Nessus scans initiated from Tenable One OT Exposure. By setting up the integrations on the Tenable One OT Exposure EM level, you provide a single source of data, and alleviate the need to configure separate integrations for each site.
.
Integrate with Tenable Security Center
You can integrate Tenable Security Center with Tenable One OT Exposure EM so that Tenable One OT Exposure EM sends information to the designated repositories.
 button on the Integrations page.
To integrate Tenable Security Center:
-
In the Tenable OT Security interface, navigate to
-
Click Add Integration.
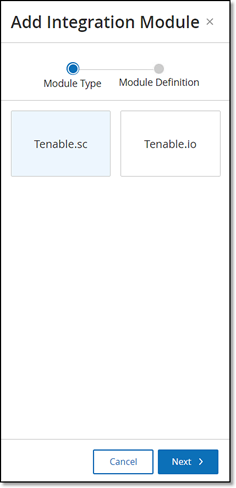
The Add Integration wizard opens with the Module Type page.
-
Click Tenable Security Center, then click Next.
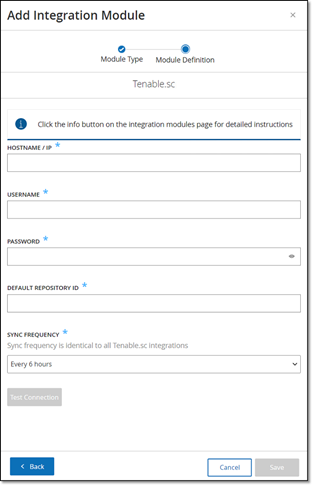
The Module Definition page appears.
-
In the Hostname\IP box, type a hostname or an IP address of the Tenable Security Center system.
-
In the Username box, type the username associated with the Tenable Security Center system.
-
In the Password box, type the password associated with the Tenable Security Center system.
-
In the Default Repository ID box, type the ID for the repository that can serve as the default destination for any synced information that does not have a designated repository (see the note).
-
In the Sync Frequency box, set the sync frequency for the integration.
-
To test the connection, click Test Connection.
-
Click Save.
Note: Tenable recommends that you create a specific user on Tenable Security Center to integrate with Tenable One OT Exposure EM. The user must have the Security role.
Integrate with Tenable One Vulnerability Management
You can integrate Tenable One Vulnerability Management with Tenable One OT Exposure EM after generating an API key in the Tenable One Vulnerability Management console.
To integrate Tenable One Vulnerability Management:
-
In the Tenable OT Security interface, navigate to
-
Click Add Integration.
The Add Integration wizard opens with the Module Type page.

-
Click Tenable One Vulnerability Management, then click Next.
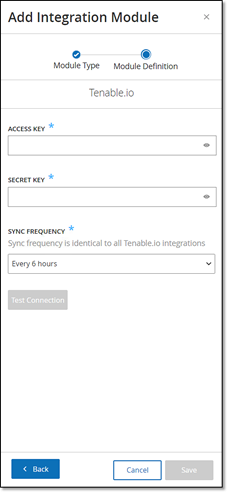
The Module Definition page of the Add Integration Module wizard opens.
-
In the Access Key box, type the access key for the API.
-
In the Secret Key box, type the secret key for the API.
-
In the Sync Frequency box, set the sync frequency for the integration.
-
To test the connection, click Test Connection.
-
Click Save.