Create a Jira Ticket
Required User Role: Basic User, Scan Operator, Standard User, Scan Manager, Administrator, or Custom Role
Within Tenable Exposure Management, you can create tickets based on findings directly from the Findings page. These tickets help you to address vulnerabilities in your environment and ensure work items for vulnerability findings are being created and assigned quickly and effectively.
Prerequisites
Before you create tickets within Jira via Tenable products, you must:
-
Have a Jira user with the following permissions:
Tip: In Jira, navigate to Settings > System > Admin Helper > Permission Helper to confirm or provision permissions for the user.Note: The Jira user account must be either a global admin or an administrator within the project you plan to use for the integration.Jira Permission
Purpose in Exposure Response Custom Context Atlassian Documentation "ASSIGNABLE_USER" User Validation Ensures the dedicated integration user is a valid assignee within the project, which is often a prerequisite for using "ASSIGN_ISSUES". Assignable User Permissions "ASSIGN_ISSUES" Work Assignment Allows the integration to assign the newly created ticket to the designated user or group specified in the Initiative configuration. Assign Issues Permissions "BROWSE_PROJECTS" Visibility Allows the integration to read and confirm the existence of the configured Jira project and its Issue Types. Browse Projects Permissions "CREATE_ISSUES" Ticket Creation Required to automatically generate new tickets for findings that match the Initiative's criteria (the "combination").
Create Issues Permissions "EDIT_ISSUES" Status Synchronization Enables Tenable to update key fields, push risk data (like VPR), and change the ticket status (e.g., from Resolved to Resurfaced). Edit Issues Permissions "LINK_ISSUES" Audit Trail Creates the essential link between the Tenable finding and the corresponding Jira ticket, enabling the Ticket Log functionality. Link Issues Permissions "MODIFY_REPORTER" Ticket Creation Required to automatically generate new tickets for findings that match the initiative's criteria. Browse Project Permissions "USER_PICKER" Ticket Creation Often referred to as Browse Users or similar, this option allows a user to search for and select other users or groups from a directory. Browse Project Permissions -
Have a Jira project with the following fields enabled for issues:
Important: For the configuration to function as expected, you must:- Have at least one Jira project
- Ensure your Jira project allows tickets to be transitioned to the Done status
-
"priority",
-
"assignee",
-
"labels",
-
"summary",
-
"description",
-
"issuetype",
-
"parent",
-
"project",
-
"reporter" — To use this field, the user must also have the "MODIFY_REPORTER" permission enabled.
-
Perform the steps to configure Jira for use with the Tenable One Platform.
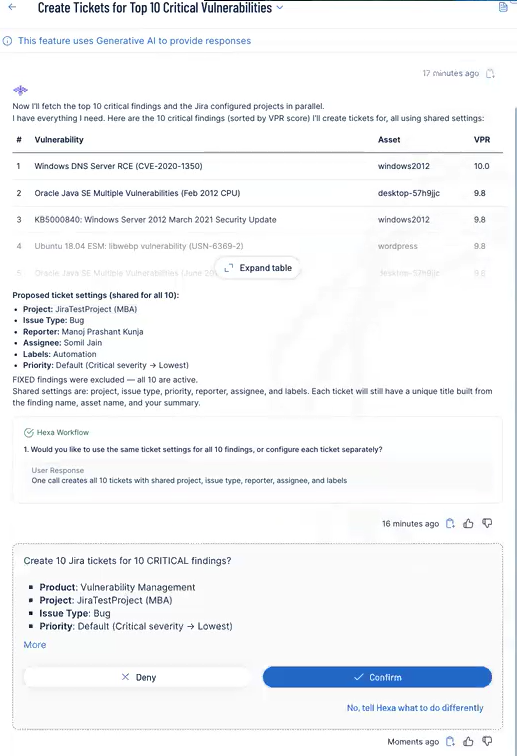
Create Tickets in Seconds with Tenable Hexa AI
Did you know that you can use Tenable Hexa AI to create a ticket for you? Simply click the ![]() button in the upper-right corner of any page to open the Hexa AI panel.
button in the upper-right corner of any page to open the Hexa AI panel.
For example, you can ask Tenable Hexa AI to create a Jira ticket for specific findings:
For more information about using Tenable Hexa AI, see the following topics:
Create Tickets Manually
To create a Jira ticket based off of a finding:
-
In Tenable Exposure Management, access the Findings view.
-
In the findings list, select the check box next to each finding you want to include in the ticket.
-
In the upper-right corner of the page, click
 Take Action.
A drop-down menu appears.

-
Click Create Jira Ticket.
The Open a Jira Ticket page appears.

-
Configure the following options. Depending on the Work Type, these can include, but are not limited to:
Tip: For more information about Jira ticket creation fields and options, see Configuring Built-In Fields in the Administering Jira Applications Support Guide.Option Description Aggregation Behavior Select one of these two options:
-
Create a new jira ticket for each finding — Every time a finding appears, a new ticket gets created in Jira.
-
New findings create subtasks on an existing ticket — Every time a finding appears, a subtask gets created on an existing Jira ticket.
Existing Jira Ticket drop-down box Select the existing Jira ticket on which you want subtasks to be created.
Note: You see this option only if you choose New findings create subtasks on an existing ticket.Project drop-down box Select the Jira project in which you want tickets to be created. Work Type drop-down box Select the type of ticket you want to create in Jira, for example, Task or Epic. Assignee drop-down box Select the user to which you want to assign the ticket. Attachment drop-down box Where applicable, select any attachments you want to include in the ticket. Team text box Type the team name to which you want to assign the ticket. Due Date text box Type the date at which the work for the ticket is due. Optionally, click the  button and select a date from the calendar.
Labels text box Type any labels you want to assign to the ticket. Priority drop-down box Select the priority you want to assign to the ticket, for example, Low or High. Reporter drop-down box Select the user you want to assign as the reporter of the ticket. -
-
Click Create Ticket.
Tenable Exposure Management creates the ticket within Jira based on the selected finding data. It can take up to 10 minutes to see the updated ticket information in both Tenable Exposure Management and Jira.