Authentication Using SAML
You can configure SAML authentication so that Tenable Identity Exposure users can use identity provider-initiated single sign-on (SSO) when logging into Tenable Identity Exposure.
Before you begin:
-
Review the Tenable SAML Configuration Quick-Reference guide for a step-by-step guide of how to configure SAML for use with Tenable Identity Exposure.
-
Check that you have the following for the identity provider (IDP):
-
SAML v2 only.
-
"Assertion encryption" is enabled.
-
IDP groups that Tenable Identity Exposure uses to grant access to in the Tenable Identity Exposure web portal.
-
URL of the SAML server.
-
Trusted Certificate Authority (CA) that signed the SAML server certificate in PEM-encoded format, beginning with -----BEGIN CERTIFICATE ----- and ending with -----END CERTIFICATE -----.
-
To configure SAML authentication:
-
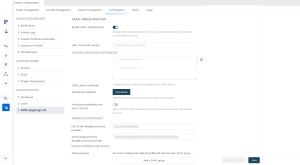
In Tenable Identity Exposure, click Systems > Configuration.
The configuration pane appears.
-
Under the Authentication section, click SAML Single Sign-on.
-
Click the Enable SAML authentication toggle.
A SAML information form appears.
-
Provide the following information:
-
In the URL of the SAML server box, type the full URL of the IDP's SAML server where Tenable Identity Exposure must connect.
-
In the Trusted Certificate Authorities box, paste the CA that signed the certificate from the SAML server.
-
-
In the Tenable Identity Exposure certificate box, click Generate and Download. This generates a new self-signed certificate, updates the SAML configuration in the database, and returns a new certificate for you to download.
Caution: When you click this button, it disrupts your SAML configuration because Tenable Identity Exposure expects the IDP to authenticate immediately with the most recently generated certificate while the IDP is still using a previous certificate, if it exists. If you generate a new Tenable Identity Exposure certificate, you must reconfigure your IDP to use the new certificate.
-
Click the Activate automatically new user's account toggle to activate new user accounts after the first SAML login.
-
Under Tenable Identity Exposure Endpoints, provide the following information:
-
URL of the Tenable Identity Exposure service provider
-
Assert endpoint of the Tenable Identity Exposure service provider
-
-
Under the Default Profile and Roles section, click Add a SAML group to specify the groups allowed to authenticate.
A SAML group information form appears.
-
Provide the following information:
-
In the SAML group name box, type the name of the allowed group as it appears in the SAML server.
-
In the Default profile drop-down box, select the profile for the allowed group.
-
In the Default roles box, select the roles for the allowed group.
-
-
If necessary, click on the
 icon to add a new allowed group.
 -
Click Save.
After you set up SAML authentication, the SAML option appears in a tab on the login page.
For more information about security profiles and roles, see:
