Configuring Microsoft Entra ID as an Identity Provider
In addition to Active Directory, Tenable Identity Exposure supports Microsoft Entra ID (formerly Azure AD or AAD) to expand the scope of identities in an organization. This capability leverages new Indicators of Exposure that focus on risks specific to Microsoft Entra ID.
To integrate Microsoft Entra ID with Tenable Identity Exposure, follow closely this on-boarding process:
-
Have the Prerequisites
-
Check the Permissions
Prerequisites
You need a Tenable Cloud account to log in to “cloud.tenable.com” and use the Microsoft Entra ID support feature. This Tenable Cloud account is the same email address used for your Welcome Email. If you do not know your email address for “cloud.tenable.com,” please contact Support. All customers with a valid license (On-Premises or SaaS) can access the Tenable Cloud at “cloud.tenable.com”. This account allows you to configure Tenable scans for your Microsoft Entra ID and collect the scan results.
Permissions
The support of Microsoft Entra ID requires the collecting of data from Microsoft Entra ID such as users, groups, applications, service principals, roles, permissions, policies, logs, etc. It collects this data using Microsoft Graph API and service principal credentials following Microsoft recommendations.
-
You must sign in to Microsoft Entra ID as a user with permissions to grant tenant-wide administrator consent on Microsoft Graph, which must have the Global Administrator or Privileged Role Administrator role (or any custom role with appropriate permissions), according to Microsoft.
-
To access the configuration and data visualization for Microsoft Entra ID, your Tenable Identity Exposure user role must have the appropriate permissions. For more information, see Set Permissions for a Role.
License Count
Tenable does not count duplicate identities against the license only when the Tenable Cloud sync feature is enabled. Without this feature, it cannot match accounts from Microsoft Entra ID and Active Directory, causing it to count each account separately.
-
Without Tenable Cloud sync: A single user with both an AD account and an Entra ID account count as two separate users against the license.
-
With Tenable Cloud sync enabled: The system consolidates multiple accounts into a single identity, ensuring that a user with multiple accounts is counted only once.
Configure Microsoft Entra ID settings
Use the following procedures (adapted from the Microsoft Quickstart: Register an application with the Microsoft identity platform documentation) to configure all required settings in Microsoft Entra ID.
-
 Create an application:
-
In the Azure Admin portal, open the App registrations page.
-
Click + New registration.
-
Give the application a name (Example: "Tenable Identity Collector"). For the other options, you can leave the default values as they are.
-
Click Register.
-
On the Overview page for this newly created app, make a note of the "Application (client) ID" and the "Directory (tenant) ID", which you will later need in the step To add a new Microsoft Entra ID tenant:
Caution: Be sure you select the Application ID and not the Object ID for the configuration to work.
-
-
Add credentials to the application:
-
In the Azure Admin portal, open the App registrations page.
-
Click on the application you created.
-
In the left-hand menu, click Certificates & secrets.
-
Click + New client secret.
-
In the Description box, give a practical name to this secret and an Expiry value compliant with your policies. Remember to renew this secret near its expiry date.
-
Save the secret value in a secure location because Azure only shows this once, and you must recreate it if you lose it.
-
-
Assign permissions to the application:
-
In the Azure Admin portal, open the App registrations page.
-
Click on the application you created.
-
In the left-hand menu, click API permissions.
- Remove the existing User.Read permission:
-
Click + Add a permission:
-
Select Microsoft Graph:
-
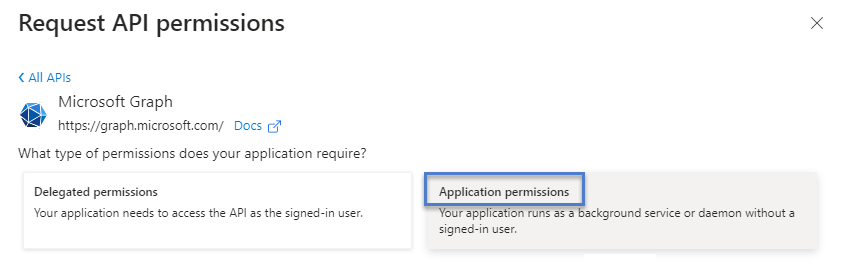
Select Application permissions (not "Delegated permissions").
-
Use the list or the search bar to find and select all the following permissions:
-
AuditLog.Read.All
-
Directory.Read.All
-
IdentityProvider.Read.All
-
Policy.Read.All
-
Reports.Read.All
-
RoleManagement.Read.All
-
UserAuthenticationMethod.Read.All
-
Click Add permissions.
-
Click Grant admin consent for <tenant name> and click Yes to confirm:


-
-
After you configure all the required settings in Microsoft Entra ID:
-
In Tenable Vulnerability Management, create a new credential of type "Microsoft Azure".
-
Select the "Key" authentication method and enter the values that you retrieved in the previous procedure: Tenant ID, Application ID, and Client Secret.
-
Activate Microsoft Entra ID support
-
To use Microsoft Entra ID, you must activate the feature in Tenable Identity Exposure settings.
-
See Identity 360, Exposure Center, and Microsoft Entra ID Support Activation for instructions.
Enable tenant scans
Adding a tenant links Tenable Identity Exposure with the Microsoft Entra ID tenant to perform scans on that tenant.
To add a new Microsoft Entra ID tenant:
-
In the Configuration page, click on the Identity Providers tab.
The Tenant Management page opens.
-
Click on Add a tenant.
The Add a tenant page opens.

-
In the Name of the tenant box, type a name.
-
In the Credentials box, click the drop-down list to select a credential.
-
If your credential does not appear in the list, you can either:
-
Create one in Tenable Vulnerability Management (Tenable Vulnerability Management > Settings > Credentials). For more information, see the procedure to create an Azure-type credential in Tenable Vulnerability Management.
-
Check that you have the "Can use" or "Can edit" permission for the credential in Tenable Vulnerability Management. Unless you have these permissions, Tenable Identity Exposure does not show the credential in the drop-down list.
-
-
Click Refresh to update the drop-down list of credentials.
-
Select the credential you created.
-
Click Add.
A message confirms that Tenable Identity Exposure added the tenant, which now appears in the list on the Tenant Management page.
To enable scans for the tenant:
Note: Tenant scans do not occur in real time and require at least 45 minutes before Microsoft Entra ID data is visible in the Identity Explorer, depending on the tenant size.
-
Select a tenant on the list and click the toggle to Scan enabled.

Tenable Identity Exposure requests a scan on the tenant and the results appear in the Indicator of Exposure page.
Note: The mandatory minimum time delay between two scans is 30 minutes and occurs at least once per day. Depending on the tenant size, most customers' data refresh multiple times per day.