BeyondTrust Auto-Discovery
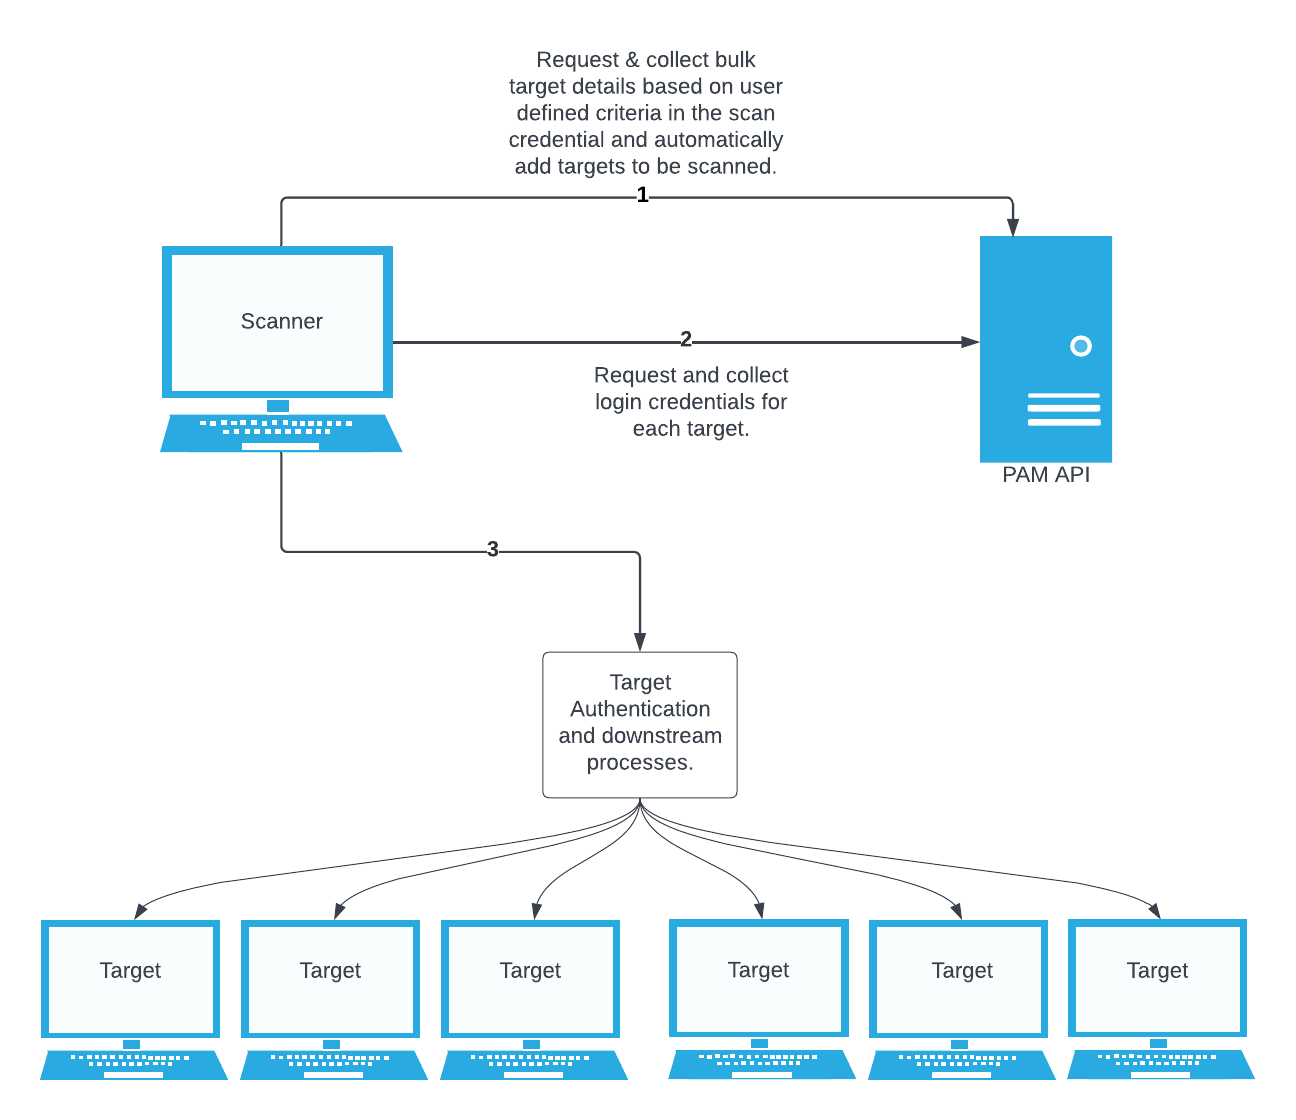
Tenable’s BeyondTrust integration provides the Auto-Discovery feature with significant advantages. When using BeyondTrust Auto-Discovery, the scan automatically adds discovered hosts as scan targets with their respective credentials. With the Auto-Discovery feature, there is no need to enter these scan targets in the target list.
Enter one target in the target list. This target can be any pingable IP address or hostname, such as the IP address of the scanner, 127.0.0.1, or the address of one of the intended targets. This initial target kicks off the collection process. You can configure up to five BeyondTrust Auto-Discovery credentials.
The standard BeyondTrust integration requires configuring a scan credential with the name of a specific secret. This secret then functions as the authentication credentials for each of the hosts in the target list. You must enter the target list when you begin configuring the scan. You may also need to configure several different credentials in the scan if the various scan targets use different accounts to authenticate.
In contrast, BeyondTrust Auto-Discovery allows you to enter a search query to collect multiple accounts. It automatically configures these accounts and their respective machines as scan targets with credentials. It associates the scan targets individually with their respective accounts. It is critical that you understand the use of these parameters as they are described in the following sections.
Note: Tenable relies on the presence of an IP address related to a System identified in the collection process. If a system does not have an IP address, Tenable is not be able to perform the Auto-Discovery process on that particular system related account.
Collection
Collect targets and accounts by Systems Pathway
This method gathers targets and accounts associated with multiple Systems in BeyondTrust. The application of this is more for Linux-based systems, as these are typically paired 1:1 between a system and an account. However, this is also an option for Windows and Database types. This is achieved by finding systems of a particular Platform and not of a specific Username.
Note: In order to use the Systems Pathway method, users should never configure a credential with a Username value.
By default, Tenable integrations use the following Platform types when configuring BeyondTrust Auto-Discovery, so you do not need to enter a value. However, if you have configured a custom Platform within BeyondTrust, you can enter the name of the Platform in this field.
-
SSH BeyondTrust Auto-Discovery: “linux”
-
Windows BeyondTrust Auto-Discovery: “windows”
-
Database BeyondTrust Auto-Discovery:
-
Oracle: “oracle”
-
PostgreSQL: “postgresql”
-
MySQL: “mysql”
-
SQL Server: “ms sql server”
-
MongoDB: “mongodb”
-
Sybase ASE: “sybase ase”
-
Cassandra: NOT SUPPORTED!
-
DB2: NOT SUPPORTED!
-
Cassandra and DB2 do not have supported Platforms in BeyondTrust. However, Tenable does give the user available credentials for the two database types for BeyondTrust Auto-Discovery. BeyondTrust supports the creation of custom Platform plugins, so a user can follow BeyondTrust’s guide to accomplish this. Consult with BeyondTrust and their documentation on this method.
In addition, Tenable has given you the ability to refine their search of System related accounts with the optional Workgroup Name field. Users may choose to organize systems and accounts within their BeyondTrust environment with specific Workgroup Names in order to take better advantage of this refined collection option.
Collect targets and accounts by Account Pathway
In contrast to the Systems Pathway, the Account Pathway relies on the entry of a specific Username in the credential. This method is perfect for multiple systems and accounts that have the same account Username, mostly seen in Windows configurations. This is achieved by you providing a specific account Username. Tenable finds the accounts associated with this username and all related Systems. In addition, Tenable automatically filters accounts by Platform type with the default options listed above in the Systems Pathway method and we give the user the ability to refine their collection with a Workgroup Name option.
Note: In order to use the Account Pathway method, you must configure a credential with a Username value
Debugging
The initial collection of accounts (except the password and/or ssh private key) is done once and on the arbitrary target/host entered in the target settings of the scan policy mentioned in the beginning of each section (SSH, Windows, and Database). Logs for the collection can be found in the Debugging Log Reporting on this particular host in the following logs:
-
Database = pam_database_auto_collect.nbin~BeyondTrust
-
SSH = pam_ssh_auto_collect.nbin~BeyondTrust
-
Windows = pam_smb_auto_collect.nbin~BeyondTrust
Adding targets to the scan automatically
After the initial collection, the integration automatically adds the hosts and necessary knowledge base (KB) entries for an authenticated scan.
Logs from this stage are located in the Debugging Log Report plugin output on this host in the following logs:
-
Database = pam_database_auto_collect.log
-
SSH = pam_ssh_auto_collect.log
-
Windows = pam_smb_auto_collect.log
To automatically add a target to the scan, the integration must collect an account that includes an IPAddress field containing either an IP address or a resolvable hostname. If the account does not have a valid IP address or resolvable hostname, the integration does not add the host to the scan. In this case errors from the function fqdn_resolv() trigger the creation of separate detailed logs:
-
Database = pam_database_auto_collect_resolv_func.log
-
SSH = pam_ssh_auto_collect_resolv_func.log
-
Windows = pam_smb_auto_collect_resolv_func.log
Credential collection
After the collection and addition of host and KBs is complete, the authentication process kicks off on each of the hosts. For each host, the integration requests the following target credentials: username, password, SSH private key, private key passphrase, and, if applicable, the elevation command. If requesting an SSH Private Key for a target, simply check the box in the credential for “Use Private Key” and Tenable attempts to gather the ssh key in the same credential enumeration along with the other credential attributes of the host.This is no different (on the host level) than “normal.”
-
Database = database_settings.nasl~BeyondTrust
-
SSH = ssh_settings.nasl~BeyondTrust
-
Windows = logins.nasl~BeyondTrust
Privilege Escalation
As with the standard BeyondTrust Integration, the BeyondTrust Auto-Discovery integration supports privilege escalation. Refer to the Elevation section of this documentation for more information.
Limitations
It is only possible to use one account per host. If the search collects multiple accounts with the same machine, the first account that the search returns is used. Additionally, the Debugging Log Report includes a warning in the collection phase logs. Generally, Tenable recommends configuring scans to collect only a single account per machine to reduce the number of unnecessary requests.
A credential is limited to a single target authentication protocol. BeyondTrust Auto-Discovery is an authentication method of the SSH, Windows, or Database credential, so it is not possible to configure a single credential that collects both SSH and Windows accounts or targets.