Configure the Tenable Connector
The Tenable Connector provides all API interactions between your Tenable applications (OT Security, Tenable Vulnerability Management, or Tenable Security Center) and ServiceNow instance.
Note: In ServiceNow, you must have the x_tsirm_api_access admin role to perform the basic connector setup process.
Note: The ServiceNow configuration only supports Tenable Security Center versions 5.7 and later.
Before you begin:
For Tenable Vulnerability Management:
Minimum Required User Role: Scan Manager
Note: The Tenable ServiceNow integration requires a user with the Scan Manager role for asset push jobs to import assets into Tenable Vulnerability Management. Alternatively, if asset push jobs are not required, you can use a Basic User role. Regardless of role, a non-administrator user must have Can View permissions for the assets they export and Can Use permissions for the tags assigned to those assets. Without the Can Use tag permissions, the assets return undefined or the integration fails to export vulnerabilities if a tag filter is used. For more information on Tenable Vulnerability Management permissions and user roles, refer to Permissions in the Tenable Developer Portal.
-
You must have your Tenable Vulnerability Management API keys.
Note: For your Tenable Vulnerability Management integration:
- Generate an API key in Tenable Vulnerability Management to complete the configuration. See the Tenable Vulnerability Management user guide for instructions on how to generate an API key. (Do not use this API key for any other third party or custom-built application or integration. A unique API key is a requirement for each installed instance of the integration.)
For Tenable Security Center:
Required User Role: Security Analyst
For OT Security:
Required User Role: Read Only
To configure the Tenable connector for Tenable Vulnerability Management, Tenable Security Center, or OT Security:
- Log in to ServiceNow.
- In the left navigation pane, click Tenable Connector > Connectors.
The Tenable Connectors page appears.
- Click New.
-
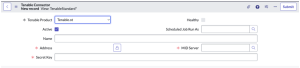
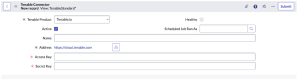
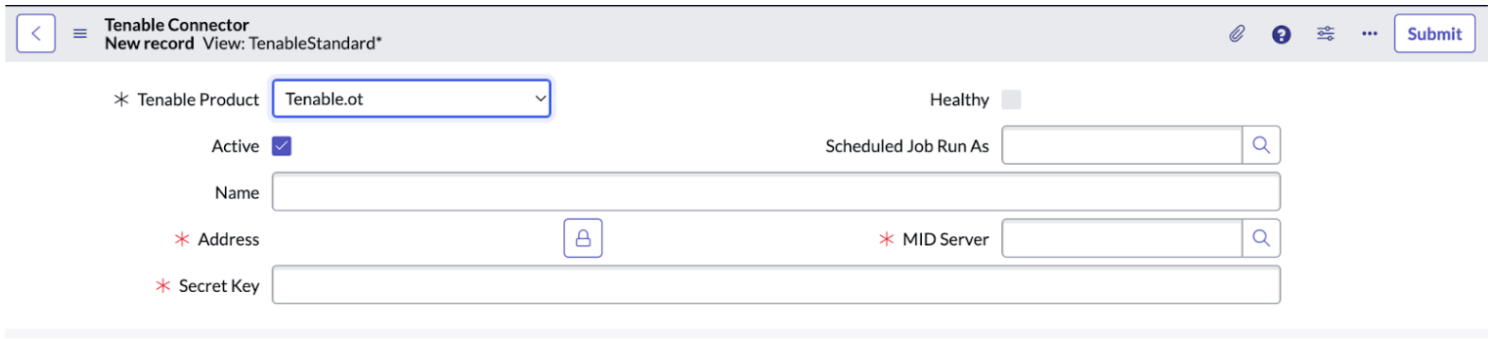
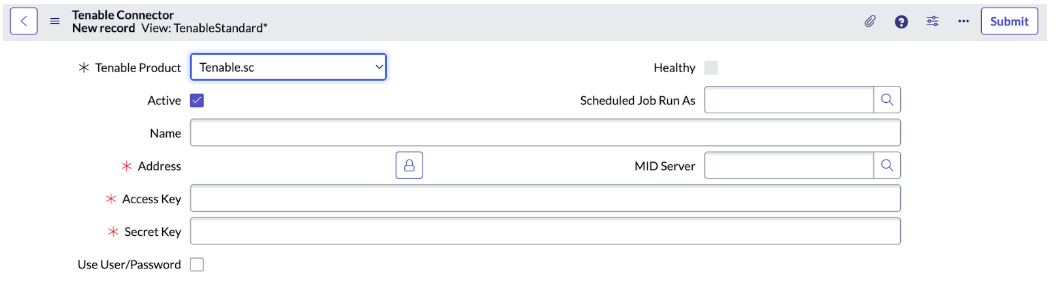
From the Tenable Product drop-down box, select Tenable.ot, Tenable.io, or Tenable Security Center.
-
If you are in a domain-separated environment, in the Domain box, type the domain into which to bring connector data.
- Select the Active checkbox.
-
In the Scheduled Job Run As box, type the username of the user with which you want to import data.
Note: If you are in a domain-separated environment, this field is a requirement. The user must be part of the domain specified in step 5.
- In the Name text box, type a name for the connector.
-
Complete the configurations for your selected Tenable application.
 For OT Security:
-
In the Address text box, type an IP address or DNS name for the connector.
Note: Type https:// before the IP or DNS name.
- In the Secret Key text box, type the secret key provided by your Tenable administrator.
- In the MID Server text box, search for and select a MID server that can access your OT Security server.
For Tenable Vulnerability Management:
-
In the Address text box, type an IP address or DNS name for the connector.
ServiceNow populates this with the Tenable Vulnerability Management IP address.
Note: Type https:// before the IP or DNS name.
- In the Access Key text box, type the access key provided by your Tenable administrator.
- In the Secret Key text box, type the secret key provided by your Tenable administrator.
For Tenable Security Center:

- Next to Address, click the lock button.
-
In the Address text box, type an IP address or DNS name for the connector.
Note: Type https:// before the IP or DNS name.
- Click the lock button to lock the address.
- In the MID Server text box, search for and select a MID server that can access your Tenable Security Center server.
- Do one of the following:
- If you check the Use User/Password checkbox:
- In the API Username text box, type the API username provided by your Tenable administrator.
- In the API Password text box, type the API password provided by your Tenable administrator.
- If you do not check the Use User/Password checkbox:
- In the Access Key text box, type the API access key provided by your Tenable administrator.
- In the Secret Key text box, type the API secret key provided by your Tenable administrator.
- If you check the Use User/Password checkbox:
Tip: To save your selected configuration options without navigating away from the page:
-
Right click in the top menu that contains the Tenable Connector heading and menu.
A list of options appears.
- Click Save.
-
- (Optional) In the General Settings section, you can specify your Max ECC Wait Time (in seconds) and Request Timeout (in seconds) for each of your configured connectors.
- In the Asset Settings section, you can set the Asset Logging Level, Asset Max Cumulative Log Entries, and Asset Max Cumulative Log Sizes. The default setting for the logging levels is Errors Only.
- In the Additional Asset Settings section, you can set New Record Sync Frequency (in minutes), Record Update Sync Frequency (in minutes), Asset Max Job Log (in days), and Asset Max Job Wait (in days).

Note: You may have more settings options on your connector page depending on the Tenable applications you have installed (For example, Service Graph Connector for Tenable for Assets [Assets Settings], OT Security for VR [VR Settings], and Tenable ITSM [ITSM Settings]).
Note: For more information about ServiceNow settings, see the ServiceNow documentation.
- Click Update.
- Click Test the Connector.
Note: If the connector test fails, check your username, password, and API Keys and retest the connector.