Advanced Patching Strategies Actions
TPM provides simplified processes to manage and modify Patching Strategies that you have already enabled. You can apply these actions either with the More dropdown from the Strategy editor, or by the table ellipses (...).
| Process | Description |
|---|---|
|
New Strategy New Advanced Strategy |
Create either a new v1 or v2 Strategy |
|
Open Strategy |
Open an existing Strategy to a tab within the Strategy view |
|
Show Changes |
Displays a diff between a previously saved version of your Strategy and any unsaved new changes |
|
Save As |
Opens a Save As overlay to rename and create a copy of the selected Strategy |
|
Delete |
Permanently delete the selected Strategy |
|
Export |
Exports full or partial Strategy data. You can either export to a file (default OBEX file type, or JSON), or to a linked server. |
|
Show References |
Will show where the Strategy is referenced in the object folder directory |
|
Manage Permissions |
Allows you to set Strategy permissions for chosen Roles and what they have access to. |
|
Run Strategy |
Will run the Strategy ASAP instead of waiting for the applied schedule |
|
Submit Patches Re-Submit Patches |
Allows you to submit selected patches to a Strategy and optionally create Approvals for the selected patches. You can also re-submit all patches if their applicable status has changed |
|
Strategy Operations |
Opens the Strategy Operations dashboard for your selected Strategy. |
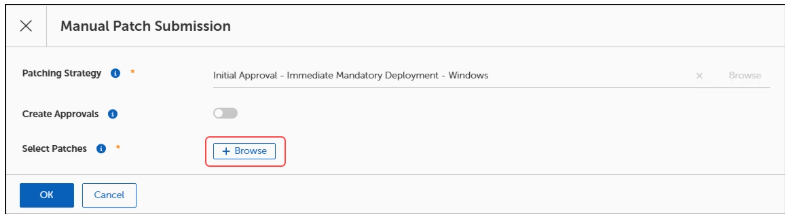
Submit Patches to an Enabled Patching Strategy
-
Select Strategies from the side navigation.
-
Select a strategy to open the strategy editor.
-
Select More, and then select Submit Patches.
-
Choose one of the following options:
-
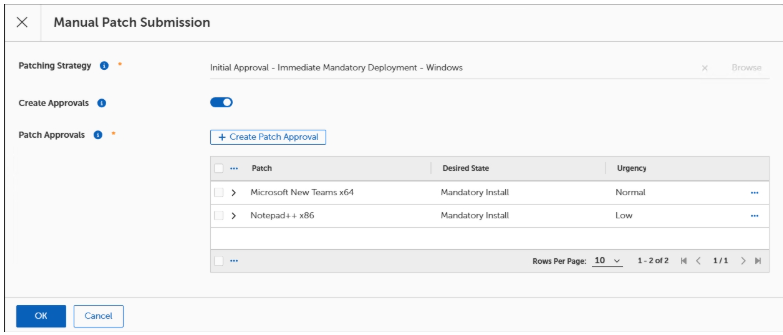
To create approvals, select the Create Approvals toggle to enable Patch Approvals, and then select + Create Patch Approval.
-
To choose patches, select + Browse, and then see select Installable Software.
-
Approvals for Adding Patches
When you submit patches to an enabled strategy, you may also create approvals specific to the individual patch. Otherwise, the patching process and bots create the approvals automatically based on the process or bot settings.
The Create Approvals functionality requires at least one approval scenario. You must create separate approvals for each patch you choose to add to an enabled patch.
Approvals in this instance consist of the following, required settings:
-
Add patches that require approvals.
-
Set the state:
-
Mandatory Install: Allows client devices to treat the product as mandatory for installation purposes.
-
Do Not Install: Allows client devices to block the installation of a particular product.
-
Rollback: Forces a rollback to a specific product version on a client device, when TPM detects a later product version than allowed.
-
Uninstall: Removes the product from client devices in the specified Business Unit.
-
-
Set the urgency: Low, Normal, High, Critical
-
Add a Patching Process
-
(Optional) Add Deployment Channel.
-
Add Business Units
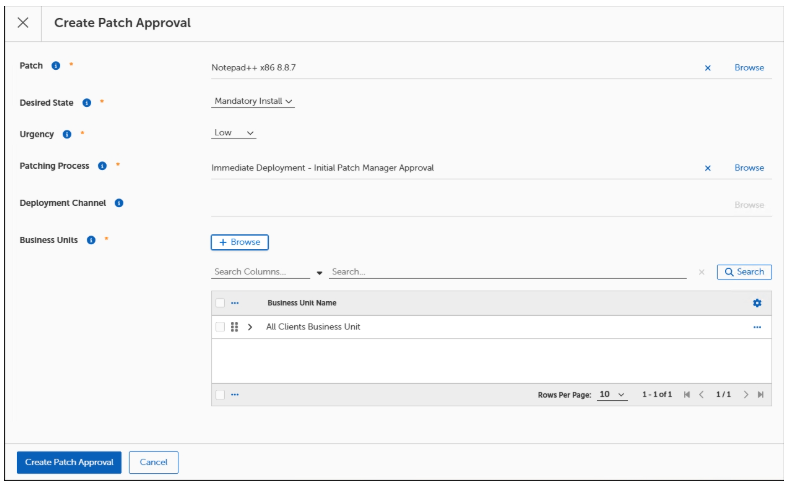
Note: Add a Deployment Channel only when you have included it in the Deployment Bot Runtimes section of the Patching Strategy Deployment Settings.