Legacy Client Upgrade
Note: These instructions only apply to the legacy Tenable Patch Windows Client 9.2.XXX, 9.1.XXX and prior versions only. For versions 9.3.XXX or newer, refer to Upgrade Tenable Patch Clients Using Automatic Deployments.
Automatic Installation
Before continuing, make sure the TPM Server has been updated to the latest version of the TPM Client. The Client installer will be obtained from the TPM Server client install folder. This folder can be found by using the ADAPTIVACLIENT environment variable.
Using the Admin Portal
-
Connect to the Admin Portal using a web browser (except Internet Explorer) – http://TenableServerFQDN[:port].
-
Enter the appropriate credentials or click Login with Active Directory.
-
Click
 > Settings > Client Auto Upgrade or Dashboards >Legacy Client Upgrade (Windows)
 -
At the top the dashboard displays the current coverage of the different versions in an overall chart and by location.

The Client Auto Upgrade must be enabled before the settings can be changed. Once enabled, it stays enabled. If it is already enabled, the last saved configurations is set in each of the following sections.
-
In the Activation window, click the Enable Client Auto Upgrade button to enable the rest of the configuration sections that follow.

-
Update as required and click Save and Deploy.
Note: Clicking Save and Deploy, or Deploy, immediately executes the workflow to perform the upgrade based on the settings in the form.
Scheduling

-
Click the calendar icon.
A calendar widget appears.
-
Select a day and time for the client upgrade to start.
Clients that launch after the specified Start Time, and have not yet received the policy, apply the policy immediately.
-
Click anywhere off the widget to close it.
The date and time has been entered into Schedule Start Time.
-
Enable Use Server Time Zone to have the specified start date and time refer to the time zone of the TPM Server.
Target Groups

-
Click the Use All Tenable Patch Clients button, or click Browse, to select one or more Tenable Patch Groups or ConfigMgr collections.
When selecting a Group or collection, check the box next to the item.
-
When finished selecting all groups/collections, click on Add to List.
Load Balancing

-
Click the Use Load Balancing button.
Note: If not enabled, ALL targeted clients execute the policy on the start date and time.
-
Set the Load Balance interval.
The load balance interval can be between 0 and 100 Days, Hours or Minutes. When Load Balancing is enabled, each client is randomly divided across the load balance interval entered.
Installation

-
Choose either Server FQDN or IP Address.
Note: The Client can be installed using either the - servername or -serverip switches. This option determines which option is used. The command line changes based on the options selected, For example, the FQDN or IP address of the Tenable Patch Server has been automatically entered.
Note: Verify that automatic discovery found the correct Server Name or IP Address by reviewing the Command Line that was auto-generated.
-
To override the FQDN or IP Address, click Override Server FQDN or IP Address and enter the name or IP address to use.
Note: If the Name or IP Address previously used is changed, it causes the client to be inactivated and re-activated, which then triggers a review of all content in the AdaptivaCache folder as well as new policy downloads. If the FQDN or IP Address needs to be changed to support a DNS CNAME Alias, see the article How-To: Redirect Tenable Patch Client to a different Tenable Patch Server.
-
Choose any of the following options:
Option Description Use Cloud Relay Allows the Client to communicate with http://services.adaptiva.cloud when unable to communicate via UDP to the on-premises Server. Note: If any of the in-scope clients have been previously configured to use the Cloud Relay Service, be sure to enable this setting otherwise client communications will stop using the Cloud Relay server.
Bind to HTTP URL Allows the Client to communicate with the on-premises Server via the defined HTTP Port. This adds the -serverurl to the command line. When the Bind to HTTP URL is enabled, enter the URL of the on-premises Server. For example: http://server.mydomain.com:9679 No Add/Remove Programs Entry Enabling this setting prevents the Client from being added to the Add & Remove Programs/Programs & Features list in Windows. Do not select this option if this information is required. Adds the –noarp switch to the command line. No Firewall Entries Enabling this setting prevents Windows Firewall entries from being created automatically. Adds the –nofirewall switch to the command line. No WoL Enabling this setting disables Wake on LAN. Do not select this option if it is desirable for machines to be woken using Wake on LAN magic packets in the event that content is available on the device, but the machine is offline. Adds the -nowol switch to the command line. Memory Allocation (in MB) This setting configures the maximum JVM memory allocation for the client. As of Client version 9.1, the default memory allocation is 512MB. Do not set this number below 512. It is recommended to set this value in powers of 2 starting at 512. Note: The Memory value in the CLI Input shows the last value used and may differ from the Memory Allocation selection. Change the Memory Allocation to sync the CLI Input.
-
Review the value of the Commandline to ensure that the servername | serverip is correct and that any required or desired command-line switches are present and displaying the correct values.
Note: Commandline will always contain the -delay 30 switch on the end. This cannot be overridden.
-
Once the command-line has been validated, click Save and Deploy to start the upgrade process.

-
Click OK after reviewing the Commandline.
These settings are saved in the database in the table AUTOUPGRADESETTINGS. When Save is clicked, the latest Client is published as TPM Content, a hidden schedule, group and content push policy is created. When the specified start date/time is reached, the clients will download the content. The content is unpacked into a local folder on the client %TEMP%\TenablePatchClientUpgrade (normally C:\Windows\TEMP).
-
To review distribution status, scroll back to the top or select Dashboards, Client Auto Upgrade Dashboard.
Manual Installation
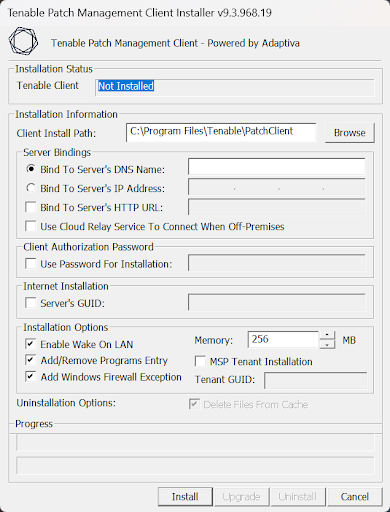
| Option | Description |
|---|---|
| Tenable Patch Install Path | Directory where the Tenable Patch Client should be installed. |
| Tenable Patch Server Bindings | Specify one of the following: Tenable Patch Server’s DNS Name or Tenable Patch Server’s IP Address |
| Tenable Patch Server Bindings | Check the options as required If the clients need to bind using HTTP, check the box: Bind to Server’s HTTP URL |
| Tenable Patch Server’s HTTP URL |
Be sure to add the port that was used during server installation. (e.g., http://servername.adaptiva.com:9679) If the clients are to be on the internet, check the box: Use Tenable Patch Cloud Relay To Connect When Off-Premises. For additional security check the following boxes:
|
| Enable Wake On LAN | Allows the client to be woken up using peer-to-peer WOL. |
| Add/Remove Programs Entry |
Adds an entry allowing for uninstallation of the client agent from the Control Panel. |
| Add Windows Firewall Exception |
Adds exceptions to the local Windows Firewall for the default client ports. For a list of these ports, refer to Communication and Network Requirements for a list of these ports. |
| Maximum Allowed Memory Heap Usage |
This is an internal performance optimization value. Changing this is not recommended unless recommended by Tenable Patch Support. |