Changes in SaaS Settings
Comparing Changes to Settings on the SaaS Tenant
Tenable Patch Management (TPM) SaaS changed some of the available settings that can be configured for the tenant. This article describes the differences between the Settings menu available on the Self-hosted server and the SaaS tenant.
Settings in SaaS
SaaS has different settings than an on-premises hosted server.
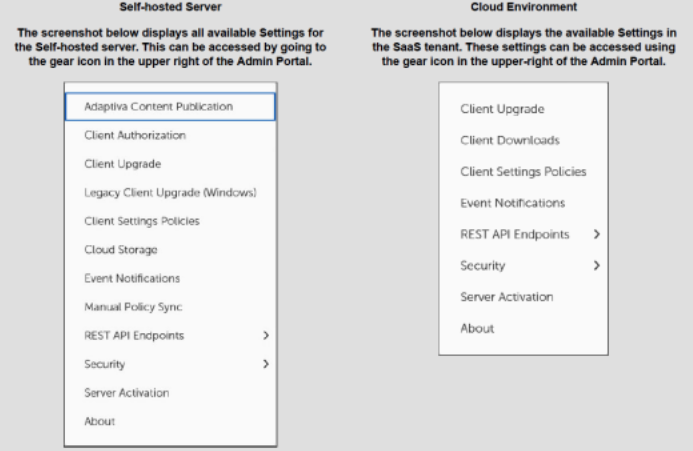
On-Prem Settings That Do Not Apply To SaaS
-
Tenable Patch Management Content Publication: Custom content is not supported in the SaaS environment.
-
Legacy Client Upgrade (Windows): The Tenable Patch Management Client Upgrade is now released automatically after the tenant is upgraded. For more information, refer to Upgrade Tenable Patch Clients Using Automatic Deployments.
-
SaaS Storage: Custom content is not supported in the SaaS environment, so there is no requirement for SaaS Storage.
-
Sensor Offline Cache: The SaaS tenant manages the sensor control.
New Options Added in SaaS
The following new option is available in the SaaS:
-
Client Downloads: Provides links to download the installation media for all supported operating systems.
Options Modified in SaaS
The following settings pages were modified to support the SaaS environment:
-
Security page: This page includes everything from the Self-hosted server, including the following changes:
-
Administrators: All accounts must be created in the SaaS Portal and assigned a role on the SaaS tenant.
-
OIDC Providers and SAML Providers: Identity Providers using OIDC and SAML must be configured in the SaaS Portal.
-
-
About page: This page is mostly the same between versions, with the following changes:
-
The Server Time Zone option was added to the SaaS tenant and must be set to your desired time zone.
-
The Synchronize UI State option was removed from the SaaS tenant.
-
Client Communication and Authentication
To ensure successful communication between clients and SaaS, users must enable outbound traffic to SaaS URLs.
-
HTTP Proxy Configuration: Allow outbound traffic to SaaS URLs through any HTTPS proxies in your environment.
-
Firewall Settings: Open the necessary UDP ports in your firewalls to enable peer-to-peer content distribution between client devices. Refer to Communication and Network Requirements.
Admin and Identity Management
SaaS users manage all administrator accounts and usage of identity providers (OIDC, SAML) through the SaaS Portal. Administrator accounts can be assigned to roles within the tenant server.
Support and Troubleshooting
Users cannot directly manage the tenant infrastructure in the SaaS Portal. Common requests that require redirection or escalation include unsigned workflows, admin or identity configuration changes, missing content due to Tenable Patch Management CDN publishing errors, or integration issues caused by restricted APIs.
Note: Users with complex RBAC setups may need specific adjustments.
Upgrading to SaaS
While there is currently no direct migration path from Tenable Patch Management On-Prem to the SaaS, existing on-prem users are eligible to move to the SaaS at no additional cost. Users will need to relink all clients and recreate all their patching strategies manually. Contact your Tenable Sales Representative for assistance on this.
Note: Migration from Tenable Security Center (on-prem) to Tenable Vulnerability Management (SaaS) is currently not supported.
Locations in Tenable Patch Management SaaS
Tenable Patch Management SaaS changes the way you create and manage Locations compared to a self-hosted environment. For more information, see On-Premises Client Detection in SaaS section below.
On-Premises Client Detection in SaaS
TPM SaaS changes the way you create and manage Locations compared with TPM– Self-hosted. TPM SaaS automatically creates a Location when the TPM Client directly communicates with the TPM Server, across the company network. If the TPM Client cannot communicate directly, it sends messages to TPM SaaS Services to relay them to the TPM Server, and then the TPM Client is placed in an Internet Location based on its public IP address.
In the TPM SaaS environment, the TPM Client communicates directly with the TPM SaaS tenant using HTTPS and automatically creates an Internet Location based on the Public IP Address of the client. The system does not display Internet Locations in Assets > Locations. It always configures Internet Locations as Wi-Fi and uses unicast to communicate with all devices on the subnet. As a result, you cannot define Business Units and Groups using Locations. Additionally, you cannot group subnets together to reduce the number of downloads to a given Location.
Note: Internet Locations are not available on the Locations page.
To group subnets into a single Location and optimize WAN downloads and better control LAN content sharing, or to enable the creation of Business Units or Groups based on a Location, complete the following steps:
-
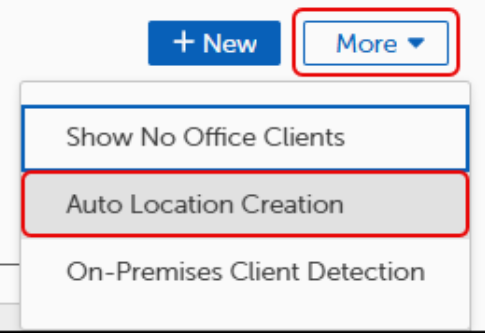
In the TPM Admin Portal, navigate to Assets > Locations.
-
Select More.
-
Select Auto Location Creation.
-
Toggle on Auto Location Creation Enabled.

-
Click Save.
-
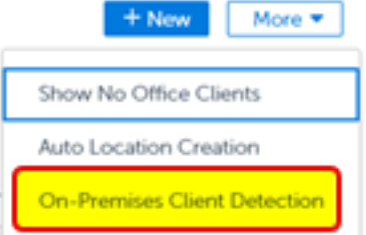
Select More
-
Select On-Premises Client Detection.
-
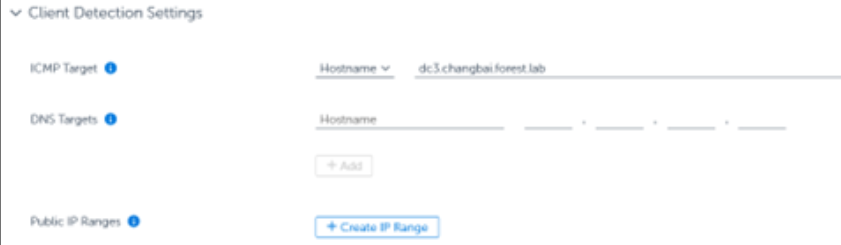
Enter the details for one or more of the following options under Client Detection Settings:
-
After completing the preceding steps, you must add an IP range to the Central Office Location. If the system automatically creates a Location based on the desired IP Range that you wish to define as the Central Office Location, you can merge it into the Central Office Location. TPM Clients that match your defined options will no longer be considered internet clients.
-
The system adds clients that match the defined options to auto-created locations based on their internal IP addresses. You can then manage these locations as needed. Refer to the following Network Topology Management section for details.
Network Topology Planning
Properly planning your network topology is essential for a successful TPM deployment. Consider the following key points:
Planning Your Network Topography
| Name | Definition |
|---|---|
|
Define locations by IP ranges |
A location consists of one or more IP ranges that identify machines connected over a LAN. |
|
Enable local content discovery |
Clients in the same location discover and download content from peers in that location (Local Discovery). |
|
Use remote discovery when needed |
If content is not available locally, clients query the parent location and download content from there (Remote Discovery). |
|
Support CDN fallback |
You can configure a location to download content directly from the internet-based CDN, if not found within the Location.. |
|
Follow the location hierarchy |
Locations continue querying up the hierarchy—up to the Central Location—until they find and download the required content. |
|
Minimize WAN traffic |
The system distributes each piece of content from a parent to a child location only once, reducing WAN usage. |
|
Use the right transport protocols |
Between locations: TPM uses Background Adaptive Transport, which protects bandwidth using Predictive Bandwidth Harvesting, NetBoost, and Flow Equalizer technologies. Within locations: TPM uses Foreground Adaptive Transport, which accelerates content delivery using the Memory Pipeline Architecture. |
|
Separate locations by WAN links |
Define separate locations for IP ranges separated by a WAN link. Misconfigured locations may cause the following conditions:
|
|
Manage topology with Excel |
Use the provided workflow to manage your network topology in a Microsoft Excel spreadsheet and import it into TPM. |
Network Topology Management
Locate and manage the list of Locations by navigating to Assets > Locations in the Web Portal.
Overview
On the Locations page, administrators can create and view the Location hierarchy structure of the computers in their organization.
Tree View
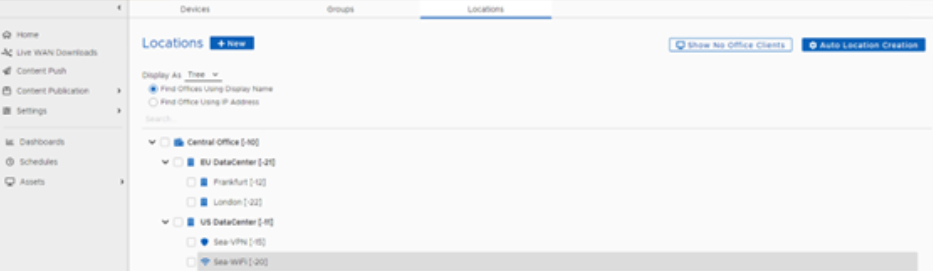
Table View
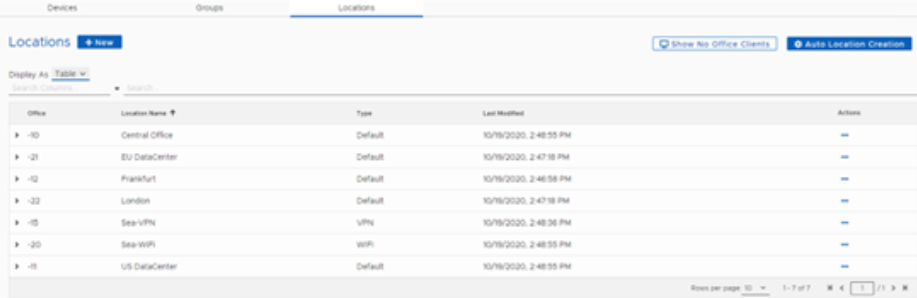
Administrators can do the following tasks on the Locations page:
-
View the hierarchical representation or table view of all locations in the system.
-
Create a new child location under an existing location.
-
Merge one location with another.
-
Delete an existing location.
-
View a location.
-
Edit a location.
-
Move a location from one place in the hierarchy to another.
-
Set the location type to Default, VPN, Wi-Fi, and other settings.
Search Bar
Search using the Search column. The Search column defaults to Location Name. The Search column can be changed by selecting another option.
Note: Internet Locations are not available on the Locations page.
Auto Location Creation Settings
When an TPM Client registers with the server for the first time, the server checks for an existing location with an IP range that matches the client. If it does not find an existing location, the server automatically creates a location using the IP address associated with the client and subnet mask. The Auto Location Creation feature on the Locations page controls this behavior.
Auto Location Creation is disabled (by default). Select More to change these settings.
Turn Auto Location Creation ON or OFF in the Auto Location Creation Settings page. Use this option when manually reorganizing subnets into different locations and want to prevent the system from auto-creating locations when a client on that subnet contacts the server.
Allowed Auto Location IP Ranges
When you enable Auto Location Creation, you can specify which IP ranges are allowed to create an auto location. Select the Restrict Auto Location Creation To The Following IP Ranges toggle to enable it. Then, select +Add Range to enter the subnet ranges.
View Location Devices
-
In the TPM Admin Portal, navigate to Assets > Locations .
-
Select the desired Location to view devices that have checked into that Location.

-
View a list of the machine names associated with the selected Location on the Device viewer page, and click OK.
-
On the Locations page, select Show NO Location clients to see a list of No Location clients.
Note: The system does not display a visible Location for internet clients. Instead, it places them in a hidden Location called InternetLocation. Navigate to Assets > Devices, and then search for devices with a Public IP value to view those clients.
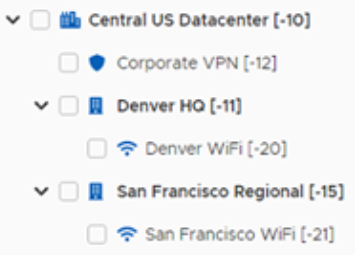
Create a Location
The TPM Server creates a Central Location, which consists of the subnet belonging to the IP address of the TPM Server. The system creates all other Locations as children of either the Central Location or other Locations. Complete the following steps to create a new location:
-
Select +New to create a new Location.
-
Once you have made the necessary changes on the New Location page, select Save.
-
Complete the following entries:
-
Name: Specifies a name for the Location
-
Description: (Optional) Adds a description for the Location.
-
Location ID: Assigns the Location dynamically by the TPM Server.
Note: This ID appears with a value of -- when creating a new Location. However, the TPM Server allocates a unique ID to the location when saving and processing the user action.
-
Location Type: Specifies the type of Location that affects the behavior of how the TPM Client communicates within the Location. Set the following options for this setting:
-
Default: Defines a standard wired Local Area Network.
-
VPN: Defines a Location and IP range or ranges allocated for clients connecting with a VPN. Clients within a VPN Location do not attempt to share content.
-
WiFi: Defines a Location and IP range or ranges allocated to clients connected over Wi-Fi. Clients within a Wi-Fi Location can share content. However, they use unicast communications rather than sending broadcasts.
Note: When a physical location includes both a wired and a wireless subnet, create a separate location for each. Set the wireless location to WiFi and assign it as a child of the wired location. This setup ensures the wireless location retrieves content from its parent.
-
Metered Connection: Defines a Location and subnet range or ranges as metered. This setting enables administrators to establish policies that restrict WAN downloads from clients on metered connections. Select the location of this policy setting within the System Configuration Perspective in the policy set (Contentsystem / No wan download on metered connection).
-
Allow Direct CDN Download: Allows a location to exit the hierarchy and go directly to the internet to download content. This may come from the CDN or from another client on the internet. Clients in this location cannot receive content from a parent location or the Central Location unless the content is unavailable on the Internet or TPM CDN.
-
-
Address Range: A table of IP address ranges, denoted by Starting IP address and Ending IP address. Complete the following steps on the Add Address Range dialog to set the address range:
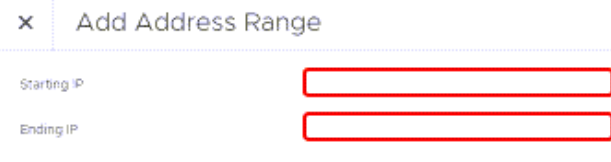
-
Select + Add Address Range to add a new address range.
Tip: Select the ellipses... on the far right under Actions to update or remove the subnet range.
-
Click OK.
Note: If the subnet range entered overlaps a range from another Location, an error occurs when clicking Save, and the Location cannot be saved.
-
Topology Settings: Allows you to place the new Location in the hierarchy. Select Browse on the Parent Location line to select the Parent location.

-
Location Devices: Displays the clients associated with that location when editing an existing Location.
-
-
Editing / Renaming / Moving a Location
-
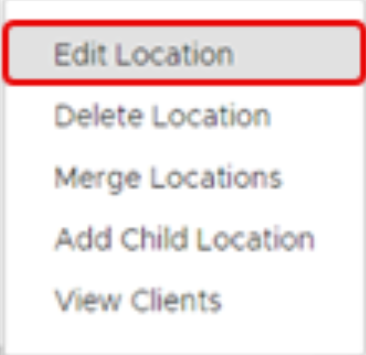
Mouse over or select the checkbox next to a Location, and then select Edit Location in the context menu.
You can also select the ellipsis… in the Actions column (to the far right) to view the context menu.
Note: The Location ID (generated upon creation) is the object ID in the database and cannot be changed. The Location name can be changed.
-
Change the Parent Location to move the location within the hierarchy using the following steps:

-
Select Browse under Topography Settings.
-
Select the checkbox next to the new parent location.
-
Select Add To List to move the location.
Tip: Select + Create Server Object to create a new Location.
-
Delete a Location
Select Delete Location from the Action menu to delete a selected Location. When you delete a location, the system also removes the defined IP range or ranges associated with that Location. Any clients reporting from that Location become No Location clients if auto-location creation is disabled. If auto-location creation is enabled, the system automatically creates a new location the next time the client checks in.
Note: All child locations of this Location are also deleted.
Merge a Location
Select Merge Locations from the Action context menu to merge IP address ranges from one location into another. Then, choose the target location. The system retains the location type (Default, VPN, or WiFi) of the target location.
Client Management in the Admin Portal
Search for and Manage TPM Clients
-
Navigate to Assets > Devices to view all TPM Clients reporting into the TPM Server.
-
Enter a search term on the Search line to search the Machine Name column.
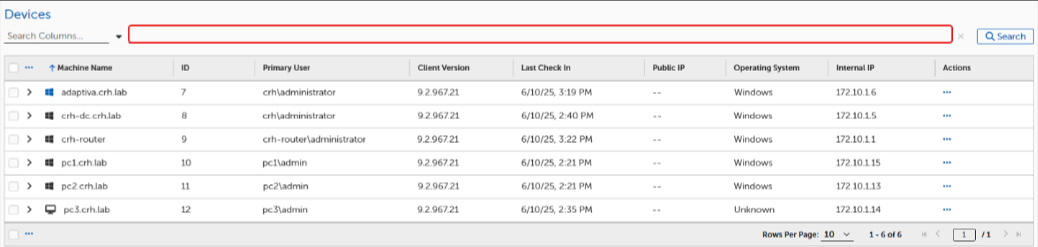
-
Select the column header to sort the list (columns Last Logged In and Public IP cannot be sorted).
-
Select the > next to the device name to view additional information about a specific Device. This expands the line to display the Client ID and Version.
Tip: Use this feature when a machine is re-imaged, the name is changed, or the record of the expired client is still listed.
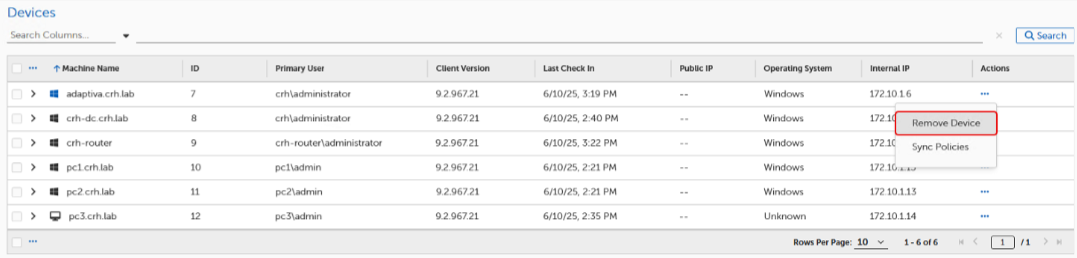
Note: The system purges inactive client records after 21 days. However, the old record remains licensed until the purge occurs.