Prioritize Endpoint Vulnerabilities
Managing endpoint exposure requires clear, unified visibility across environments and security domains. Within Tenable Exposure Management, you can consolidate asset inventory, vulnerability intelligence, configuration data, and identity signals into a single, actionable risk view.
-
This guide shows you how to prioritize endpoint vulnerabilities by following a structured process.
-
The examples in this guide use the CrowdStrike Connector, however with minor adjustments this process can be used for any third party connector.
-
If you are a Tenable Vulnerability Management customer, your custom asset tags — such as combinations of operating system and device type — automatically synchronize into Tenable Exposure Management.
-
For endpoints that only exist in third-party connectors like the CrowdStrike Connector, you can create custom tags (for example, Source = CrowdStrike) and combine them with your existing tags to maintain complete coverage.
By following these best practices — whether using CrowdStrike or any third-party connector — you can unify your asset view, strengthen your risk insights, reduce exposure, and accelerate remediation across your organization.
Step 1: Tenable Exposure Management Identifies and Deduplicates Endpoints
Tenable Exposure Management uses a default merge strategy to identify and combine duplicate assets ingested from multiple sources — including third-party connectors such as CrowdStrike — based on key matching attributes.
Deduplication criteria include:
-
Cloud Instance ID
-
MAC Addresses
-
Hostnames
-
External IPs
-
Fully Qualified Domain Names (FQDNs)
-
IP Addresses
In the Crowdstrike example, the default values for device merging are:
-
cloud_instance_id
-
mac_addresses
-
hostname + fqdns + external_ips
-
hostname + fqdns
-
fqdns + external_ips
-
hostname + external_ips
-
hostname
When Tenable Exposure Management merges assets:
-
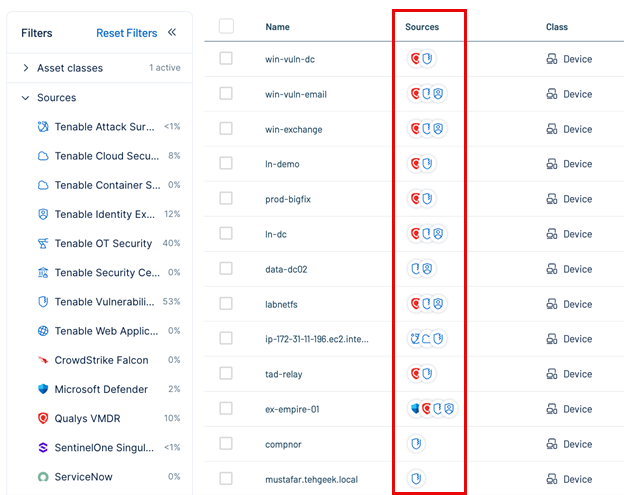
It automatically applies asset attributes, such as tags, across the merged record.
-
You can confirm successful deduplication by checking for multiple icons in the Sources column in the Assets list.
Step 2: Classify Endpoints Using Pre-Built Tags
Use built-in tagging systems from third-party connectors to classify assets.
In the CrowdStrike example:
Each asset automatically receives a product_type tag, identifying its type (Workstation, Endpoint, or Domain Controller).
To classify your endpoints:
-
Make sure asset deduplication is complete.
-
Filter assets by product_type:endpoint.
This gives you a consolidated list of endpoints, regardless of their source.
Step 3: Determine Endpoint Owners
Segment your endpoints by ownership or system type using additional tags provided by third-party connectors.
In the CrowdStrike example:
Assets are also tagged with host_group to indicate the operating system.
To segment endpoints:
Filter assets using a combination of product_type:endpoint and the appropriate host_group, such as host_group:windows.
This lets you quickly analyze vulnerabilities by platform or asset owner group.
Step 4: Identify Vulnerabilities on Endpoints
Once you have your endpoints identified, you can filter to find associated vulnerabilities.
To view vulnerabilities:
-
Within Tenable Exposure Management, navigate to Weaknesses.
-
Apply the following filters:
-
Tag = product_type:endpoint
-
Weakness Type = Vulnerability
-
Tenable Exposure Management displays a full view of vulnerabilities affecting your endpoints.
Step 5: Create Exposure Signals
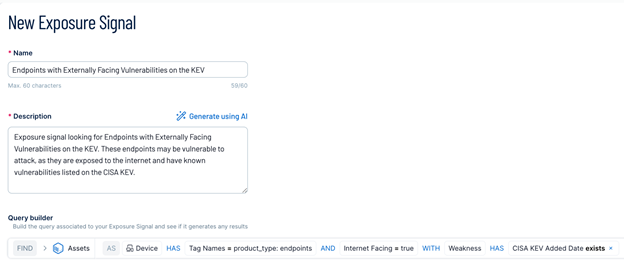
Create custom Exposure Signals to track and monitor endpoint vulnerabilities based on your tagging and segmentation/attributes.
To create an exposure signal:
-
Within Tenable Exposure Management, navigate to Exposure Signals.
-
Create a new signal using the relevant filters.
Example:
Create a signal that identifies external-facing endpoints affected by CISA KEV vulnerabilities.
You can also:
-
Monitor remediation trends over time.
-
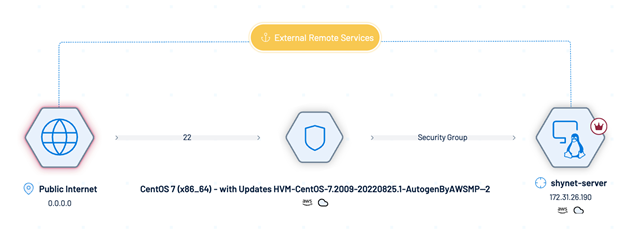
Within the Inventory view, click View Graph to visualize attack paths.
-
Filter by Asset ID to examine risks such as ransomware exposure, toxic combinations, and compromised credentials.
Step 6: Prioritize Vulnerabilities Using Tenable Scores and Attributes
Use the Exposure View to prioritize risk across your assets.
To prioritize endpoint vulnerabilities:
-
Segment assets using tags like product_type:endpoint and host_group:windows.
-
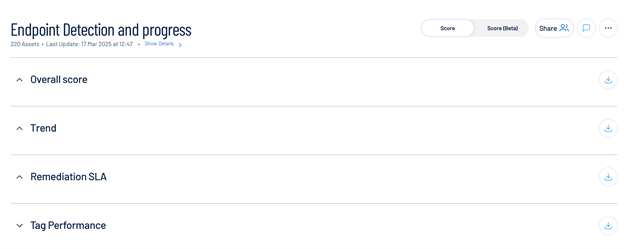
Create a custom card, such as Endpoint Detection and Progress, to monitor scores, trends, and SLA performance for your endpoint group.
You can adjust targets based on your:
-
Business needs
-
Team capacity
- Regulatory and compliance requirements
Step 7: Share Insights with Stakeholders
You can monitor progress, generate reports, and share insights using customizable dashboards in Tenable Exposure Management.
-
Export dashboards or data for executive reporting.
-
Share tailored views with stakeholders to track remediation efforts.


