Configure Tenable Nessus in Tenable Core
The Nessus page displays summary information about your Tenable Nessus configuration.
Tenable Nessus Installation Info
The Nessus Installation Info section provides information for the Tenable Nessus application. You can view the URLs, Service Status, License, Challenge Code, Application version, and Binary version.
After you start up Tenable Core + Tenable Nessus, the message Error: Invalid/Expired Activation Code appears until you fully configure the Tenable Nessus application. For more information, see Configure Nessus in the Tenable Nessus User Guide.
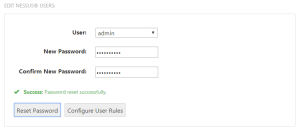
Edit Tenable Nessus Users
The Edit Nessus Users section provides a place where you can update user passwords and configure user rules.
To update a password:
- Select the user from the drop-down list.
- Enter the New Password in the New Password field.
- Confirm the New Password in the Confirm New Password field.
-
Click Reset Password. A green success message displays at the bottom of the card.

To configure user rules:
- Select the user from the drop-down list.
- Click the Configure User Rules link. A new window opens with a text box to enter the user rules.
- Enter the user rules and click Save.
- A success message appears at the bottom of the Edit Nessus User card.
Tenable Nessus Plugin Management
The Nessus Plugin Management section enables users to update their Tenable Nessus plugin set manually. This is useful in offline situations where Tenable Security Center will not have direct access to the Tenable plugin servers. It is important to disable the Tenable Security Center nightly plugin update process when using the manual method.
Note: While performing these builds, Tenable Nessus cannot be running. Stop Tenable Nessus by selecting the Stop option in the Service Status section on the Tenable Nessus Installation Info card.
To rebuild the plugin database:
- Click the Rebuild Plugin Database button.
- A message with a status update that the system is rebuilding the plugin database appears at the bottom of the card.
- A green Success message appears when the rebuild is complete.
To remove plugins:
- Click the Remove Plugins button.
- A message with a status update that the system is removing the plugins appears at the bottom of the card.
- A green Success message appears when the removal is complete.
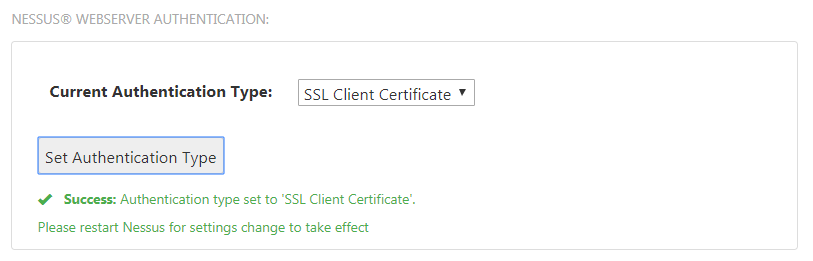
Tenable Nessus Webserver Authentication
The Web Server Authentication section controls the configuration of the SSL Client Certificate authentication permissions. The two options are password or SSL Client Certificate. This setting controls the option available for users to log into the Tenable Nessus server via SSL client certificate or password authentication.
- The SSL Client Certificate option configures the Tenable Nessus web server to accept only connections from browsers that present a valid SSL client certificate. The web server rejects other connection attempts with the exact message displayed, dependent on the browser in use.
- The Password option configures the Tenable Nessus web server to ignore any SSL client certificates but allow the browser connection. This is the default setting and works with most browsers without issue.
To change the Tenable Nessus Webserver Authentication:
- Click the arrow in the drop-down menu to display the options on the Nessus Webserver Authentication card.
- Select the desired type of authentication.
-
Click Set Authentication Type to save the new selection. A green Success message appears to confirm the update and prompts you to restart Tenable Nessus for the changes to take effect.

Edit Tenable Nessus Rules
This section allows you to define the nessusd.rules, that function the same as the user rules discussed above, to forbid or allow nessusd to connect to some or all ports for the specified IP address or Plugin ID. These rules affect Tenable Nessus globally regardless of the defined Tenable Nessus user rules.
- Make edits directly in the text box displayed.
- Click Save Nessus Rules to confirm the update.
Tenable Nessus Logs
The Tenable Nessus Logs section contains four different log types. Click on the drop-down menu to view the Backend log, Webserver log, Error log, and nessussd.messages log. After making your selection, click view log.