Configure Linked AWS Accounts for Key-based Authentication
Required User Role: Administrator
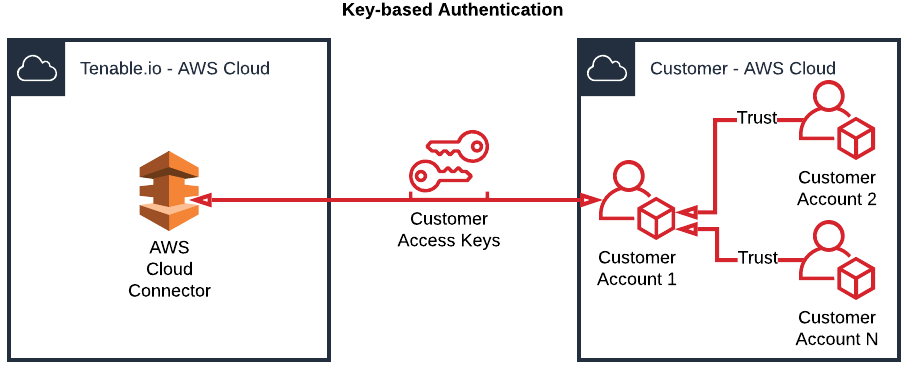
This section assumes that access keys have already been generated for the primary account, and explains how to configure linked AWS accounts as depicted in the diagram below.
Before you begin:
- Configure the primary AWS account.
- Record the Account ID for the primary AWS account.
To configure linked AWS accounts:
- Obtain your Tenable Vulnerability Management container ID, as described in License Information.
-
In your AWS account, create a role named tenableio-connector to delegate permissions to an IAM user, as described in the Amazon AWS documentation.
-
In the navigation pane of the console, click Roles > Create role.
-
For role type, click Another AWS account.
- For Account ID, type the AWS account ID of the primary AWS account.
-
Select the Require external ID check box, and type the Tenable container ID that you obtained in Step 1.
- Click Next: Permissions.
- Create or reuse a policy with the following permissions:
AWS Service Permission Amazon EC2 DescribeInstances
AWS CloudTrail
- DescribeTrails
- GetEventSelectors
- GetTrailStatus
- ListTags
- LookupEvents
Tenable recommends that you set Amazon Resource Name to * (all resources) for each AWS Service.
-
Click Next: Tagging.
- (Optional) Add any desired tags.
-
Click Next: Review.
- In the Role name box, type tenableio-connector.Caution: The role must be named tenableio-connector for the connector to work.
-
Review the role, ensuring that the role name is tenableio-connector, and then click Create role.
- Record the Role ARN for the created role. You need the Role ARN for the next section of the configuration.
-
To configure the primary AWS account:
Note: For more detailed steps, see the Amazon documentation: Accessing and Administering the Member Accounts in Your Organization.
- Create a policy that has permission to use the AWS Security Token Service (AWS STS) AssumeRole API (sts:AssumeRole) action.
Navigate to Policies and then click Create Policy.
- For Service, choose STS.
For Actions, type
AssumeRolein the Filter box and then select the check box next to it when it appears.- Click You chose actions that require the role resource type.
- Click Add ARN.
- In the Specify ARN for role field, paste the ARN recorded for the role created in the linked account(s).
- Click Add.
- Click Review policy.
- In the Name field, type a unique name for your policy.
- Click Create Policy.
- Add the policy created in step 1 to a user or group associated with the access keys used when you created your connector.
- Click the Add Permissions button.
Select the Attach existing policies directly check box.
- Find the policy with
sts:AssumeRolethat was created in step 1. Click Next: Review.
Click Add permissions.