Tenable Nessus Certificate Configuration for Windows
Commands and Relevant Files
The following section describes the commands and relevant files involved in the Nessus SSL process on a Windows system.
Certificate Authority and Nessus Server Certificate
The command C:\Program Files\Tenable\Nessus\nessuscli mkcert creates the Certificate Authority and generates the server certificate. This command creates the following files:
|
File Name Created |
Purpose |
Where to Copy to |
|---|---|---|
|
C:\Program Files\Tenable\Nessus\nessus\CA\cacert.pem |
This is the certificate for the Certificate Authority. If using an existing PKI, this will be provided to you by the PKI and must be copied to this location. |
C:\Program Files\Tenable\Nessus\nessus\CA\ on any additional Nessus servers that need to authenticate using SSL. |
|
C:\Program Files\Tenable\Nessus\nessus\CA\servercert.pem |
This is the public certificate for the Nessus server that is sent in response to a CSR. |
C:\Program Files\Tenable\Nessus\nessus\CA\ on any additional Nessus servers that need to authenticate using SSL. |
|
C:\Program Files\Tenable\Nessus\nessus\CA\cakey.pem |
This is the private key of the Certificate Authority. It may or may not be provided by the Certificate Authority, depending on if they allow the creation of sub users. |
C:\Program Files\Tenable\Nessus\nessus\CA\ on any additional Nessus servers that need to authenticate using SSL. |
|
C:\Program Files\Tenable\Nessus\nessus\CA\serverkey.pem |
This is the private key of the Nessus server. |
C:\Program Files\Tenable\Nessus\nessus\CA\ on any additional Nessus servers that need to authenticate using SSL. |
Nessus Client Keys
The Nessus user, which in this case is the user ID that Tenable Security Center uses to communicate with the Nessus server, is created by the command C:\Program Files\Tenable\Nessus\nessuscli mkcert-client.
This command creates the keys for the Nessus clients and optionally registers them appropriately with the Nessus server by associating a distinguished name (dname) with the user ID. It is important to respond y (yes) when prompted to register the user with the Nessus server for this to take effect. The user name may vary and is referred to here as user.
The certificate filename is a concatenation of cert_, the user name you entered and .pem. Additionally, the key filename is a concatenation of key_, the user name you entered and .pem.
The following files are created by this command:
|
File Name Created |
Purpose |
|---|---|
|
C:\Documents and Settings\<UserAccount>\Local Settings\Temp\nessus-xxxxxxxx\cert_<user>.pem |
This is the public certificate for the specified user. |
|
C:\Documents and Settings\<UserAccount>\Local Settings\Temp\nessus-xxxxxxxx\key_<user>.pem |
This is the private key for the specified user. |
|
C:\Program Files\Tenable\Nessus\nessus\users\<user_name>\auth\dname |
This is the distinguished name to be associated with this user. The distinguished name consists of a number of options separated by commas in the following format: "/C={country}/ST={state}/L={location}/OU={organizational unit}/O={organization/CN={common name}" |
Creating and Deploying SSL Authentication for Nessus
Create Keys and User on Nessus Server
To create the keys and user:
-
Create the Certificate Authority and Nessus server certificate using the command C:\Program Files\Tenable\Nessus\nessuscli mkcert
-
Provide the requested information.
Caution: Critical: Any Nessus Scanner that has previously processed scans will not initially accept these keys as a policy.db will have already been created on the Nessus Scanner. Remove the policies.db from the Nessus Scanner to ensure the deployment finishes successfully.
-
To remove the policies.db on a Linux system issue this command as root:
rm /opt/nessus/var/nessus/users/<UserName>/policies.db
-
To remove the policies.db on a Windows system, navigate to the C:\Program Files\Tenable\Nessus folder and remove the policies.db file. The actual location of the policies.db differs depending on the version of Windows that is running.
-
Create the user ID for the Nessus client, which is Tenable Security Center in this case, to log in to the Nessus server with, key and certificate using the following command:
C:\Program Files\Tenable\Nessus\nessuscli mkcert-client
If the user does not exist in the Nessus user database, it is created. If it does exist, it is registered to the Nessus server and have a distinguished name (dname) associated with it. It is important to respond y (yes) when prompted to register the user with the Nessus server for this to take effect. The user must be a Nessus admin, so answer y when asked.
The certificates created contain the username entered previously, in this case admin, and are located in the directory as listed in the example above (e.g., C:\Documents and Settings\<UserAccount>\Local Settings\Temp\nessus-00007fb1). In the specified directory, the certificate and key files in this example are named cert_admin.pem and key_admin.pem.
Transfer Certificates and Keys to Tenable Security Center
Transfer the cert_admin.pem and key_admin.pem files to a desired location on Tenable Security Center, change into that directory and concatenate them as follows:
# cat cert_admin.pem key_admin.pem > nessuscert.pem
Note: The nessuscert.pem file will be used when configuring the Nessus scanner on Tenable Security Center. This file needs to be copied to somewhere accessible for selection from your web browser during the Nessus configuration.
Configure Nessus Daemons
To enable certificate authentication on the Nessus server, the force_pubkey_auth setting must be enabled. Once enabled, log in to the Nessus server may only be completed by SSL certificates. Username and password login are disabled. As the root (or equivalent) user on the Nessus server, run the following command:
C:\Program Files\Tenable\Nessus\nessuscli fix --set force_pubkey_auth=yes
Open the Nessus Server Manager GUI, click Stop Nessus Server and then click Start Nessus Server.
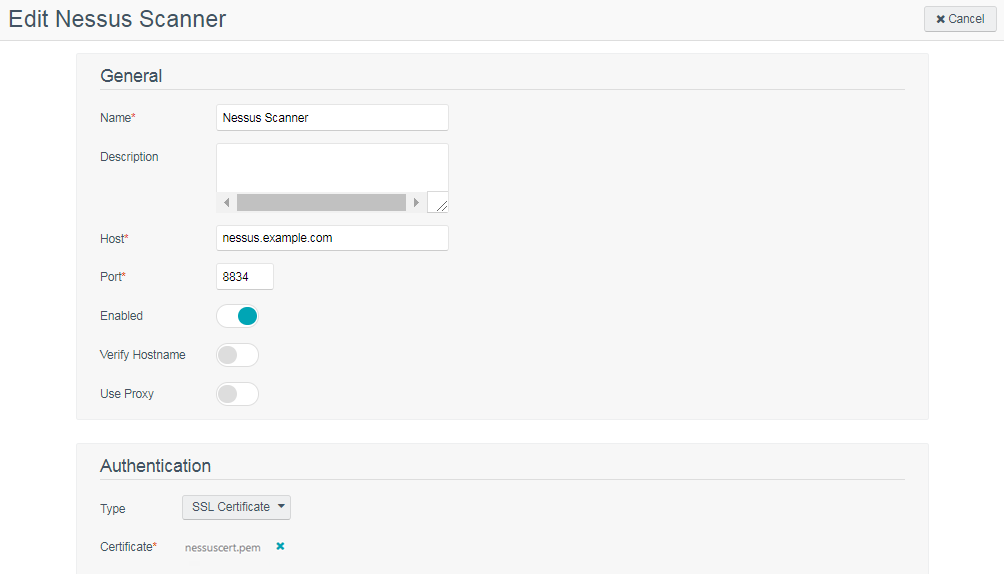
Change the Nessus Mode of Authentication
In Tenable Security Center, update your Tenable Nessus scanner configuration to use SSL certificate-based authentication. For more information, see Add a Tenable Nessus Scanner.