Generate a Report from Tenable Web App Scanning Findings
You can generate a report for one or more vulnerabilities from the Findings page.
To create a report from the Findings page:
- In the left navigation plane, click
 Findings.
The Findings page appears.
-
In the row, click the
 button.
A drop-down menu appears.
-
In the drop-down box, click
 Generate Report.
The Generate Report plane appears.
-
Select the findings for which you want to create a report.
Scope Action Create a report for a single vulnerability Do one of the following:
-
In the Actions column, click the
 button in the row for the vulnerability for which you want to create a report.
The action options appear in the row.
Create a report for multiple vulnerabilities Do one of the following:
-
Select more than one vulnerability for which you want to create a report. To select all vulnerabilities, select the check box at the top of the list.
Tenable Web App Scanning enables the action bar.
-
-
Click Generate Report.
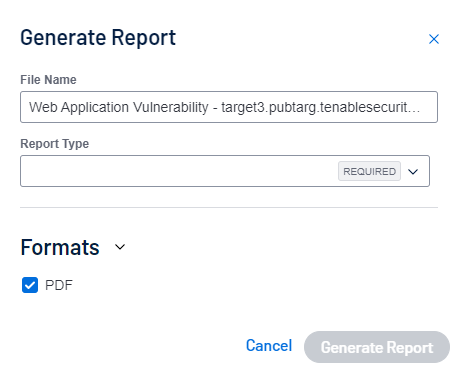
The Generate Report pop-up appears.
-
(Optional) In the Name box, type a new name for the report.
-
From the Report Type drop-down box, select a report type.
Report Type Web App Scanning Executive Findings Report Web App Scanning Vulnerability Finding Details By Asset Report Web App Scanning Vulnerability Finding Details By Plugin Report -
(Optional) Click the Schedule toggle to enable scheduling of the report.
The fields to schedule the report appear.
-
To schedule a report, modify the following settings:
-
In the Start Date and Time box, select when to schedule the report. The default is the current date and time.
-
In the Time Zone box, select the required time zone or retain the default timezone.
-
In the Repeat drop-down box, select frequency of report generation: Daily, Weekly, Monthly, Custom, or Does not repeat. The default is Daily.
-
In the Repeat Ends drop-down box, select when you want the scheduling to end: On or Never. If you select On, specify a date in the End Date box for when you want the report scheduling to end.
-
In the Add Recipients box, type the email addresses of the recipients to whom you want to send the report.
-
Click Schedule Report.
Tenable Web App Scanning schedules the report and displays a confirmation message.
-
-
Click Generate Report.
Tenable Web App Scanning generates the report. In the notification message, you can click the Report Results link and view the new report on the Report Results page. The new report appears highlighted.
