System Configuration
The OT Security System Configuration screens enable you to automatically configure and manually perform Plugin updates, as well as view and update details regarding your device, HTTPS certificate, API Keys, and license.
Device
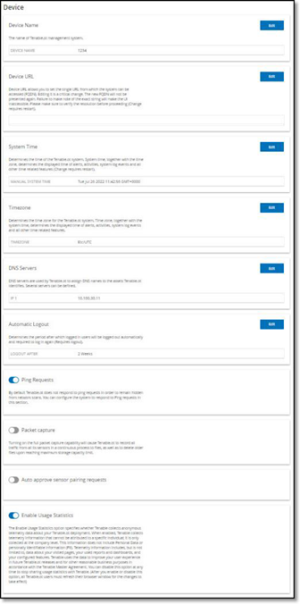
This screen shows detailed information about your OT Security configuration. You can view the info and edit the configuration on this screen.
The following info is shown:
-
Device Name – a unique identifier for the OT Security appliance.
-
Device URL – allows you to set the single URL from which the system can be accessed (FQDN).
Note: Editing the Device URL is a critical change. The new FQDN will not be presented again. Failure to make note of the exact string will make the UI inaccessible. Please make sure to verify the resolution before proceeding. -
System Time – the correct time and date are generally set automatically, but can be edited.
Note: Setting the correct date and time is essential for accurate recording of logs and alerts. -
Timezone – select the local time zone at the site location from the dropdown list.
-
DNS Servers – DNS servers are used by the OT Security system to assign DNS names to the assets OT Security identifies. Several servers can be identified.
-
Automatic Logout – determines the period after which logged-in users will be logged out automatically and required to log in again.
-
Open Ports Age Out Period – determines the period after which Open Port listings will be removed from the individual Asset Details screen if no further indication is received that the port is still open. Default setting is two weeks. For more information, see Inventory.
Ping Requests
Turning on Ping Requests activates the OT Security platform’s automatic response to ping requests.
To Activate Ping Requests:
-
Go to the Local Settings > System Configuration > Device screen.
-
Toggle the Ping Requests switch to ON.
Packet Captures
Turning on the full packet capture capability activates continuous recording of full-packet captures of all traffic in the network. This enables extensive troubleshooting and forensic investigation capabilities. When the storage capacity is exceeded (1.8 TB), the system deletes older files. You can view and download available files on the Network > Packet Captures screen, see section Network.
To Activate Packet Captures:
-
Go to the Local Settings > System Configuration > Device screen.
-
Toggle the Packet Capture switch to ON.
Note: You can stop the Packet Capture feature at any time by toggling the switch to OFF.
Auto Approve Sensor Pairing Requests
Enabling automatic approval of incoming Sensor pairing requests ensures all Sensor pairing requests are approved without any additional steps taken by the administrator. If this option is not selected, final manual approval is required for any new Sensors to connect to your network.
To Enable Auto Approval for Incoming Sensor Pairing Requests:
-
Go to the Local Settings > System Configuration > Device screen.
-
Toggle the Auto Approve Incoming Sensor Pairing Requests switch to ON.
Note: You can allow automatic approval of incoming Sensor pairing requests at any time by toggling the switch to OFF.
Enable Usage Statistics
The Enable Usage Statistics option specifies whether Tenable collects anonymous telemetry data about your OT Security deployment. When enabled, Tenable collects telemetry information that cannot be attributed to a specific individual; it is only collected at the company level. This information does not include personal data or personally identifiable information (PII). Telemetry information includes, but is not limited to, data about your visited pages, your used reports and dashboards, and your configured features. Tenable uses the data to improve your user experience in future OT Security releases and for other reasonable business purposes in accordance with the Tenable Master Agreement. This setting is enabled by default.
To enable Usage Statistics:
-
Go to the Local Settings > System Configuration > Device screen.
-
Toggle the Enable Usage Statistics switch to ON.
Note: You can disable sharing of usage statistics at any time by toggling the switch to OFF.
Sensors
After Sensors have been paired using the Tenable Core UI, you may approve new pairings, view and manage Sensors using the Edit, Pause and Delete functions in the Actions menu. You may also choose to enable automatic approval for Sensor pairing requests using the toggle switch.
Viewing the Sensors Screen
The Sensors table shows a list of all Sensors v. 2.214 and above in the system.

The information shown on the screen is described in the following table:
| Parameter | Description |
|---|---|
| IP | The IPv4 address of the Sensor. |
| Status | The status of the Sensor: Connected, Connected (Unauthenticated), Pending approval, Disconnected or Paused. |
| Active Queries | The capacity of the Sensor to send Active Queries (Enabled, Disabled, N/A) |
| Active Query Networks | The network segments to which the Sensor is assigned. |
| Name | The name of the Sensor in the System. |
| Last Update | The date and time that the Sensor information was last updated. |
| Sensor Identifier | The Sensor Universal Unique Identifier (UUID), a 128-bit value used to uniquely identify an object or entity on the internet. |
| Version | The Sensor version. |
| Throughput | A measure of how much data is streaming through the sensor (in kilobytes per second). |
Manually Approving Incoming Sensor Pairing Requests
If the Auto Approve Sensor Pairing Requests setting is toggled to OFF, incoming sensor pairing requests must be manually approved before they are successfully connected.
To manually approve a Sensor pairing request:
-
Go to the Local Settings > System Configuration > Sensors screen.
-
Click on a row in the table with a status of Pending Approval.
-
Click Actions > Approve, or right-click and select Approve from the right-click menu.
 Note: If you want to delete a Sensor, you may click Actions > Delete, or right-click and select Delete from the right-click menu.
Once a Sensor is connected in Authenticated mode, it can be configured to perform Active Queries in the network segments to which it is assigned. You need to specify which network segments it will query.
To configure Active Queries:
-
Under Local Settings, go to System Configuration > Sensors.
-
Click on a row in the table with a status of Connected.
-
Click Actions > Edit, or right-click and select Edit from the right-click menu.
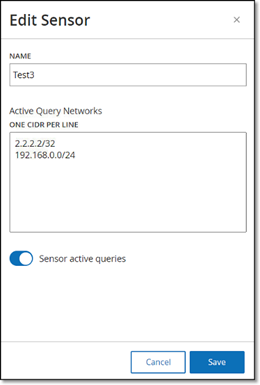
The Edit Sensor panel is displayed.
-
If you would like to rename the Sensor, edit the text in the Name field.
-
In the Active Query Networks field, add or edit relevant network segments to which the Sensor will send active queries, using CIDR notation and adding each subnetwork on a separate line.
Note: Queries can only be performed on CIDRs that are included in the monitored network ranges. Make sure to add only CIDRs that are accessible through this Sensor. Adding CIDRs that are not accessible may interfere with the ICP's ability to query those segments by other means. -
6. Toggle the Sensor active queries switch to ON to enable active queries.
-
Click Save.
The panel closes.
-
In the Sensors table, under the Active Queries heading, the enabled Sensors will now display Enabled.
Port Configuration
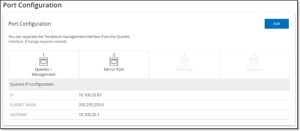
The Port Configuration screen shows how the ports on the device are configured. For more information on Port Configuration, see Installing the OT Security Appliance > Step 4 – Setup Wizard > SCREEN 2 – DEVICE.
Updates
Keeping Plugins and IDS Engine Ruleset up-to-date ensures that your assets are monitored for all of the latest known vulnerabilities. Updates can be performed through the cloud, both automatically and manually, and can be performed offline as well.
Tenable Nessus Plugin Set Updates
Cloud Updates
Users with an internet connection can update Plugins through the Cloud. When automatic updates are turned on, Plugins will update at the time and frequency set by the user (Default: daily at 02:00 AM).
Setting Automatic Cloud Updates of Plugins
To enable automatic updates of Plugins:
-
Under Local Settings, go to System Configuration > Updates.
The Updates screen is displayed with Nessus Plugin Set Cloud Updates, showing the number of your Plugin Set, when it was last updated and the update schedule.
-
If the toggle switch is not turned on, click on it to turn on automatic updates.
To edit the schedule of automatic updates of Plugins:
-
Under Local Settings, go to System Configuration > Updates.
The Updates screen is displayed with Nessus Plugin Set Cloud Updates, showing the number of your Plugin Set, when it was last updated and the update schedule.
-
Click on the Edit Frequency button.
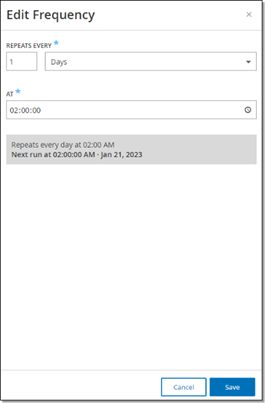
The Edit Frequency side panel is displayed.
-
Under Repeats Every, set the time interval at which you would like to update the Plugins by entering a number and selecting a unit of time (Days or Weeks) from the dropdown menu.
-
If you select Weeks, select which day(s) of the week you would like to perform a weekly update on the plugins.
-
Under At, set the time of day at which you would like to update the Plugins (in HH:MM:SS) by clicking on the clock icon and selecting the time, or by entering the time manually.
-
Click Save.
A dialog is displayed, letting you know that the frequency has been updated successfully.
Performing Manual Cloud Updates of Plugins
To manually update Plugins:
-
Under Local Settings, go to System Configuration > Updates.
The Updates screen is displayed with Nessus Plugin Set Cloud Updates, showing the last updated version of your Plugin Set, when it was last updated and the update schedule.
-
Click on the Update Now button.
A dialog is displayed, letting you know that the update has started. When the update is completed, the Plugin Set field will display the number of the current Plugin Set.
Note: While the Plugin Set update is in progress, keep the browser window open and do not refresh the page.
Offline Updates
Users without an internet connection on their OT Security device can manually update their Plugins by downloading the latest Plugin set from the Tenable Customer Portal and uploading the file.
To update Plugins offline:
-
Under Local Settings, go to System Configuration > Updates.
The Updates screen is displayed with Nessus Plugin Set Cloud Updates, showing the number of your Plugin Set, when it was last updated and the update schedule.
-
Click on the Update From File button.
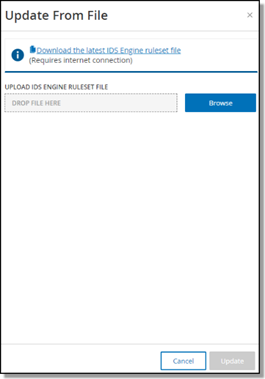
The Update From File window is displayed.
-
If you have not yet done so, click the link to download the latest Plugin file, then return to the Update From File window.
Note: Downloading the latest Plugin file from the link is only possible through an internet connection, such as with an internet-connected PC. -
Click Browse and navigate to the Plugin set file you downloaded from the OT Security Customer portal.
-
Click Update.
IDS Engine Ruleset Updates
Cloud Updates
Users with an internet connection can update their IDS Engine Ruleset through the Cloud. When automatic updates are turned on, the IDS Engine Ruleset will update at the time and frequency set by the user (Default: Repeats every week on Monday and Thursday at 02:00 AM).
Setting Automatic Cloud Updates of the IDS Engine Ruleset
To enable automatic updates of the IDS Engine Ruleset:
-
Under Local Settings, go to System Configuration > Updates.
The Updates screen is displayed with IDS Engine Ruleset Cloud Updates, showing the number of your Rule Set, when it was last updated and the update schedule.
-
If the toggle switch is not turned on, click on it to turn on automatic updates.
To edit the schedule of automatic updates of the IDS Engine Ruleset:
-
Under Local Settings, go to System Configuration > Updates.
The Updates screen is displayed with IDS Engine Ruleset Cloud Updates, showing the number of your Rule Set, when it was last updated and the update schedule.
-
Click on the Edit Frequency button.
The Edit Frequency side panel is displayed.

-
Under Repeats Every, set the time interval at which you would like to update the Ruleset, by entering a number and selecting a unit of time (Days or Weeks) from the dropdown menu.
-
If you select Weeks, select which day(s) of the week you would like to perform a weekly update on the Ruleset.
-
Under At, set the time of day at which you would like to update the IDS Engine Ruleset (in HH:MM:SS) by clicking on the clock icon and selecting the time, or by entering the time manually.
-
Click Save.
A dialog is displayed, letting you know that the frequency has been updated successfully.
Performing Manual Cloud Updates of the IDS Engine Ruleset
To manually update the IDS Engine Ruleset:
-
Under Local Settings, go to System Configuration > Updates.
The Updates screen is displayed with IDS Engine Ruleset Cloud Updates, showing the number of your Rule Set, when it was last updated and the update schedule.
-
Click on the Update Now button.
A dialog is displayed, letting you know that the update has started. When the update is completed, the Ruleset field will display the number of the current IDS Engine Ruleset.
Offline Updates
Users without an internet connection on their OT Security device can manually update their IDS Engine Ruleset by downloading the latest Ruleset from the Tenable Customer Portal and uploading the file.
To update the IDS Engine Ruleset offline:
-
Under Local Settings, go to System Configuration > Updates > IDS Engine Ruleset Cloud Updates.
The Updates screen is displayed, showing the number of your Ruleset, when it was last updated and the update schedule.
-
Click on the Update From File button.
The Update From File window is displayed.

-
If you have not yet done so, click the link to download the latest IDS Engine ruleset file.
Note: Downloading the latest IDS Engine ruleset file from the link is only possible through an internet connection, such as with an internet-connected PC. -
Click Browse and navigate to the IDS Engine ruleset set file you downloaded from the OT Security Customer portal.
-
Click Update.
Certificate
Generating an HTTPS Certificate
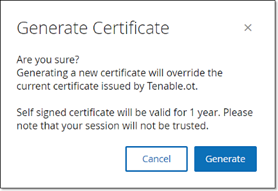
The HTTPS certificate ensures the system is using a secure connection to the OT Security appliance and server. The initial certificate expires after two years. You can generate a new self signed certificate at any time. The new certificate is valid for one year.
To generate a self signed certificate:
-
Under Local Settings, go to the System Configuration > Certificate screen.
-
Click on the Actions button, and select Generate Self Signed Certificate.

The Generate Certificate confirmation window is displayed.
-
Click Generate.
The self signed certificate is generated and can be viewed in the Local Settings > System Configuration > Certificate screen.
Uploading an HTTPS Certificate
To upload an HTTPS Certificate:
-
Under Local Settings, go to the System Configuration > Certificate screen.
-
Click on the Actions button and select Upload Certificate.

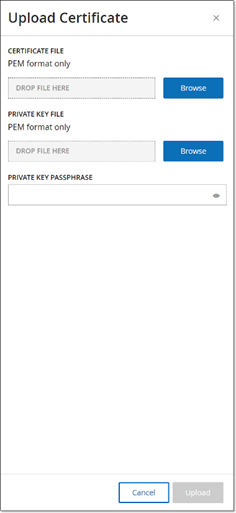
The Upload Certificate side panel is displayed.
-
Under Certificate File click on the Browse button and navigate to the Certificate file you wish to upload.
-
Under Private Key File, click on the Browse button, and navigate to the Private Key file you wish to upload.
-
Enter the private key passphrase in the Private Key Passphrase field.
-
Click on the Upload button to upload the files.
The side panel closes.
Note: After replacing the certificate, it is recommended to reload the browser tab to ensure the HTTP Certificate update was successful. If not, a warning notice will be displayed.
