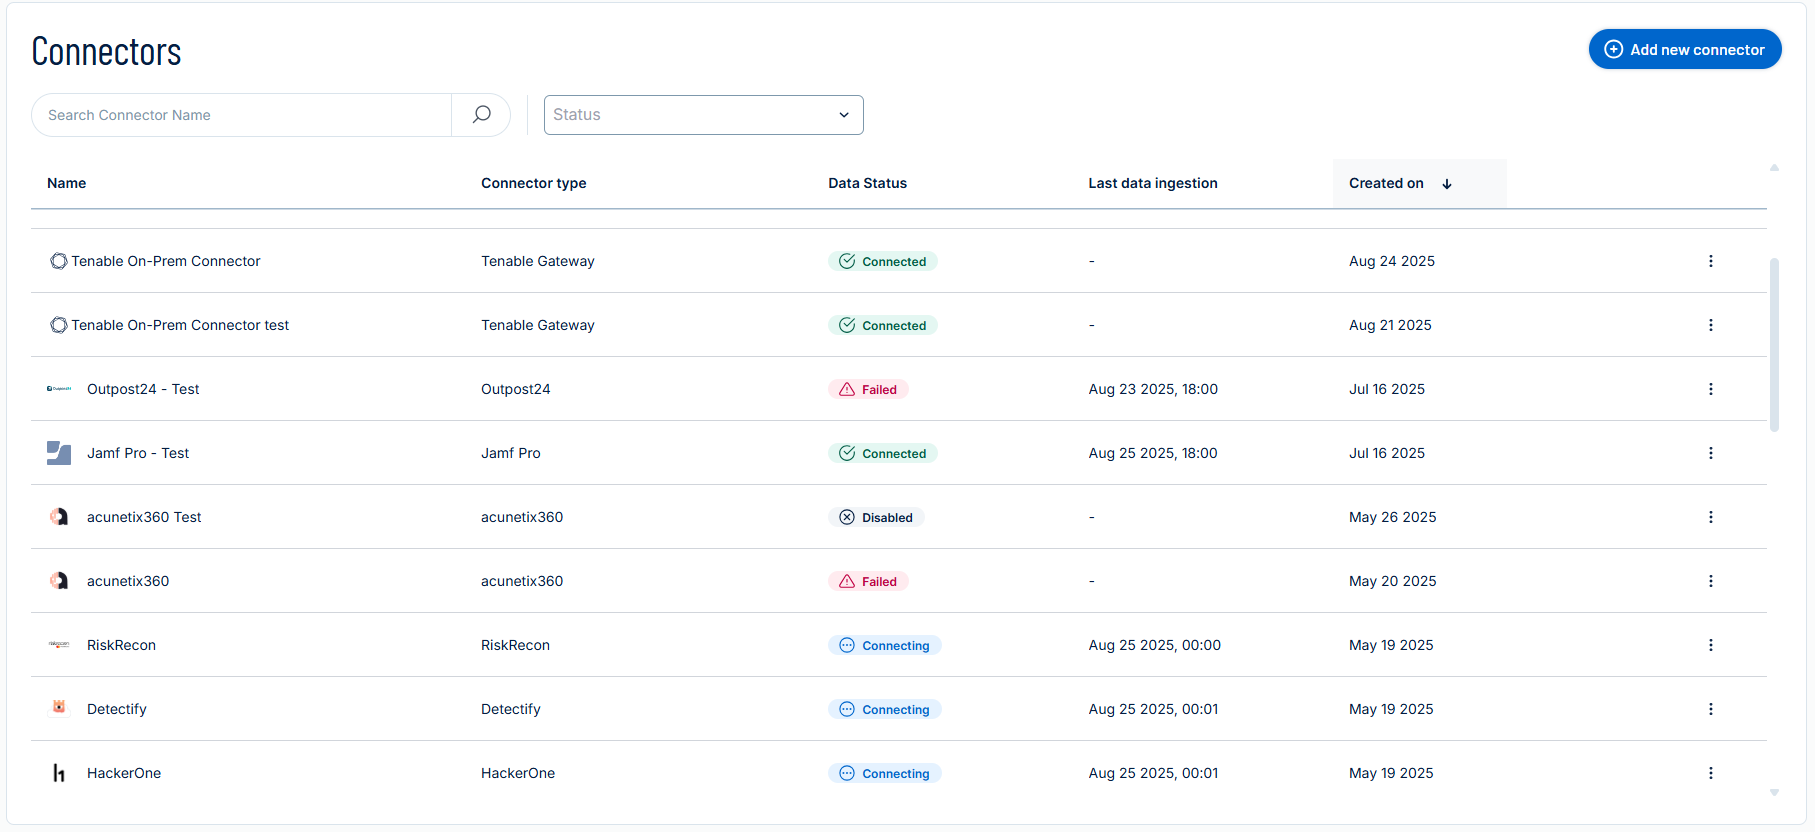
Manage Connectors
The following is not supported in Tenable FedRAMP Moderate environments. For more information, see the Tenable FedRAMP Product Offering.
In Tenable Exposure Management, you can manage your third party connectors in the following ways:
Add a New Connector
Required User Role: Administrator or Custom Role
Add a connector to ingest third party asset and finding data into Tenable Exposure Management.
To add a new connector:
-
Navigate to the Connectors page.
-
In the upper-right corner, click
 Add new connector.
The Connectors Library appears.

-
In the search box, type the name of the connector.
-
On the tile for the connector, click Connect.
The connector configuration options appear.
-
Configure the connector according to the specific connector's configuration instructions. For more information on connector types and how to configure them, see Supported Third-Party Integrations.
View Connector Status and Logs
Required User Role: Administrator or Custom Role
The Connector Logs in Tenable Exposure Management provide detailed insights into the processing lifecycle of your connectors, including both the actual processing time and any waiting time that occurs when multiple connectors are syncing simultaneously.
To view your connector logs:
-
Navigate to the Connectors page.
-
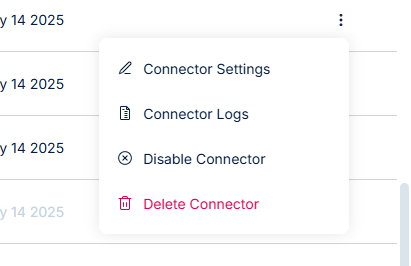
In the table, for the connector for which you want to view logs, click the
 button.
A menu appears. -
In the menu, click Connector Logs.
The connector sync logs appear in a clear, user-friendly table. Each sync cycle is listed separately, allowing you to distinguish between different sync attempts.
 Tip: You can also access the connector logs directly from the connector setup page.
The logs display sync history, timestamps, types (Full or Incremental), and error messages (if any).
Schedule Connector Sync Time
Required User Role: Administrator or Custom Role
Set connector sync schedules to keep data fresh, consistent, and aligned with your operational needs. Configure specific sync times and days to reduce system load, improve performance, and give your team timely access to accurate security data.
To schedule connector sync time:
-
Navigate to the Connectors page.
-
In the table, click the connector for which you want to schedule the sync time.
The connector setup page appears.
-
In the Connector Scheduling section, configure the desired sync time.
Edit Connector Settings
Required User Role: Administrator or Custom Role
To edit connector settings:
-
Navigate to the Connectors page.
-
In the table, locate the connector you want to edit.
-
To access the connector setup page, do one of the following:
-
In the table, click the name of the connector you want to edit.
-
In the table, next to the connector you want to edit, click the
button.A menu appears.
-
Click Connector Settings.
-
The connector setup page appears.
-
-
Update the connector settings based on your desired configuration options. Here, you can configure:
-
Connector credentials
-
Data pulling configuration
-
Connector scheduling
Tip: For more information about specific connectors and how to configure them, see Supported Third-Party Integrations.
-
-
Once complete, do one of the following:
-
Cancel – Discard any changes.
-
Update and sync now – Apply your changes and immediately trigger a full sync for the connector.
-
Update – A confirmation message appears. Here, you can choose whether to apply the changes immediately or on the configured sync schedule.

-
Disable or Enable a Connector
Required User Role: Administrator or Custom Role
You can manually disable a connector when you no longer want it to fetch new data.
To disable a connector:
-
Navigate to the Connectors page.
-
In the table, next to the connector you want to disable, click the
 button.
A menu appears.
-
Click Disable Connector.
Tenable Exposure Management updates the status of the connector to Disabled.
To resume syncing data for a disabled connector, you can re-enable the connector at any time. No data is lost during this state.
To enable a connector:
-
In the Connectors table, next to the connector you want to enable, click the
button.A menu appears.

-
Click Enable Connector.
Tenable Exposure Management updates the status of the connector to Enabled.
Delete a Connector
Required User Role: Administrator or Custom Role
You can remove connectors and their associated data from Tenable Exposure Management.
To delete a connector:
-
Navigate to the Connectors page.
-
In the table, next to the connector you want to delete, click the
button.A menu appears.
-
Click Delete Connector.
The connector row appears grayed out to indicate that the deletion process has started.
 Tip: For more information about deleting connectors, tags, and their data, see Deleted Connectors and Tags .