Configure the Tenable Data Collector App
Required User Role: Basic User
Note: The Tenable integration with Microsoft Sentinel works with a Basic User if that user is assigned Can View permissions on the assets they are to export, along with Can Use permissions on tags the assets are assigned. Without the Can Use tag permissions, the assets return undefined or the integration fails to export vulnerabilities if a tag filter is used. For more information on Tenable Vulnerability Management permissions and user roles, refer to Permissions in the Tenable Developer Portal.
You can configure the Microsoft Sentinel data collector to allow you to bring in Tenable Vulnerability Management assets and vulnerabilities into Sentinel for better risk management. This integration uses the Microsoft Sentinel data collector framework and Azure functions to collect and insert data into Sentinel.
Microsoft Sentinel is a scalable, cloud-native, security information event management (SIEM), and security orchestration automated response (SOAR) solution. For more information about Microsoft Sentinel, see the Microsoft documentation.
Before you begin:
-
The following requirements are essential for configuring all components:
-
Microsoft EntraID Application. The Azure account user must have an Application Developer or Application Owner role at subscription level to create Microsoft EntraID Application.
- A Logs Analytics Workspace with Microsoft Sentinel enabled in your Azure subscription.
-
Microsoft Sentinel Workspace
-
- For assistance with launching Microsoft Sentinel, see the Microsoft Sentinel quick start guide.
Note: The Microsoft Azure Sentinel integration does not export fixed vulnerabilities.
Data Connector Usage and Functionality
The Tenable VM Data Connector ingests following five types of data via various functions: Tenable VM Assets, Tenable VM Vulnerabilities, Tenable VM Compliance, Tenable WAS Assets, and Tenable WAS Vulnerabilities.
Based on the input you provide, the Function App fetches data periodically for the selected inputs from the Tenable platform. The collected data is then ingested into the MS Sentinel Tables. The following data types provide the flow of execution for all the functions (for asset type) and a similar flow is executed for all the other types of data.
-
TenableExportStarter
-
TenableExportOrchestrator
-
TenableStartAssetExportJob
-
TenableAssetExportStatusAndSendChunks
-
TenableAssetDownloadChunkOrchestrator
-
TenableAssetDownloadAndProcessChunks
Cleanup and stats functions running in the background:
-
TenableCleanUpOrchestrator
-
TenableGenerateJobStats
-
TenableCleanTables
Note: The Entra ID application generates two different Object IDs.
-
Sign in to the Azure Portal.
-
Search for and select Microsoft Entra ID.
-
In the left side menu, select Enterprise applications.
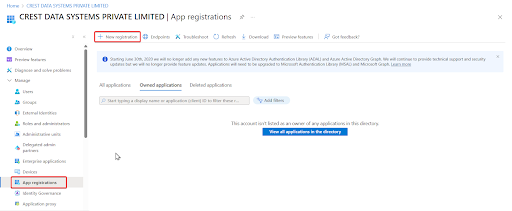
This integration requires an App Registration in the Azure Portal. To create a new application in Microsoft Entra ID:
Note: If you already have an application and have the Client ID and Client Secret ready, you can skip this section.
-
Sign in to the Azure Portal.
-
Search for and select Microsoft Entra ID.
-
Navigate to Manage, select App registrations.
-
Click New Registration.
-
Enter a Display Name for your application.
-
Click Register to complete the initial app registration.
Once the registration is complete, the Azure Portal displays the App Registration Overview pane. There you can find the Application (Client) ID and Tenant ID, both required as configuration parameters in the Tenable VM MS Sentinel Data Connector.
To create a new Client Secret (also known as an application password) for the Tenable VM MS Sentinel Data Connector:
-
Sign in to the Azure Portal.
-
Navigate to App registrations and select your application.
-
Go to Certificates & secrets > Client secrets > New client secret.
-
Enter a description for your client secret.
-
Choose an expiration period or specify a custom lifetime (maximum limit is 24 months).
-
To generate the client secret, Click Add.
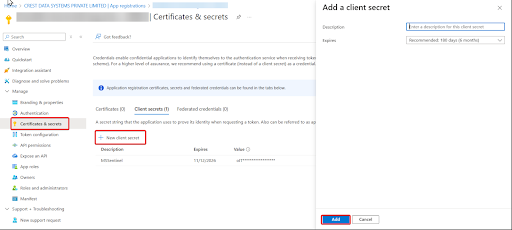
Note: Make sure to record the client secret's value, as it is notdisplayed again once you leave this page. The client secret value is a required configuration parameter for the Tenable VM MS Sentinel Data Connector.
-
Sign in to the Azure Portal.
-
Navigate to Microsoft Entra ID and click Enterprise applications.
-
From the list of applications, search for the application you created and click it.
The Client ID, Tenant ID and Entra Object ID appears in the window

-
Click the application.
-
On the overview page, copy the Object ID.
This is the “AzureEntraObjectId” needed for your ARM template role assignment.
-
Navigate to Resource Group and select your resource group.
-
In the left menu, click Access control (IAM).
-
Click Add.
-
Choose Add role assignment.
-
Select Microsoft Sentinel Contributor as the role.
-
Click Next.
-
In Assign access to, select User, Group, or Service Principal.
-
Click Add members.
-
Type the name of the application you created, and select it.
-
Click Review + assign.
A new window appears.
-
In the new window, again click Review + assign.
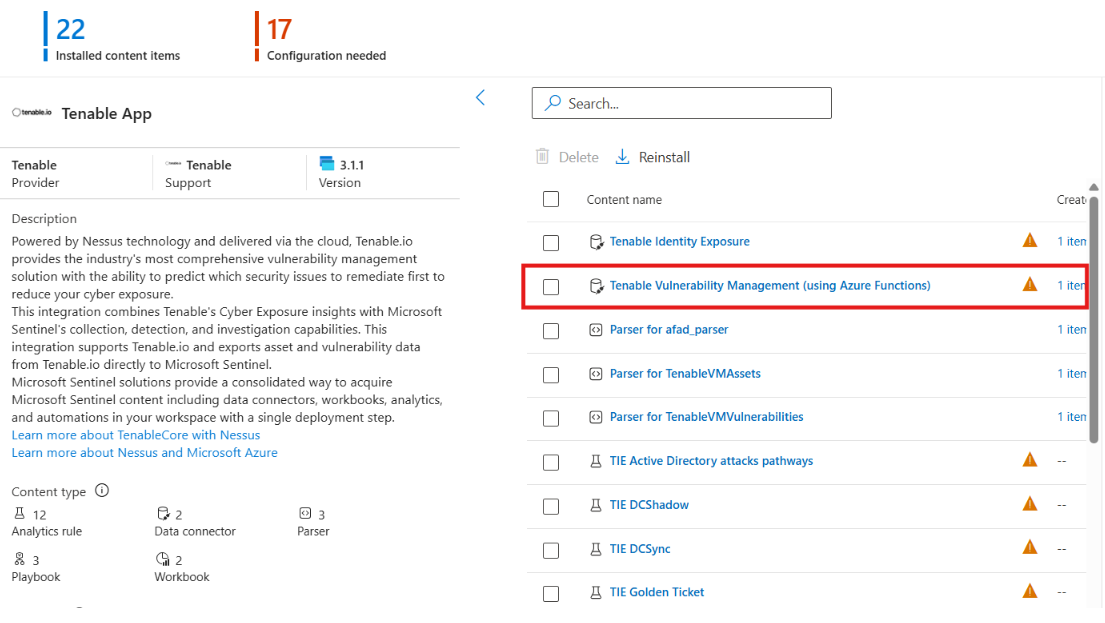
After clicking on the Manage button from the content hub in the Microsoft Azure portal, you get a list of Tenable Vulnerability Management Data Connectors in the solution.
-
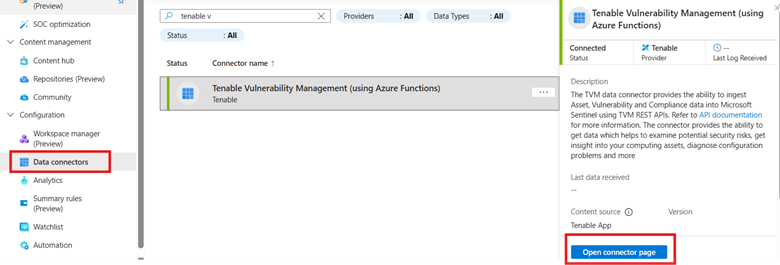
Go to Microsoft Sentinel, select the Workspace where the solution was installed,
-
Navigate to Data Connectors, search for "Tenable Vulnerability Management Data Connector."
-
Click Open Connector Page.
-
Scroll down the right-side section and click Deploy to Azure/Deploy to Azure Gov.
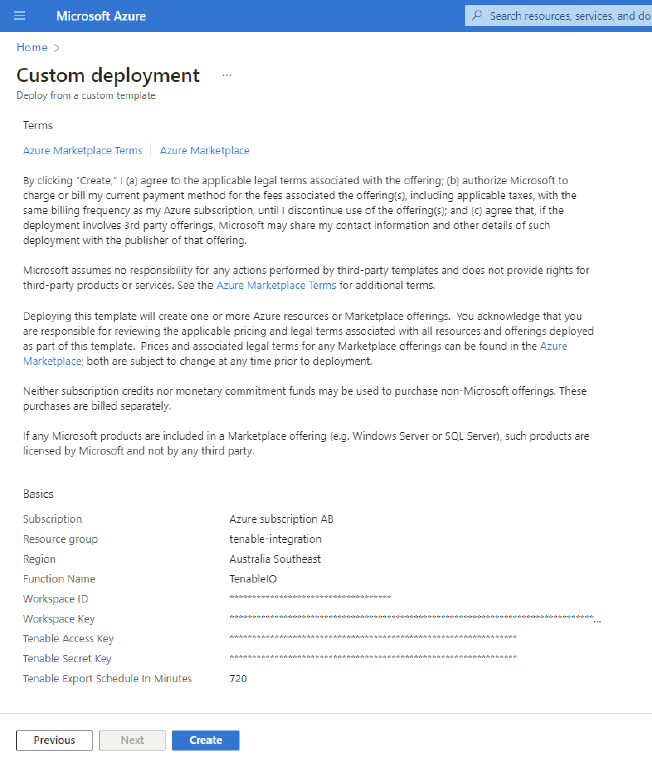
After clicking Deploy to Azure, you get a pop-up to Open external website?.
-
Click Yes.
You are redirected to the configuration screen for the Tenable Vulnerability Management Data Connector.
-
Once all fields have been populated, click Review + create.
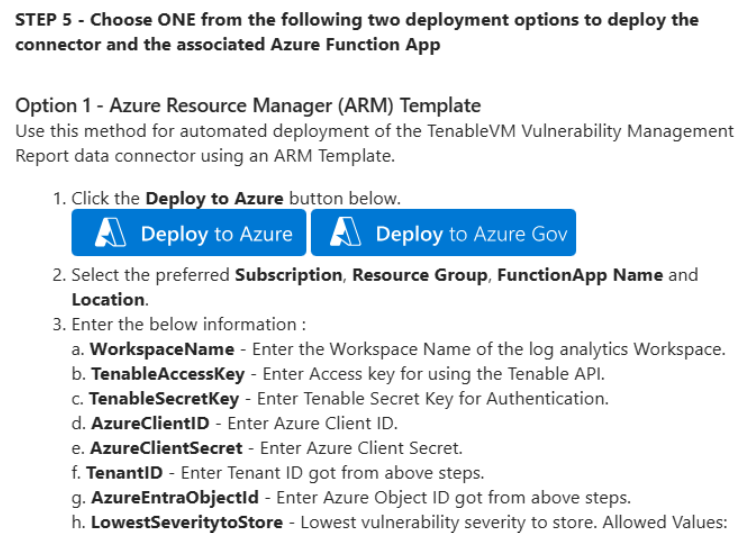
Parameter Name Description Resource Group
Resource group of your azure account in which you want to configure this data connector.
Function Name
Name of the Function App Name.
Note: Keep the default name
Workspace Name
Log analytics workspace name. Can be found under Log analytics > Settings.
Tenable Access Key
Access key for using the Tenable API.
Tenable Secret Key
Secret key for using the Tenable API.
Location
The location in which the data collection rules and data collection endpoints should be deployed.
Azure Client Id
Provide Azure Client Id that you created during App Registration in the Microsoft Entra ID.
Azure Client Secret
Provide the Azure Client Secret that you created when creating the client secret in the App Registered in the Microsoft Entra ID.
Tenant Id
Provide Tenant Id of your Microsoft Entra ID.
Azure Entra Object Id
Provide Object id of your Microsoft Entra App.
Lowest Severity to Store
The lowest vulnerability severity to store. If you select ANY, then the selected severity, and all greater severities are considered to collect vulnerability data.
Compliance Data Ingestion
Select true if you want to enable Compliance data ingestion from Tenable VM. (Default is false.)
WAS Asset Data Ingestion
Select true if you want to enable WAS Asset data ingestion from Tenable VM. (Default is false.)
WAS Vulnerability Data Ingestion
Select true if you want to enable WAS Vulnerability data ingestion from Tenable VM. (Default is false.)
Lowest Severity to Store for WAS
The lowest vulnerability severity to store for WAS. If you select ANY, then the selected severity, and all greater severities are considered to collect WAS Vuln data.
Tenable Export Schedule In Minutes
Schedule in minutes to create a new export job from Tenable VM.
Asset Table Name
Enter name of the table used to store Asset Data logs.
Note: Leaving this field empty causes a validation error.
Vuln Table Name
Enter name of the table used to store Vulnerability Data logs.
Note: Leaving this field empty causes a validation error.
Compliance Table Name
Enter name of the table used to store Compliance Data logs.
Note: Leaving this field empty causes a validation error.
WAS Asset Table Name
Enter name of the table used to store WAS Asset Data logs.
Note: Leaving this field empty causes a validation error.
WAS Vuln Table Name
Enter name of the table used to store WAS Vulnerability Data logs.
Note: Leaving this field empty causes a validation error.
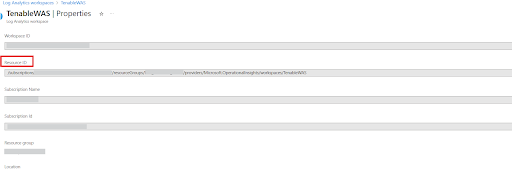
App Insights Workspace Resource ID
Migrate Classic Application Insights to Log Analytic Workspace (going end-of life by 29 February 2024). Use the Log Analytic Workspace > Properties setting with the Resource ID property value. This is a fully qualified resourceId in the following format: '/subscriptions/{subscriptionId}/resourceGroups/{resourceGroupName}/providers/Microsoft.OperationalInsights/workspaces/{workspaceName}
You can find AppInsightsWorkspaceResourceID in your Log Analytics Workspace under Properties.
-
The fields are finalized. Click Create.
-
Once the deployment has been completed, click Go to Resource Group to see the resources that have been created.
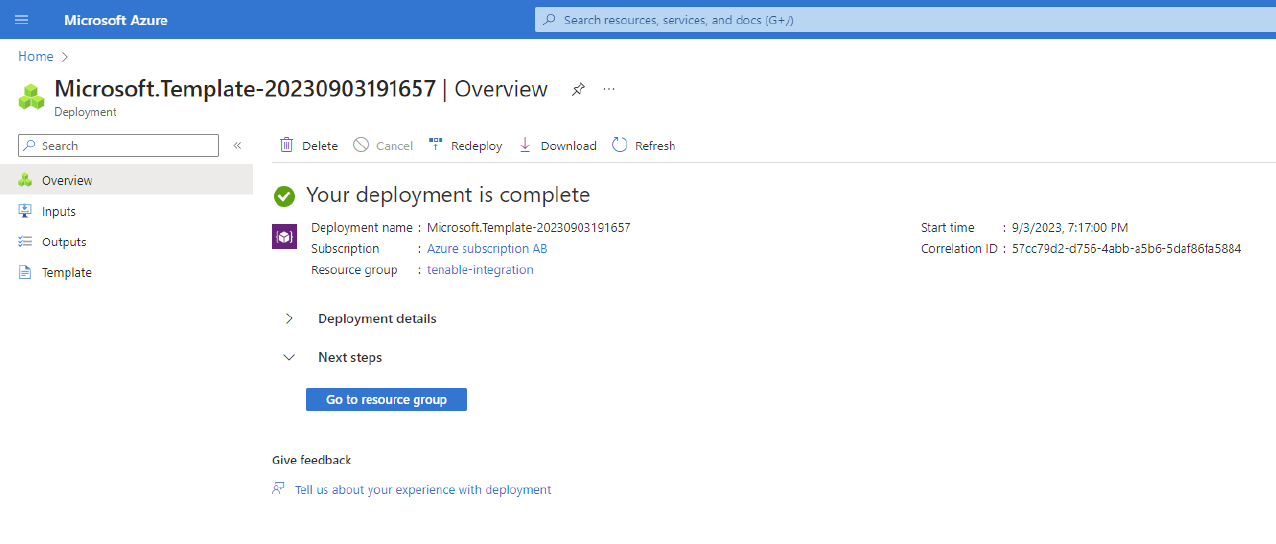
The Data Connector is now available under Function App.
-
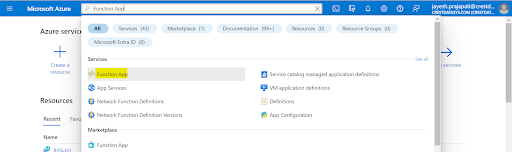
Navigate to Function App by searching for it in the search box.
-
Locate the installed Function App using the name provided during configuration.

-
Click the Tenable Function App.
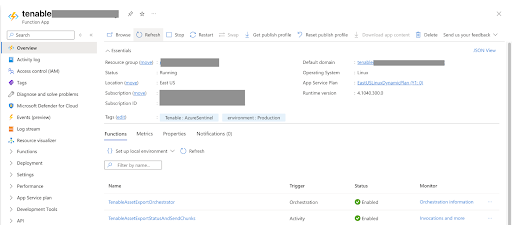
The associated Azure Functions responsible for ingesting data into Microsoft Sentinel appear.
Once the integration is set up, data starts flowing into Microsoft Sentinel through the configured Function App. You can view this data in the Log Analytics Workspace tables specified during setup or use the parsers deployed during installation.