Install the Tenable App for Microsoft Sentinel
Required User Role: Basic User
Note: The Tenable integration with Microsoft Sentinel works with a Basic User if that user is assigned Can View permissions on the assets they are to export, along with Can Use permissions on tags the assets are assigned. Without the Can Use tag permissions, the assets return undefined or the integration fails to export vulnerabilities if a tag filter is used. For more information on Tenable Vulnerability Management permissions and user roles, refer to Permissions in the Tenable Developer Portal.
The Tenable App for Microsoft Sentinel combines Tenable's Cyber Exposure insights with Sentinel's collection, detection, and investigation capabilities. This integration supports Tenable Vulnerability Management and exports asset and vulnerability data from Tenable Vulnerability Management directly to Microsoft Sentinel.
Microsoft Sentinel is a scalable, cloud-native, security information event management (SIEM), and security orchestration automated response (SOAR) solution. For more information about Microsoft Sentinel, see the Microsoft documentation.
Before you begin:
- You must have a Logs Analytics Workspace with Microsoft Sentinel enabled in your Azure subscription.
- For assistance with launching Microsoft Sentinel, see the Microsoft Sentinel quick start guide.
-
Resource Group (This requires Microsoft Sentinel Contributor Role at Subscription Level.)
Caution: Important Note for Upgrading to Tenable App Version 3.1.0. If you have previously configured an older version of the Tenable App in your Microsoft Sentinel environment and now wish to upgrade to the latest version (v3.1.0), Tenable recommends that you delete the existing Function App and associated resources before proceeding.
Caution:Tenable recommends you deploy the latest version of the Tenable App (v3.1.0) in a new Microsoft Sentinel workspace rather than upgrading the existing one. Version 3.1.0 supports the Log Ingestion API, which requires the use of Data Collection Rules (DCR) and Data Collection Endpoints (DCE). Since table names are tied to specific DCRs, the tables used in the previous app version cannot be reused.
Why is this necessary?
Version 3.1.0 introduces integration with the Log Ingestion API, which relies on Data Collection Rules (DCR) and Data Collection Endpoints (DCE) to ingest data into the Microsoft Sentinel workspace. In this new architecture:
-
The data tables are tightly coupled with DCRs.
-
Existing table names from older versions cannot be reused due to these structural dependencies.
As a result, you must create a new Microsoft Sentinel workspace to properly configure and deploy the Tenable App v3.1.0.
(If upgrading to v3.1.0) Delete the existing Function App and associated resources:
-
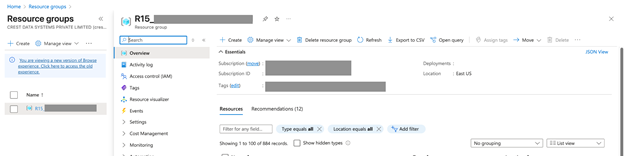
In the Azure portal, navigate to Resource Group and select your resource group in which the existing function app is deployed.
-
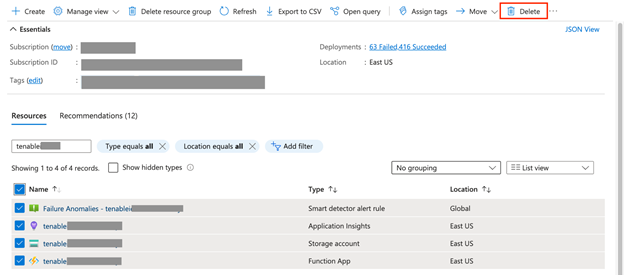
In the Resources section search for the currently running Tenable function app name and select all the resources for that function app.
-
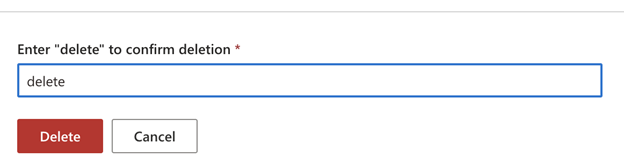
After clicking on the delete button, the portal requests confirmation. Type "delete" in the textbox and click on the delete button.
Note: For more information, refer to the Microsoft documentation.