Locations Settings and Actions
The following is a comprehensive guide of Locations and their available settings, settings, and actions in the user interface. This is intended for the more advanced user looking for additional features for their setup.
Note: If you'd like to learn more about how to use these, please contact our Tenable Customer Support Team. For more general information regarding Locations, refer to Locations.
Location settings
When creating or editing a new Location, you will need to configure the following settings and settings:
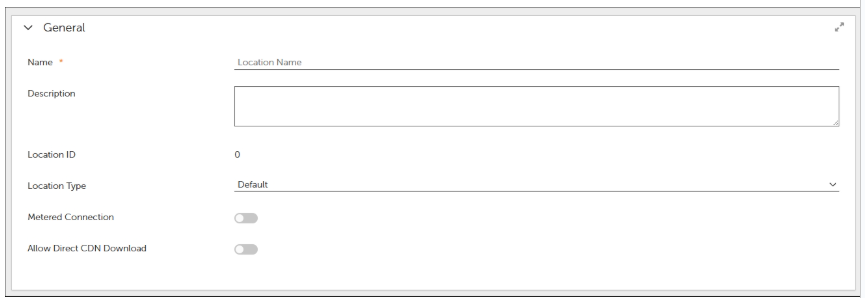
General Settings
-
Name: This text field allows you to specify a name for the Location
-
Description:
This text field allows you to optionally add a description for the Location.
-
Location ID: This is assigned to the Location dynamically by the Tenable Patch Server. When creating a new Location, this shows as 0 until the Location is saved, then it is allocated a unique ID.
-
Location Type: This setting affects the behavior of how clients communicate within the Location. For more information regarding the Location Types, see the Location Types section.
The options for this setting are:
-
Default
-
VPN
-
WiFi
-
-
Metered Connection: Defines a Location and subnet range or ranges as metered. This setting allows you to create policies that restrict WAN downloads from clients that are on metered connections. This policy setting can be configured within the System Configuration Perspective within the policy set: Contentsystem / No WAN download on metered connection.
-
Allow Direct CDN Download: It allows an office to exit the hierarchy and go directly to the internet to download content. This may come from the Content Delivery Network (CDN) or from another client on the internet. Clients in this office will prefer content from an internet-based peer first. If no peers are available the content will be downloaded from the Tenable Patch CDN. If that is also unavailable, the content will be downloaded via the office hierarchy, going to the parent office and eventually to the Central office to get the content.
You'll want to use this when your VPN subnet is split-tunnel capable or if your remote office also has its own internet connection. This will help to reduce traffic on the corporate WAN network connection.
Address Range
This is a table of IP address ranges, denoted by starting IP address and ending IP address. You'll want to set your address range for your Location's specific subnet.
Note: A subnet should be no larger than \24 (255.255.255.0).
Topology settings
This setting allows you to browse and select a Parent Location.
For more information regarding how to set up your network topology, refer to Network Topology.
Location actions
You can perform actions on a Location by clicking the ellipsis (...) under Actions, next to the Location in the results pane. These actions include:

-
Edit: This action allows you to edit an existing Location:
-
Click Edit to open the Location context menu lets you change various settings for the Location. Note that you cannot change the Location ID, which is the object ID in the database and was generated upon creation.
-
The Location name can be renamed.
-
The Parent Location can be changed to move the Location within the hierarchy.
-
To move the Location, click on Browse and check the box next to the new parent Location and click on OK. Or, you can create a new Location by clicking on + Create new Location to use as your Parent Location.
-
-
Rename: Allows you to rename an existing Location's settings.
-
Save As: Allows you to save a copy of an existing Location and its settings. However, this is not recommended. If a Location is created with an IP range(s) and a copy is made, you receive an error for overlapping IP ranges.
-
Delete: Click Delete to delete the selected Location. ALL child Locations are automatically deleted when deleting a Parent Location. Once a Location is deleted, the IP range(s) defined within the Location are also deleted. Any clients which were reporting from the Location will become NO OFFICE clients if Auto-Location creation is turned off or a new Location will be auto-created the next time the client checks in if Auto-Location creation is turned on.
-
Export: By default this is disabled and is only supported using the import/export Workflow. Contact Tenable Customer Support for more information.
-
Show References: This opens an Object References overlay and show you a tree hierarchy of where your Location is referenced in places like Parent Locations and Groups.
-
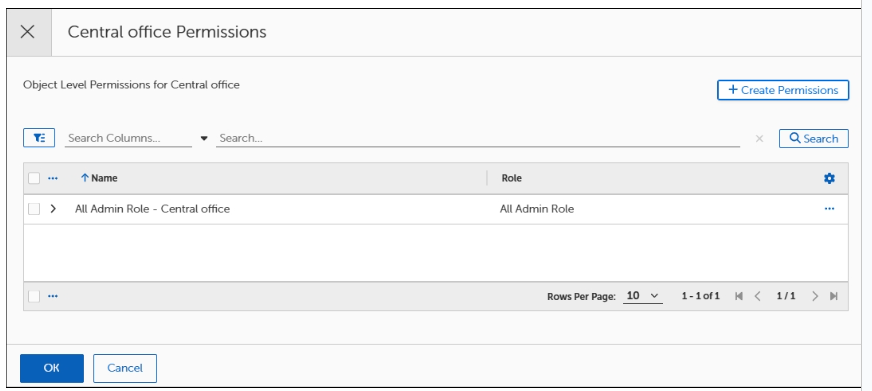
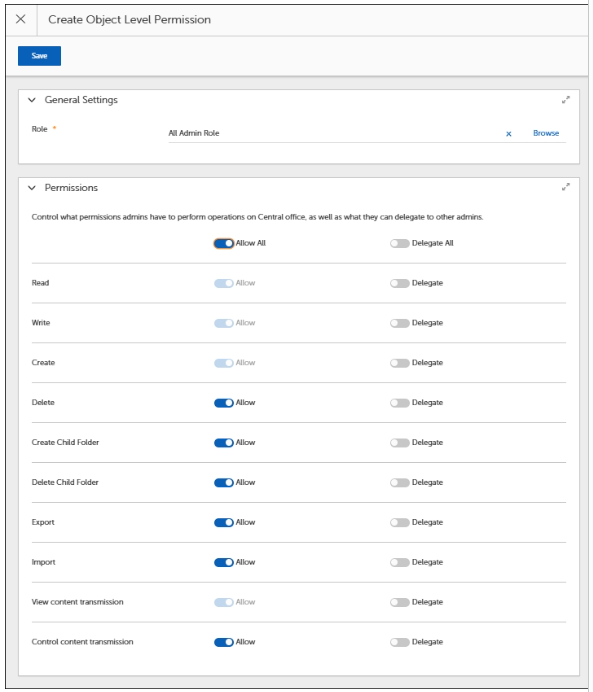
Manage Permissions: Manage Permissions settings allow you to manage permissions for specific Locations. This opens a Location Permissions overlay where you can view, edit, and create new permissions based on Roles. Steps to perform are:
-
Click Create Permissions.
-
In General Settings, click Browse.
-
Select a Role.
-
In Permissions, toggle ON/OFF permissions
-
Click Save.
-
-
Create Child Office: Allows you to create a new Location with the Parent Location setting prepopulated with the selected Parent Location.
-
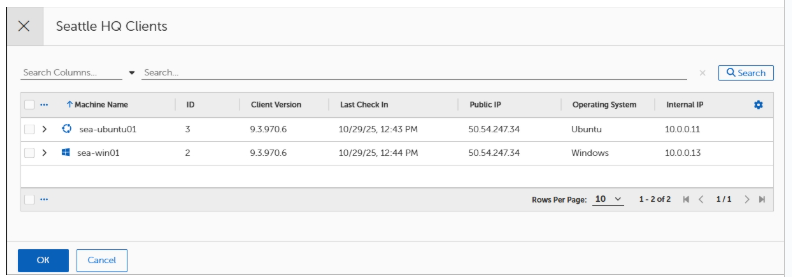
View Clients: Click the name of any Location from the Locations table to view their associated Clients. The Device overlay will open showing the list of machine names associated with the Location. The devices can be sorted by clicking the column headers (the Last Logged In and Public IP columns are not sortable). One important reason to view the device list is to determine which client is functioning as the RVP on a given subnet.
-
Sync Policies: This immediately syncs all Clients associated with a Location. This is useful after creating a new Location and wanting to manually sync instead of waiting for the Scheduling Settings sync time frames.
Multi-select Location actions
-
Merge Offices: To merge or move Locations, you must check the box next to the Location(s) and then click the ellipsis (...) beneath it.
-
Click Merge Offices to select a target Location to merge the selected Location into.
The IP Address Range(s) of the selected Location is added to the target Location and then be deleted.
The Location Type(Default, VPN, WiFi) of the target Location remains unchanged.
-
-
Move Offices: Click Move Offices to select a new Parent Location for the selected Location.
-
Sync Policies on Selected: This immediately syncs all Clients in selected Locations.
'More' dropdown actions
-
Show No Office Clients: This displays an overlay of clients that are not associated with any Location. This applies when a client device is removed from a Location or a Location is deleted.
-
Auto Location Creation: Auto Location gets created when Tenable Patch clients communicate with the server without belonging to any existing Location. For more information regarding Auto Location, refer to Enabling Auto Location.
-
On-Premises Client Detection (SaaS Only): For more information regarding On-Premises Client Detection, refer to On-Premises Client Detection in SaaS.