Upload a Custom Server Certificate
If you do not want to use the Tenable-provided server certificate, you can upload a custom server certificate to Tenable Core. For more information, see Manage the Server Certificate.
You cannot upload multiple custom server certificates to Tenable Core. Uploading a new file replaces the existing file.
Tip: By default, Tenable Core uses the same certificates for Tenable Core as well as Tenable Nessus.
Before you begin:
- Confirm your custom server certificate and key files use the *.der, *.pem, or *.crt extension.
- Move the custom server certificate and key files to a location accessible from your browser.
To upload a custom server certificate for Tenable Core:
-
Log in to Tenable Core via the user interface, as described in Log In to Tenable Core.
The Tenable Core web user interface page appears.
-
In the left navigation pane, click SSL/TLS Certificates.
The SSL/TLS Certificates page appears.
- Click the System Certificate tab.
-
(Optional) If uploading a custom certificate for an installed application instead of for your Tenable Core user interface, click the tab for your application.

Note: You may need to restart your application. For more information, refer to Start, Stop, or Restart Your Application.
-
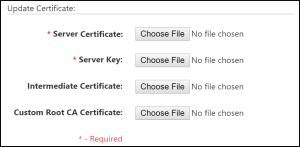
Locate the Update Certificate section in the SERVER CERTIFICATES section.
-
Provide your Server Certificate.
-
Click Choose File.
The upload window appears.
-
Browse to and select the file.
Tenable Core loads the file.
-
-
Provide your Server Key.
-
Click Choose File.
The upload window appears.
-
Browse to and select the file.
Tenable Core loads the file.
-
-
(Optional) If your custom server certificate is signed by a custom CA that requires an intermediate certificate to validate the custom server certificate, provide your Intermediate Certificate.
-
Click Choose File.
The upload window appears.
-
Browse to and select the file.
Tenable Core loads the file.
-
-
(Optional) If your custom server certificate is signed by a custom CA, upload your Custom Root CA Certificate.
-
Click Choose File.
The upload window appears.
-
Browse to and select the file.
Tenable Core loads the file.
-
-
Click Install Server Certificates.
Tenable Core uploads the files. A success message appears to confirm the upload succeeded.
-
In the left navigation pane, click Services.
The Services page appears.
-
Restart the Cockpit service, as described in Manage Services.
The Cockpit service restarts and enables the new certificate.
-
Restart any applications the certificate is synced to.
Note: If you do not restart your Tenable Core applications (for example, Security Center or Tenable Nessus) the new certificate may not be present.

