Configure Jira
Required User Role: Administrator
Before you can create Jira tickets within Tenable Vulnerability Management, you must configure your Jira account.
Prerequisites
Before you create tickets within Jira via Tenable products, you must:
-
Have a Jira user with the following permissions:
Tip: In Jira, navigate to Settings > System > Admin Helper > Permission Helper to confirm or provision permissions for the user.Jira Permission
Purpose in Exposure Response Custom Context Atlassian Documentation "ASSIGNABLE_USER" User Validation Ensures the dedicated integration user is a valid assignee within the project, which is often a prerequisite for using "ASSIGN_ISSUES". Assignable User Permissions "ASSIGN_ISSUES" Work Assignment Allows the integration to assign the newly created ticket to the designated user or group specified in the Initiative configuration. Assign Issues Permissions "BROWSE_PROJECTS" Visibility Allows the integration to read and confirm the existence of the configured Jira project and its Issue Types. Browse Projects Permissions "CREATE_ISSUES" Ticket Creation Required to automatically generate new tickets for findings that match the Initiative's criteria (the "combination").
Create Issues Permissions "EDIT_ISSUES" Status Synchronization Enables Tenable to update key fields, push risk data (like VPR), and change the ticket status (e.g., from Resolved to Resurfaced). Edit Issues Permissions "LINK_ISSUES" Audit Trail Creates the essential link between the Tenable finding and the corresponding Jira ticket, enabling the Ticket Log functionality. Link Issues Permissions "MODIFY_REPORTER" Ticket Creation Required to automatically generate new tickets for findings that match the initiative's criteria. Browse Project Permissions "USER_PICKER" Ticket Creation Often referred to as Browse Users or similar, this option allows a user to search for and select other users or groups from a directory. Browse Project Permissions -
Have a Jira project with the following fields enabled for issues:
Important: For the configuration to function as expected, you must:- Have at least one Jira project
- Ensure your Jira project allows tickets to be transitioned to the Done status
-
"priority",
-
"assignee",
-
"labels",
-
"summary",
-
"description",
-
"issuetype",
-
"parent",
-
"project",
-
"reporter" — To use this field, the user must also have the "MODIFY_REPORTER" permission enabled.
-
Perform the steps to configure Jira for use with the Tenable One Platform.
Configure the Integration
Before you create an initiative, you must first configure a connection between Jira and Tenable Vulnerability Management.
To configure Jira issue creation in Tenable Vulnerability Management:
-
In the left navigation, click
 Settings.
The Settings page appears.
- Click on the
 Jira Cloud tile.

The Jira Connector page appears.
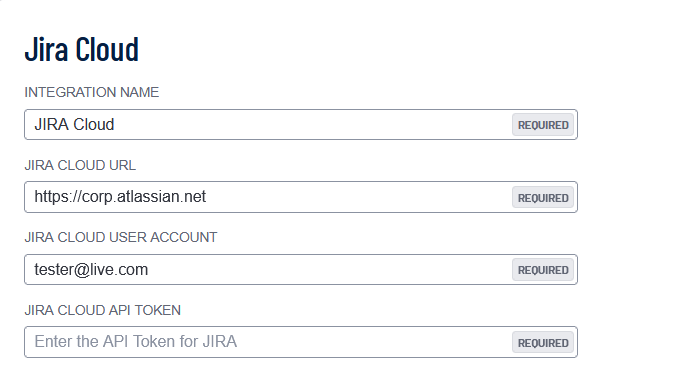
- Configure the following Jira Cloud Credentials:
- To test the connection, click Connect.

Once Tenable validates the integration connectivity, a Connection was Successful notification appears.
Important! You must successfully connect the integration before you can proceed.
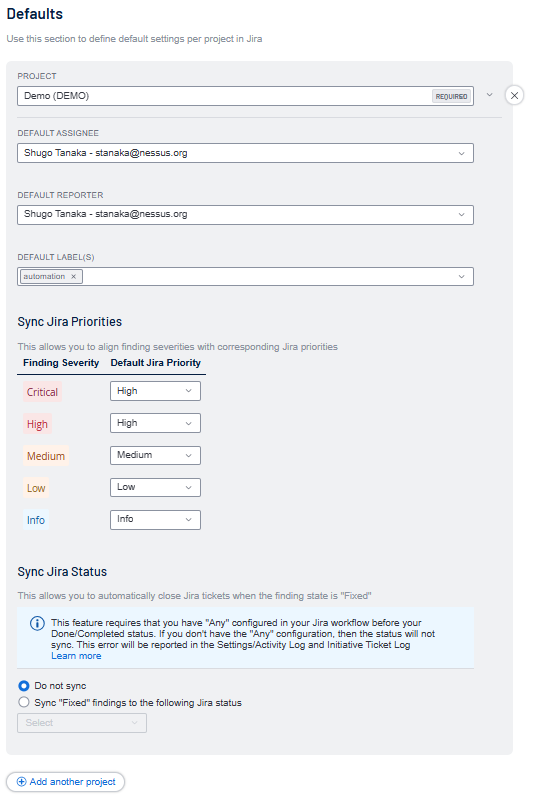
- Configure the following default values for each Jira project:
- To set default values for additional Jira projects, click
 Add Another Project.
 - Click Save.
| Option | Description |
|---|---|
| Integration Name | Choose your own Jira integration name. |
| Jira Cloud URL | The unique web address for your organization's instance of Jira Cloud, typically formatted as https://[your-company-name].atlassian.net. |
| Jira Cloud User Account |
Your individual credentials (email and password) used to authenticate and access your organization's Jira Cloud site. |
| Jira Cloud API Token |
Your API key or token for authenticated access to the Jira Cloud API. |
| Option | Description |
|---|---|
| Project | The Jira Project name that these options relate to. |
| Default Assignee | Assign a user as a default assignee from the drop-down list. |
| Default Reporter | Assign a default reporter value from the drop-down list. |
| Default Label(s) | Labels from your project that you want to use within Tenable Vulnerability Management. |
| Sync Jira Priorities |
Create a mapping of Tenable finding severities (for example, Critical, High, Medium, Low, Info) to Jira Priorities (for example, Highest, High. Lowest). |
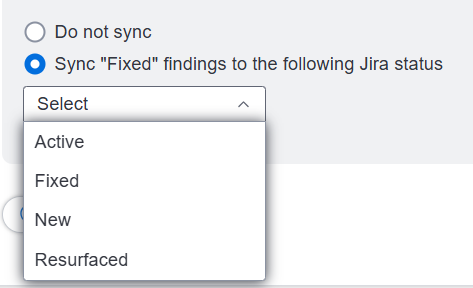
| Sync Jira Status |
Automatically close Jira tickets when the associated finding state is Fixed. Select the Sync "Fixed" findings to the following Jira status radio button and, from the drop-down menu, select the Jira status you to which you want to sync the fixed findings.
Important! For this feature to work as expected, you must configure the Any > Done/Completed status within your Jira workflow. If the status sync is incomplete or unsuccessful, an error message appears in the Activity Log and the Ticket Log section of the Finding Details page. For more information, see Add Statuses to a Jira Workflow.
|