Create an Exposure Response Initiative
Required User Role: Basic, Scan Operator, Standard, Scan Manager, or Administrator
In the Exposure Response section, you create initiatives, which are projects to address vulnerabilities in your environment. In initiatives, you track specific findings using combinations and apply asset tags to choose the assets in scope. You can then assign initiatives to your team, set SLAs (Service Level Agreements), generate tickets, and track progress using remediation scan results. Tenable calls this process mobilization. Ticket statuses are bi-directional and therefore update dynamically between Tenable One Vulnerability Management and the selected ticketing system.
Example Initiative
To address recently exploited vulnerabilities on your Headquarters network, you might create an initiative as follows:
-
Name — Recently exploited vulnerabilities at HQ
-
Asset Scope — Network: HQ
-
Owner — [email protected]
-
Remediate Within — 7 days
-
Combinations — Category is equal to Recently Actively Exploited AND VPR is greater than 6

Before You Begin
Before you create an initiative:
-
Create asset tags — Initiatives use asset tags to define the assets in scope. Create any asset tags you plan to use for your initiative.
-
(Optional) Create custom combinations — If you plan to use custom combinations, create them via the Manage Combinations tab.
-
Configure the appropriate ticketing system for use with Tenable One Vulnerability Management:
Create a New Initiative
Create Initiatives in Seconds with Tenable Hexa AI
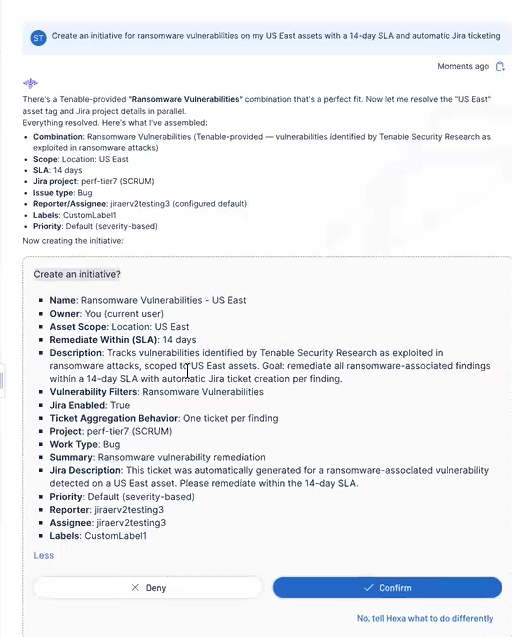
Did you know that you can use Tenable Hexa AI to create an initiative for you? Simply click the ![]() button in the upper-right corner of any page to open the Hexa AI panel.
button in the upper-right corner of any page to open the Hexa AI panel.
For example, you can ask Tenable Hexa AI to create an initiative based on specific vulnerabilities:
For more information about using Tenable Hexa AI, see the following topics:
Manually Create an Initiative
To create an initiative based off of a finding:
-
In the left navigation, click
 Exposure Response.
The Exposure Response page appears. By default, the
 Initiatives tab is active.
 -
In the My Initiatives section, click the
 button.
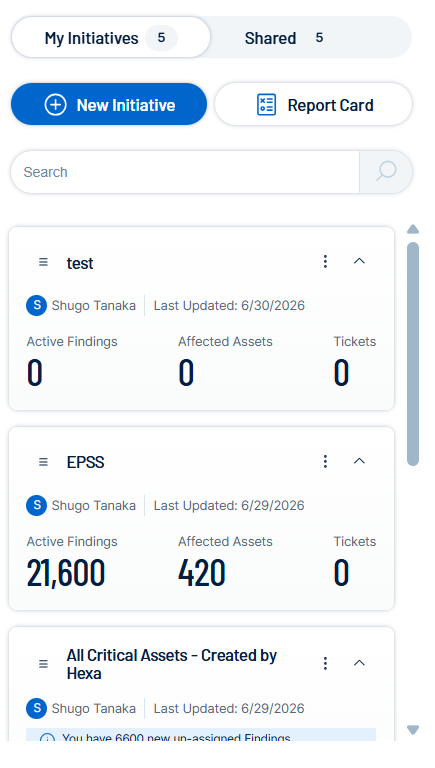
The Create an Exposure Response Initiative pane appears.
-
On the Basic Setup tab, configure the following options:
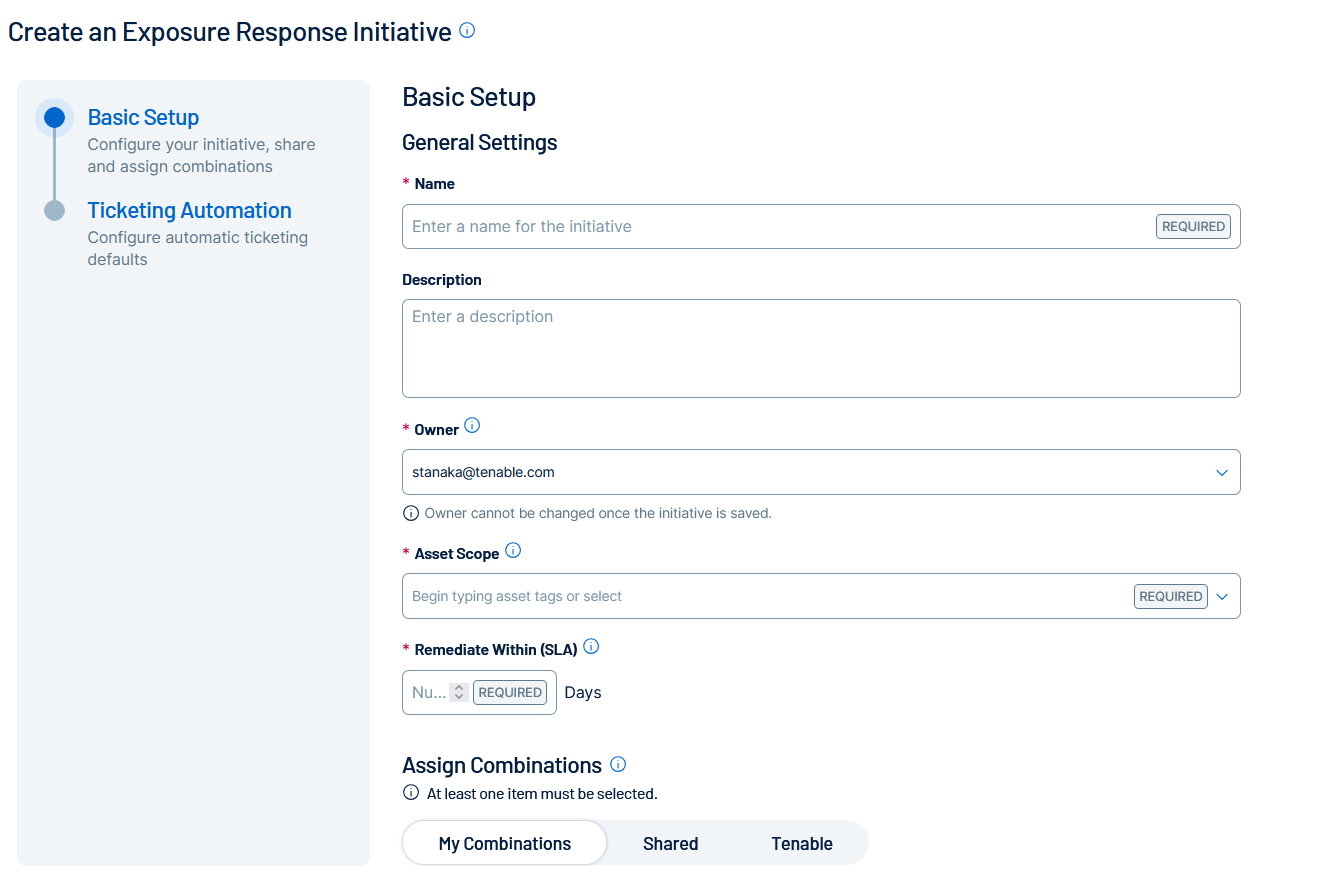
Option Description Name (required) Type a name for the initiative. Description Type a description for the initiative, for example Reduce my external attack surface. Owner Select the initiative owner from a list of Tenable One Vulnerability Management users. You cannot reassign initiatives once you create them.
Note: Only administrators and initiative owners can view initiatives.Asset Scope (required) Choose up to ten tags to define which assets in your environment are in scope. Search for and select tags to assign, for example Priority: High or Software: Oracle. Remediate Within (SLA) (required) Choose an SLA, in days, by which all findings require remediation. For example, to set an SLA of one week, type 7. Assign Combinations Select up to ten combinations from the available tabs:
-
My Combinations — Your personal combinations, which only you can view. You cannot assign personal combinations to initiatives you do not own.
-
Shared — Organization-wide combinations, which anyone can view or use, and which your administrators and the combination owners can update. Track updates in the
 Combination Timeline.
 -
Tenable — Predefined combinations from the Tenable Research Team. These may be updated infrequently, which can change the resources in your initiatives. Track updates in the
Combination Timeline.
-
- Click the Ticketing Automation tab.Important! The Ticketing Automation options are only available for Administrator users. For more information, see Roles.
The Setup Delivery Methods appear.
- Do one of the following:
- To configure Jira ticketing automation:
- Click Jira.
Note: You must first configure Jira for use with Tenable One Vulnerability Management. For more information, see Configure Jira.
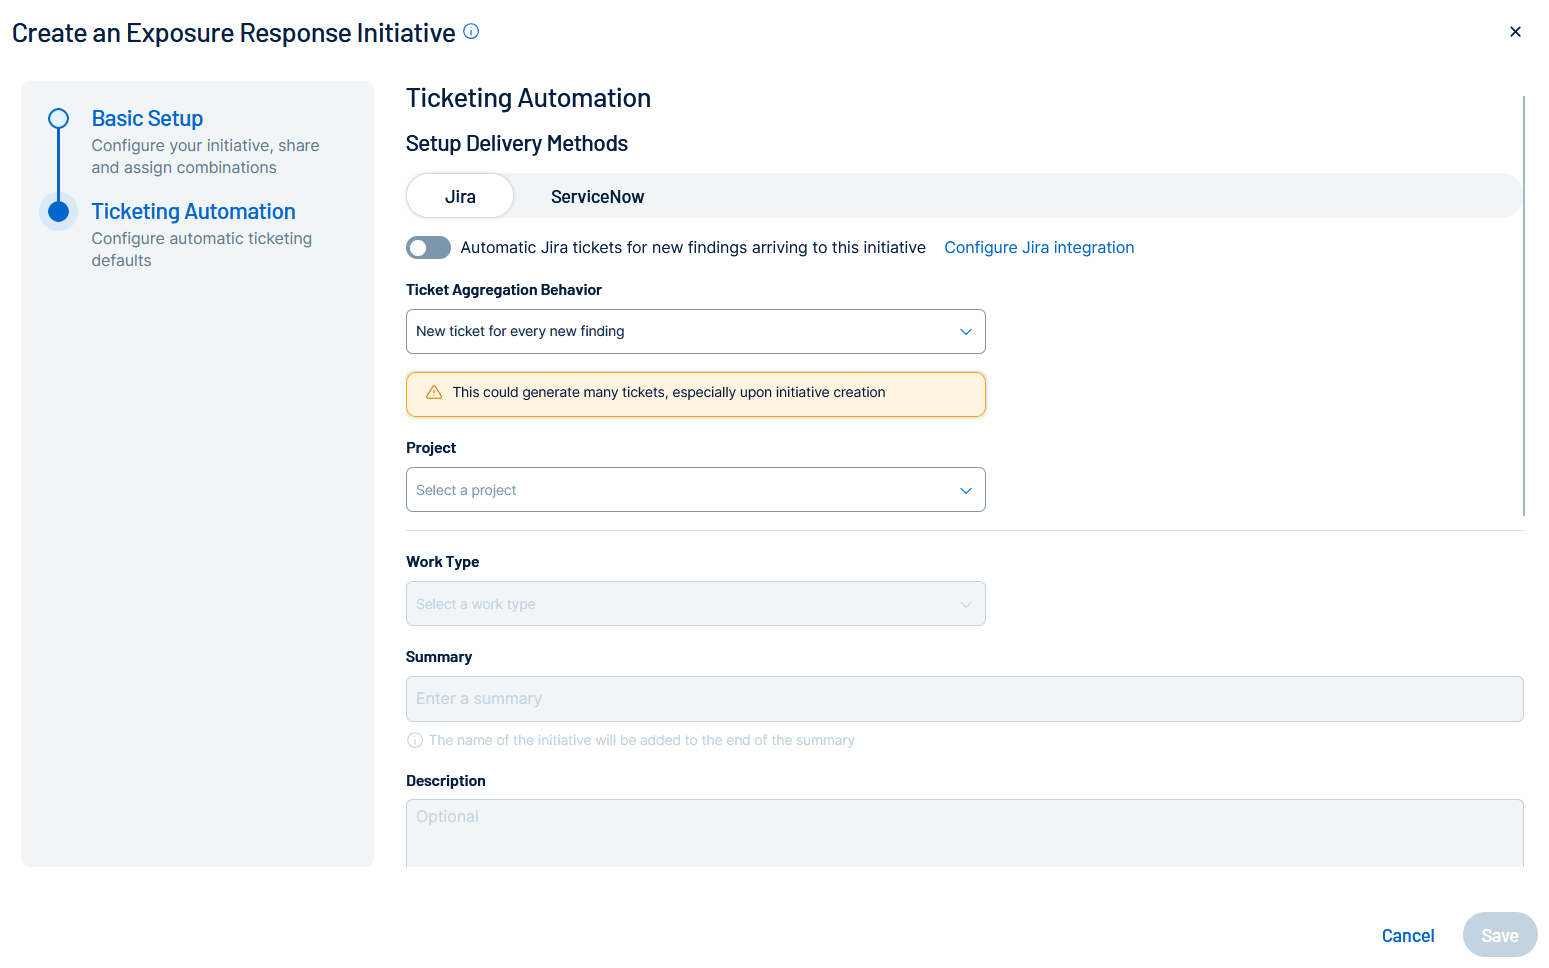
Jira ticketing configuration options appear.
Configure the following options:
Option Description Ticket Aggregation Behavior Select how you want Tenable One Vulnerability Management to aggregate tickets for the finding:
New ticket for every new finding — Every time a finding appears, a new ticket gets created in Jira.
New findings create subtasks on an existing ticket — Every time a finding appears, a subtask gets created on an existing Jira ticket.
Existing Jira Ticket (optional) Select the existing Jira ticket from the drop-down list.
Note: You see this option only if you choose New findings create subtasks on an existing ticket.Project The Jira project in which you want tickets to be created.
Important: You must have at least one Jira project for the configuration to function as expected.Work Type The specific type of issue created, for example, Story, Task, or Bug. Summary The Jira Summary combines the finding name, asset name, and this text to create a descriptive ticket title. Description A detailed explanation of the issue, context, and steps to reproduce (if applicable). Priority The relative importance or severity of the issue. Default value: Default Mapping.
Note: Leave this set to Default Mapping to allow the priority to be set by the finding severity based on your Jira instance configuration. For more information about overriding this severity, see Configure Jira.Reporter The user who created the issue and submitted it to the project. Assignee The user to which the ticket or subtask is assigned in Jira. Parent The larger issue (for example, an Epic) under which the current item is nested. Labels Custom tags you want to apply to the ticket for flexible categorization and filtering.
- Click Jira.
- To configure ServiceNow ticketing automation:
- Click ServiceNow.
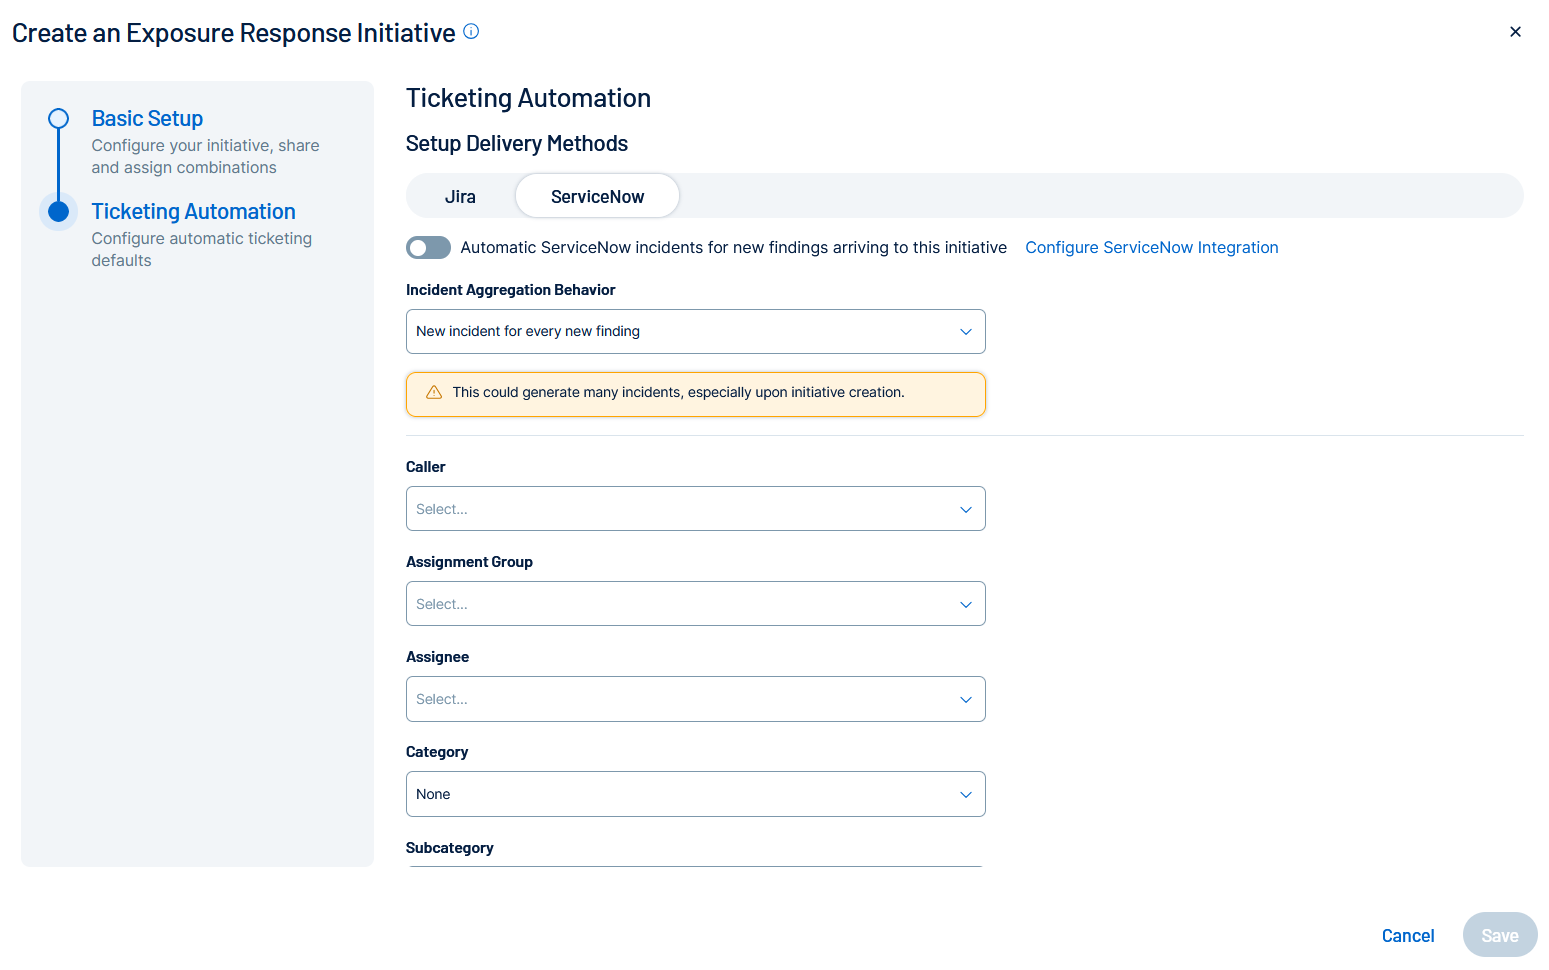
ServiceNow ticketing configuration options appear.
Note: You must first configure ServiceNow for use with Tenable One Vulnerability Management. For more information, see Configure ServiceNow. Configure the following options:
Option Description Incident Aggregation Behavior Select one of these two options:
New incident for every new finding
Every time a finding appears, a new incident gets created in ServiceNow.
New findings create child incidents on an existing parent
Every time a finding appears, a child incident gets created on an existing ServiceNow parent incident.
Existing ServiceNow Incident (optional) Select the existing ServiceNow incident from the drop-down list.
Note: You see this option only if you choose New findings create subtasks on an existing incident.Caller The user who originally reported or requested the issue. Assignment Group The team or group responsible for managing and resolving the ticket. Assignee The individual user currently responsible for resolving the ticket. Category A high-level classification of the issue or request, for example, Hardware, Network, Software. Subcategory A more detailed breakdown within the selected Category, for example, Laptop, Wireless, OS. Impact The measured effect this issue has on the business process or service. Values are Default, High, Medium or Low.
Note: Set this to Default to allow the finding severity to set the impact based on your ServiceNow instance configuration. For more information on overriding this setting, see Configure ServiceNow.Urgency The speed required to resolve the issue, based on business needs. Values are Default, High, Medium or Low. Note: Set this to Default to allow the urgency to be set by the finding severity based on your ServiceNow instance configuration. For more information on overriding this setting, see Configure ServiceNow.Tags Any tags or labels you want to apply to the incident. Short Description This value is appended to the name of the finding. Description Additional descriptive information for this incident.
- Click ServiceNow.
- To configure Jira ticketing automation:
-
Click Save.
The initiative appears in the My Initiatives panel. It can take up to 10 minutes to see the updated ticket information in both Tenable One Vulnerability Management and the selected ticketing system.