Navigate Tenable Vulnerability Management
Tenable Vulnerability Management includes several helpful shortcuts and tools that highlight important information and help you to navigate the user interface more efficiently:
Quick Actions Menu
The quick actions menu displays a list of the most commonly performed actions.
To access the quick actions menu:
- In the upper-right corner, click the
 Quick Actions button.
The quick actions menu appears.
-
Click a link to begin one of the listed actions.
Resource Center
The Resource Center displays a list of informational resources including product announcements, Tenable blog posts, and user guide documentation.
To access the Resource Center:
- In the upper-right corner, click the
 button.
The Resource Center menu appears.
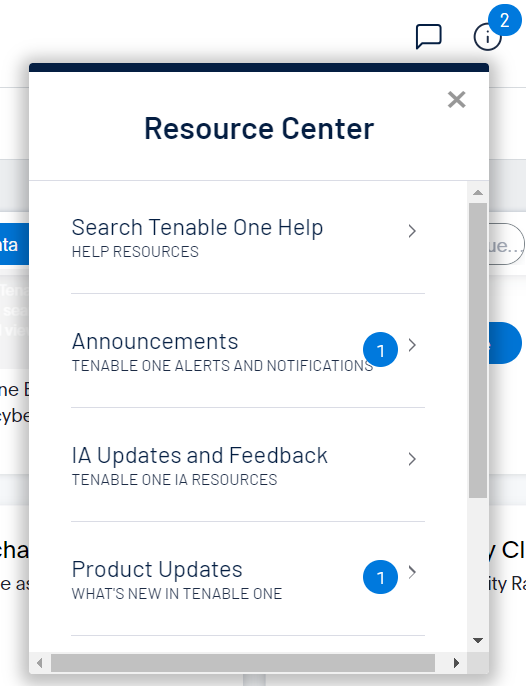
-
Click a resource link to navigate to that resource.
Notifications
In Tenable Vulnerability Management, the Notifications panel displays a list of system notifications. The  button shows the current number of unseen notifications. When you open the Notifications panel, Tenable Vulnerability Management marks those notifications as seen. Once you have seen a notification, you can clear it to remove it from the Notifications panel.
Note:Tenable Vulnerability Management groups similar notifications together.
To view notifications:
- In the upper-right corner, click the button.
The Notifications panel appears and displays a list of system notifications.
In the Notifications panel, you can do the following:
To clear one notification, next to the notification, click the
 button.
To expand a group of notifications, at the bottom of the grouped notification, click More Notifications.
To collapse an expanded group of notifications, at the top of the expanded notifications, click Show Less.
To clear an expanded group of notifications, at the top of the expanded notifications, click Clear Group.
To clear all notifications, at the bottom of the panel, click Clear All.
Settings
Click the  button to navigate directly to the Settings page, where you can configure your system settings.
Workspace
When you log in to Tenable, the Workspace page appears by default. On the Workspace page, you can switch between your Tenable applications or set a default application to skip the Workspace page in the future. You can also switch between your applications from the Workspace menu, which appears in the top navigation bar.
Open the Workspace Menu
To open the Workspace menu:
-
From any Tenable application, in the upper-right corner, click the
 button.
The Workspace menu appears.
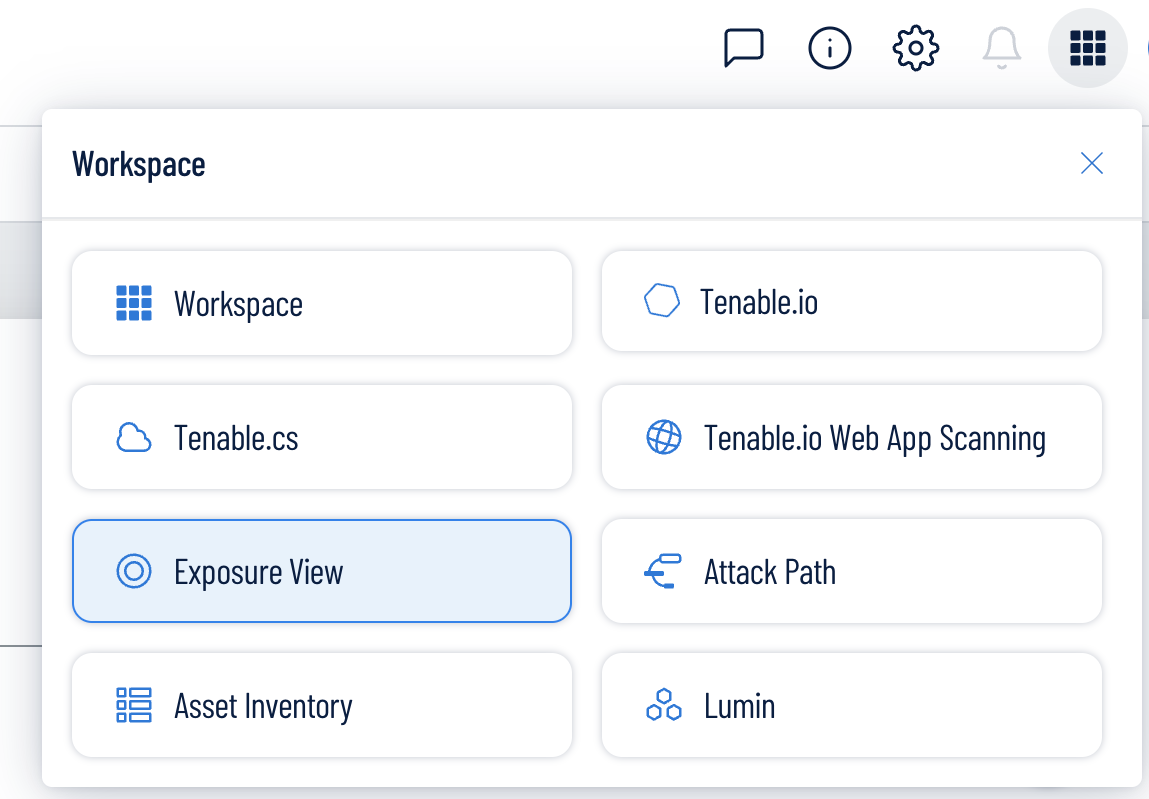
-
Click an application tile to open it.
View the Workspace Page
To view the Workspace page:
-
From any Tenable application, in the upper-right corner, click the
 button.
The Workspace menu appears.
-
In the Workspace menu, click Workspaces.
The Workspace page appears.

On the Workspace page, you can do the following:
-
Where applicable, at the bottom of a tile, view the percentage of your license utilization for the application. Click See More to navigate directly to the License Information page for the selected application.
Tip: For more information on how Tenable licenses work and how assets or resources are licensed in each product, see Licensing Tenable Products. -
Set a default application:
When you log in to Tenable, the Workspace page appears by default. However, you can set a default application to skip the Workspace page in the future.
By default, users with the Administrator, Scan Manager, Scan Operator, Standard, and Basic roles can set a default application. If you have another role, contact your administrator and request the Manage permission under My Account. For more information, see Custom Roles.To set a default login application:
-
In the top-right corner of the application to choose, click the
 button.
 A menu appears.
-
In the menu, click Make Default Login Page.
This application now appears when you log in.
-
-
Remove a Default Application:
To remove a default login application:
-
In the top-right corner of the application to remove, click the
button. A menu appears.
-
Click Remove Default Login Page.
The Workspace page now appears when you log in.
-
-
Request Access to a Tenable application:
Some applications, like Tenable Identity Exposure, require you to request access to the application. You can do this directly via the Workspace page.
To request access to a Tenable application:
-
In the lower-right corner of the tile, click Request.

You navigate directly to the request page for the selected application.
-
User Account Menu
The user account menu provides several quick actions for your user account.
To access the user account menu:
- In the upper-right corner, click the blue user circle.
The user account menu appears.
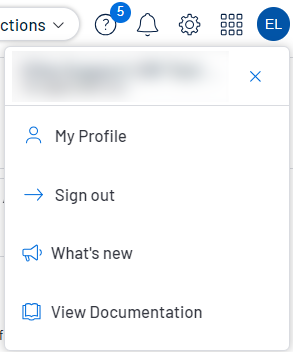
- Do one of the following:
- Click My Profile to configure your own user account. You navigate directly to the My Account settings page.
- Click Sign out to sign out of Tenable Vulnerability Management.
- Click What's new to navigate directly to the Tenable Vulnerability Management Release Notes.
- Click View Documentation to navigate directly to the Tenable Vulnerability Management User Guide documentation.
- Click My Profile to configure your own user account. You navigate directly to the My Account settings page.
For additional information about navigating the Tenable Vulnerability Management interface, see the following topics: