Get Started with Role-Based Access Control
Role-based access control (RBAC) lets administrators define who can access the platform, what data they can see, and what actions they can perform. By combining roles, permissions, and tags, you can logically segment your vulnerability data to match your organization's team structure, geographic boundaries, or regulatory requirements.
This topic explains the RBAC model, describes each component, and walks you through the recommended setup sequence. For guidance on maintaining and optimizing your RBAC configuration over time, see Best Practices for Tenable Role-Based Access Control (RBAC).
How RBAC Works
Roles vs. Permissions: What Is the Difference?
RBAC in Tenable One Vulnerability Management is built on three distinct, complementary components:
- Roles — Control what actions a user can perform and which product modules they can access. A role determines whether a user can create a scan, manage credentials, or administer users.
- Permissions — Control which assets a user can view and access in the platform. Permissions are always scoped to assets defined by a tag. A permission determines whether a user can view the assets tagged
Region:EMEAin the asset inventory and scan results.Note: Permissions scope data visibility — they do not prevent a user from manually entering an IP address outside their permitted tag scope when configuring or launching a scan. - Tags — Define the asset scope that a permission applies to. Tags are key-value pairs assigned to assets and are the mechanism that drives data segmentation.
A useful shorthand: a role answers "what can this user do?" while a permission answers "which assets can they see and access in the platform?"
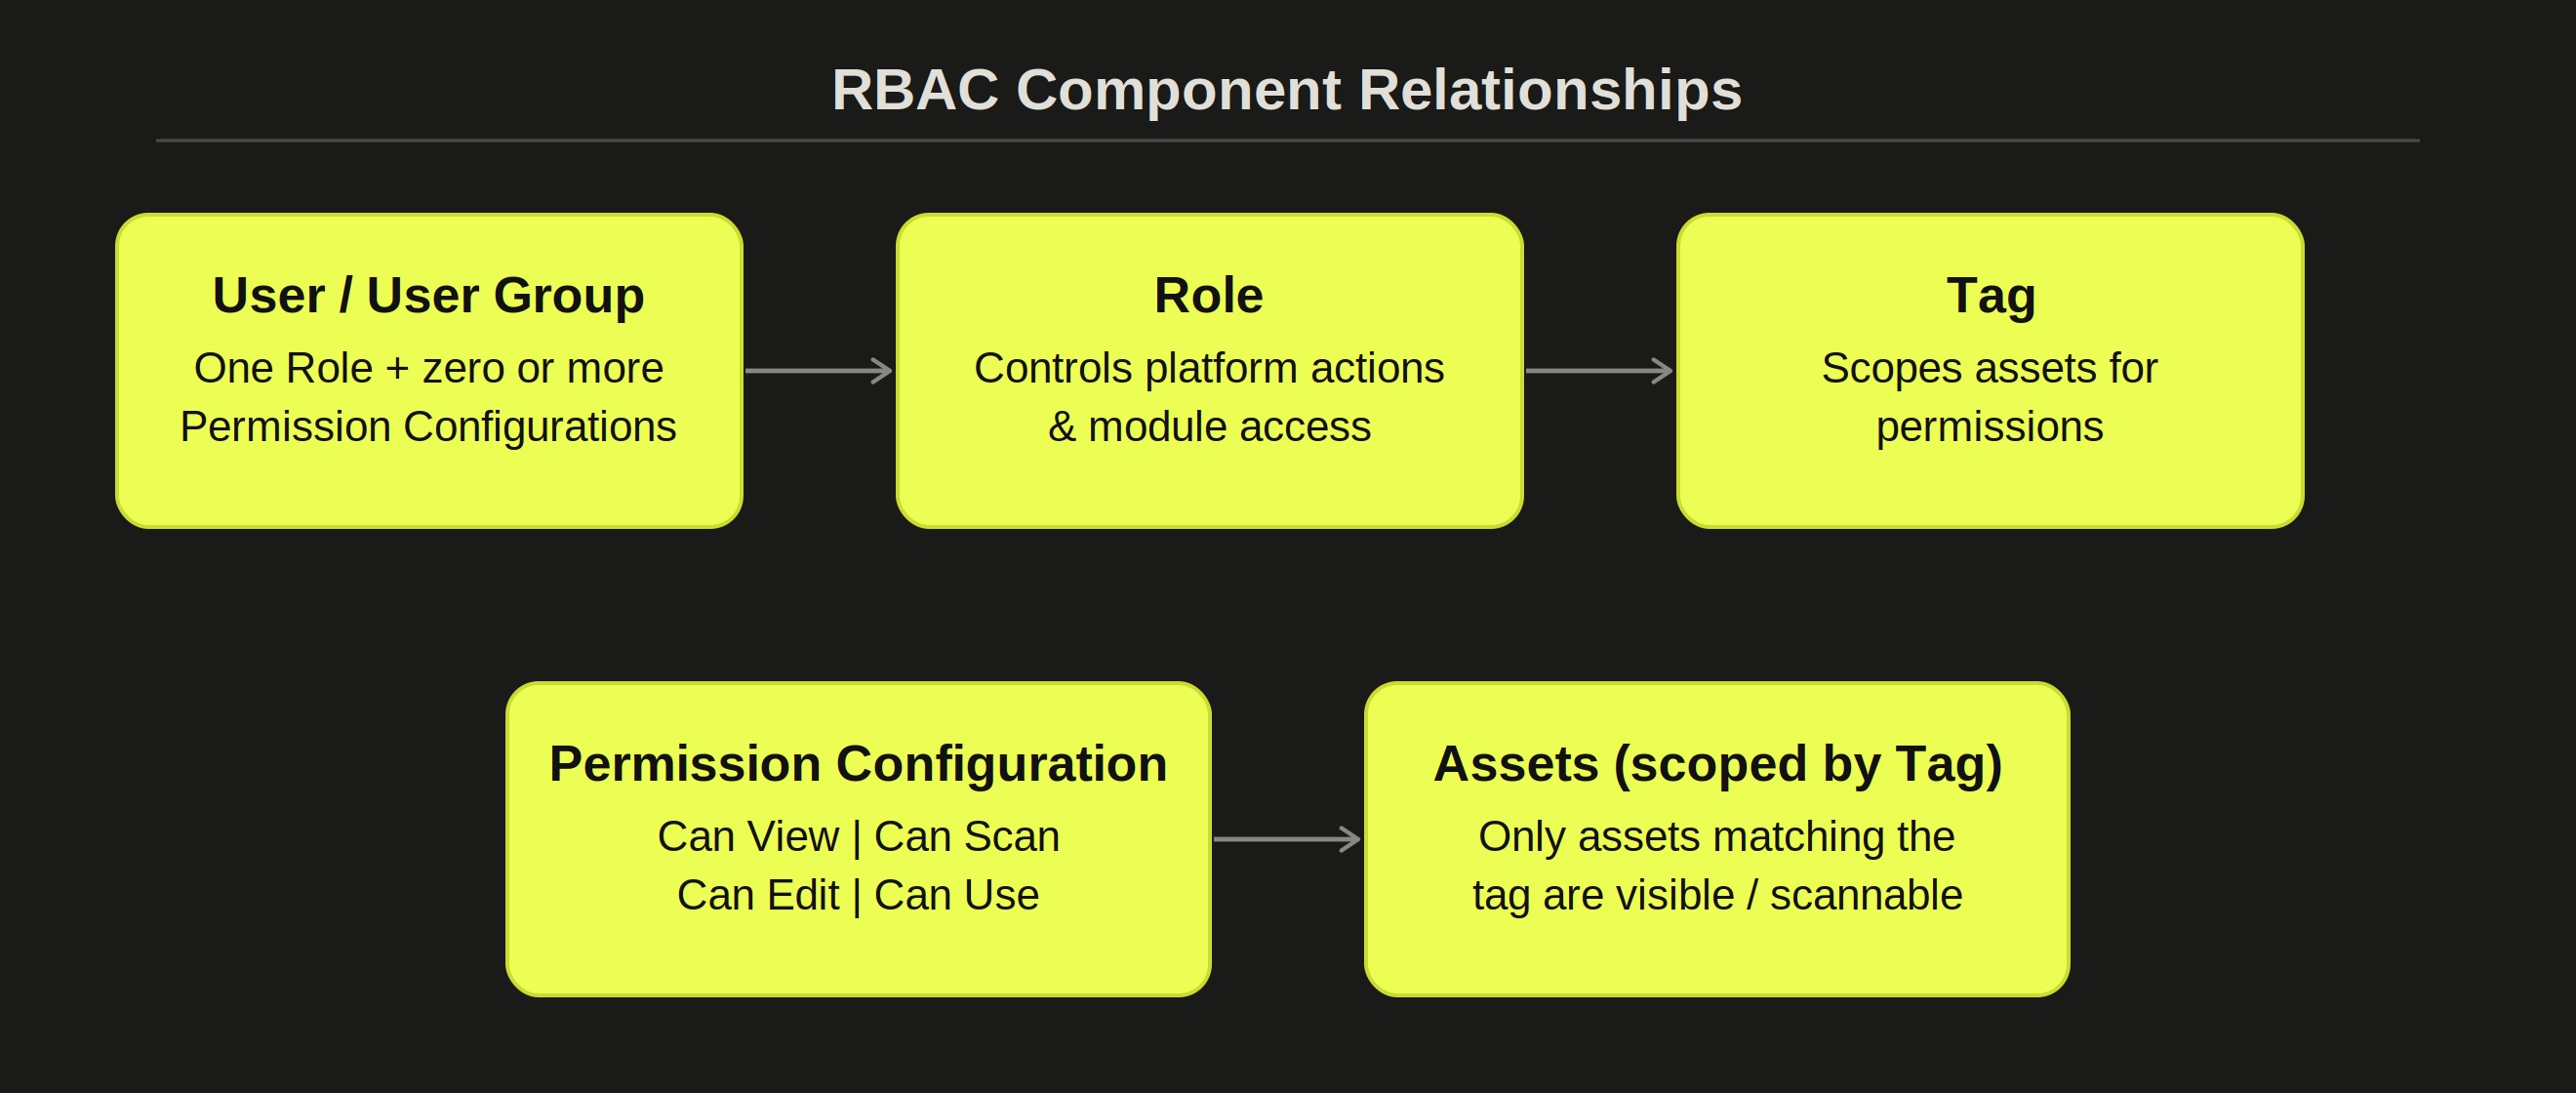
Component Relationships
The following diagram shows how Users, Roles, Groups, Permissions, Tags, and Assets relate to one another:
Tenable-Provided Roles
When you create a user, you must assign exactly one role. This role determines the functions and modules available to that user. The following Tenable-provided roles are available, ordered from least to most privileged:
| Role | Typical User | Key Capabilities |
|---|---|---|
| Read-Only | Auditors, compliance officers, executives | View dashboards, reports, and findings. Cannot create, edit, delete, or run scans. |
| Basic | Remediation team members with limited access | Run and view scans assigned to them. Cannot configure the platform or manage users. |
| Scan Operator | Network operations staff, junior analysts | Launch, pause, stop, and review scans. Cannot create scan policies or manage global settings. |
| Standard | Security analysts, vulnerability engineers | Create and manage scans. Generate reports. No administrator-level platform control. |
| Scan Manager | Senior analysts, scan team leads | Full scan management including scan policies and credentials. No user management. |
| Administrator | Platform owners, security architects | Full access to all functions, including user management and system configuration. Full and implicit object permissions. |
For a complete reference of role privileges, see Tenable-Provided Roles and Privileges.
Custom Roles
When your organization's workflows don't map neatly to a Tenable-provided role, custom roles let you define exactly what a user can and cannot do — for example, create scans but not delete them, or view reports but not modify scan policies. Before creating a custom role, consider:
- Which areas of the product should the user have access to?
- Within each area, which parts of the navigation can the user access?
- Within the navigation, what actions can the user take?
When creating a custom role, you must include Read privileges for the General Settings, License, and My Account sections. Without these, users assigned to the role cannot log in.
For more information, see Custom Role Privilege Application.
Permission Configurations
A permission configuration defines what a user or group can do with a specific set of assets. It combines a permission type, an asset scope defined by one or more tags, and one or more users or user groups.
The following permission types are available:
| Permission | What it allows | Tag interaction | Recommended use |
|---|---|---|---|
| Can View | Read-only visibility into assets, scan results, and reports. | See the assets. | Auditors, compliance staff, remediation stakeholders. |
| Can Scan | Execute and manage scans. The asset must be discovered and tagged before it can be scanned. | Scan the asset. Asset must be discovered and tagged first. | Teams that need to run scans without managing policies. |
| Can Edit | Modify and manage objects: scan settings, asset group definitions, report templates. | Edit the tag definition or rule. Change static assignments. | Analysts managing scan configurations. Use with caution. |
| Can Use | Apply an existing object (scan policy, report template) without modifying it. | See the tag. Filter by tag. | Users leveraging shared configurations without changing them. |
Important! Consider the following caveats:
-
The Can Scan permission controls whether a user has permission to interact with assets that carry a given tag. It does not enforce a hard network boundary — a user with scan launch privileges can still manually enter an IP address that falls outside their permitted tag scope and successfully run a scan against it.
-
Adding Can Edit to a permission configuration alongside Can View or Can Scan allows the assigned users to change the scope of the assets they can view and scan. Tenable recommends combining Can Edit with Can View or Can Scan only for administrator users.
-
You can assign a permission configuration directly to a user or to a group. When a scan runs, Tenable One Vulnerability Management evaluates target permissions based on the scan owner's permissions, not the user who launched the scan.
For more information, see Permissions in the Tenable One Vulnerability Management User Guide.
Tags and Asset Scoping
Tags are the foundation of data segmentation in Tenable One Vulnerability Management. Each tag is a key-value pair — for example, Region:EMEA or Team:CloudOps — that you assign to one or more assets. When you reference a tag in a permission configuration, only assets matching that tag fall within the permission scope.
Tenable recommends using tag automation rules wherever possible to keep tags current as assets are added, modified, or decommissioned.
User Groups
User groups let you manage permission configurations for multiple users at once. When you assign users to a group, those users inherit all permissions assigned to the group. A group is a collection of permissions — assigning permissions to groups rather than individuals is the recommended approach for managing access at scale.
Common grouping strategies include organizing by geography (for example, US-East, EMEA, APAC), business unit (Finance, Engineering, HR), asset type (Databases, Web Servers, Workstations), or criticality (Production, Development, DMZ).
Recommended Setup Sequence
Complete the following steps in order when configuring RBAC for the first time, or when making significant changes to your access model:
- Plan your access model — Map your teams and assets. Identify who needs to see what.
- Create tags — Tag assets to define the scopes your permission configurations will use.
- Create user groups (optional) — Group users who share the same permission needs.
- Create users — Add users and assign each one a role (Tenable-provided or custom).
- Create permission configurations — Combine permission type + tag scope + users/groups.
- Assign permissions — Associate permission configurations with users or groups.
- Validate access — Log in as a test user to verify the correct data and functions are available.
Configure RBAC: Step-by-Step
Step 1 — Define User Roles and Responsibilities
The first step in a strong RBAC implementation is deciding what level of access each type of user needs. In Tenable One Vulnerability Management, roles broadly determine the actions a user can perform — such as managing users, configuring scans, or viewing vulnerability data. Tenable recommends starting with preconfigured roles where possible, and creating custom roles only when the preconfigured options do not meet your needs.
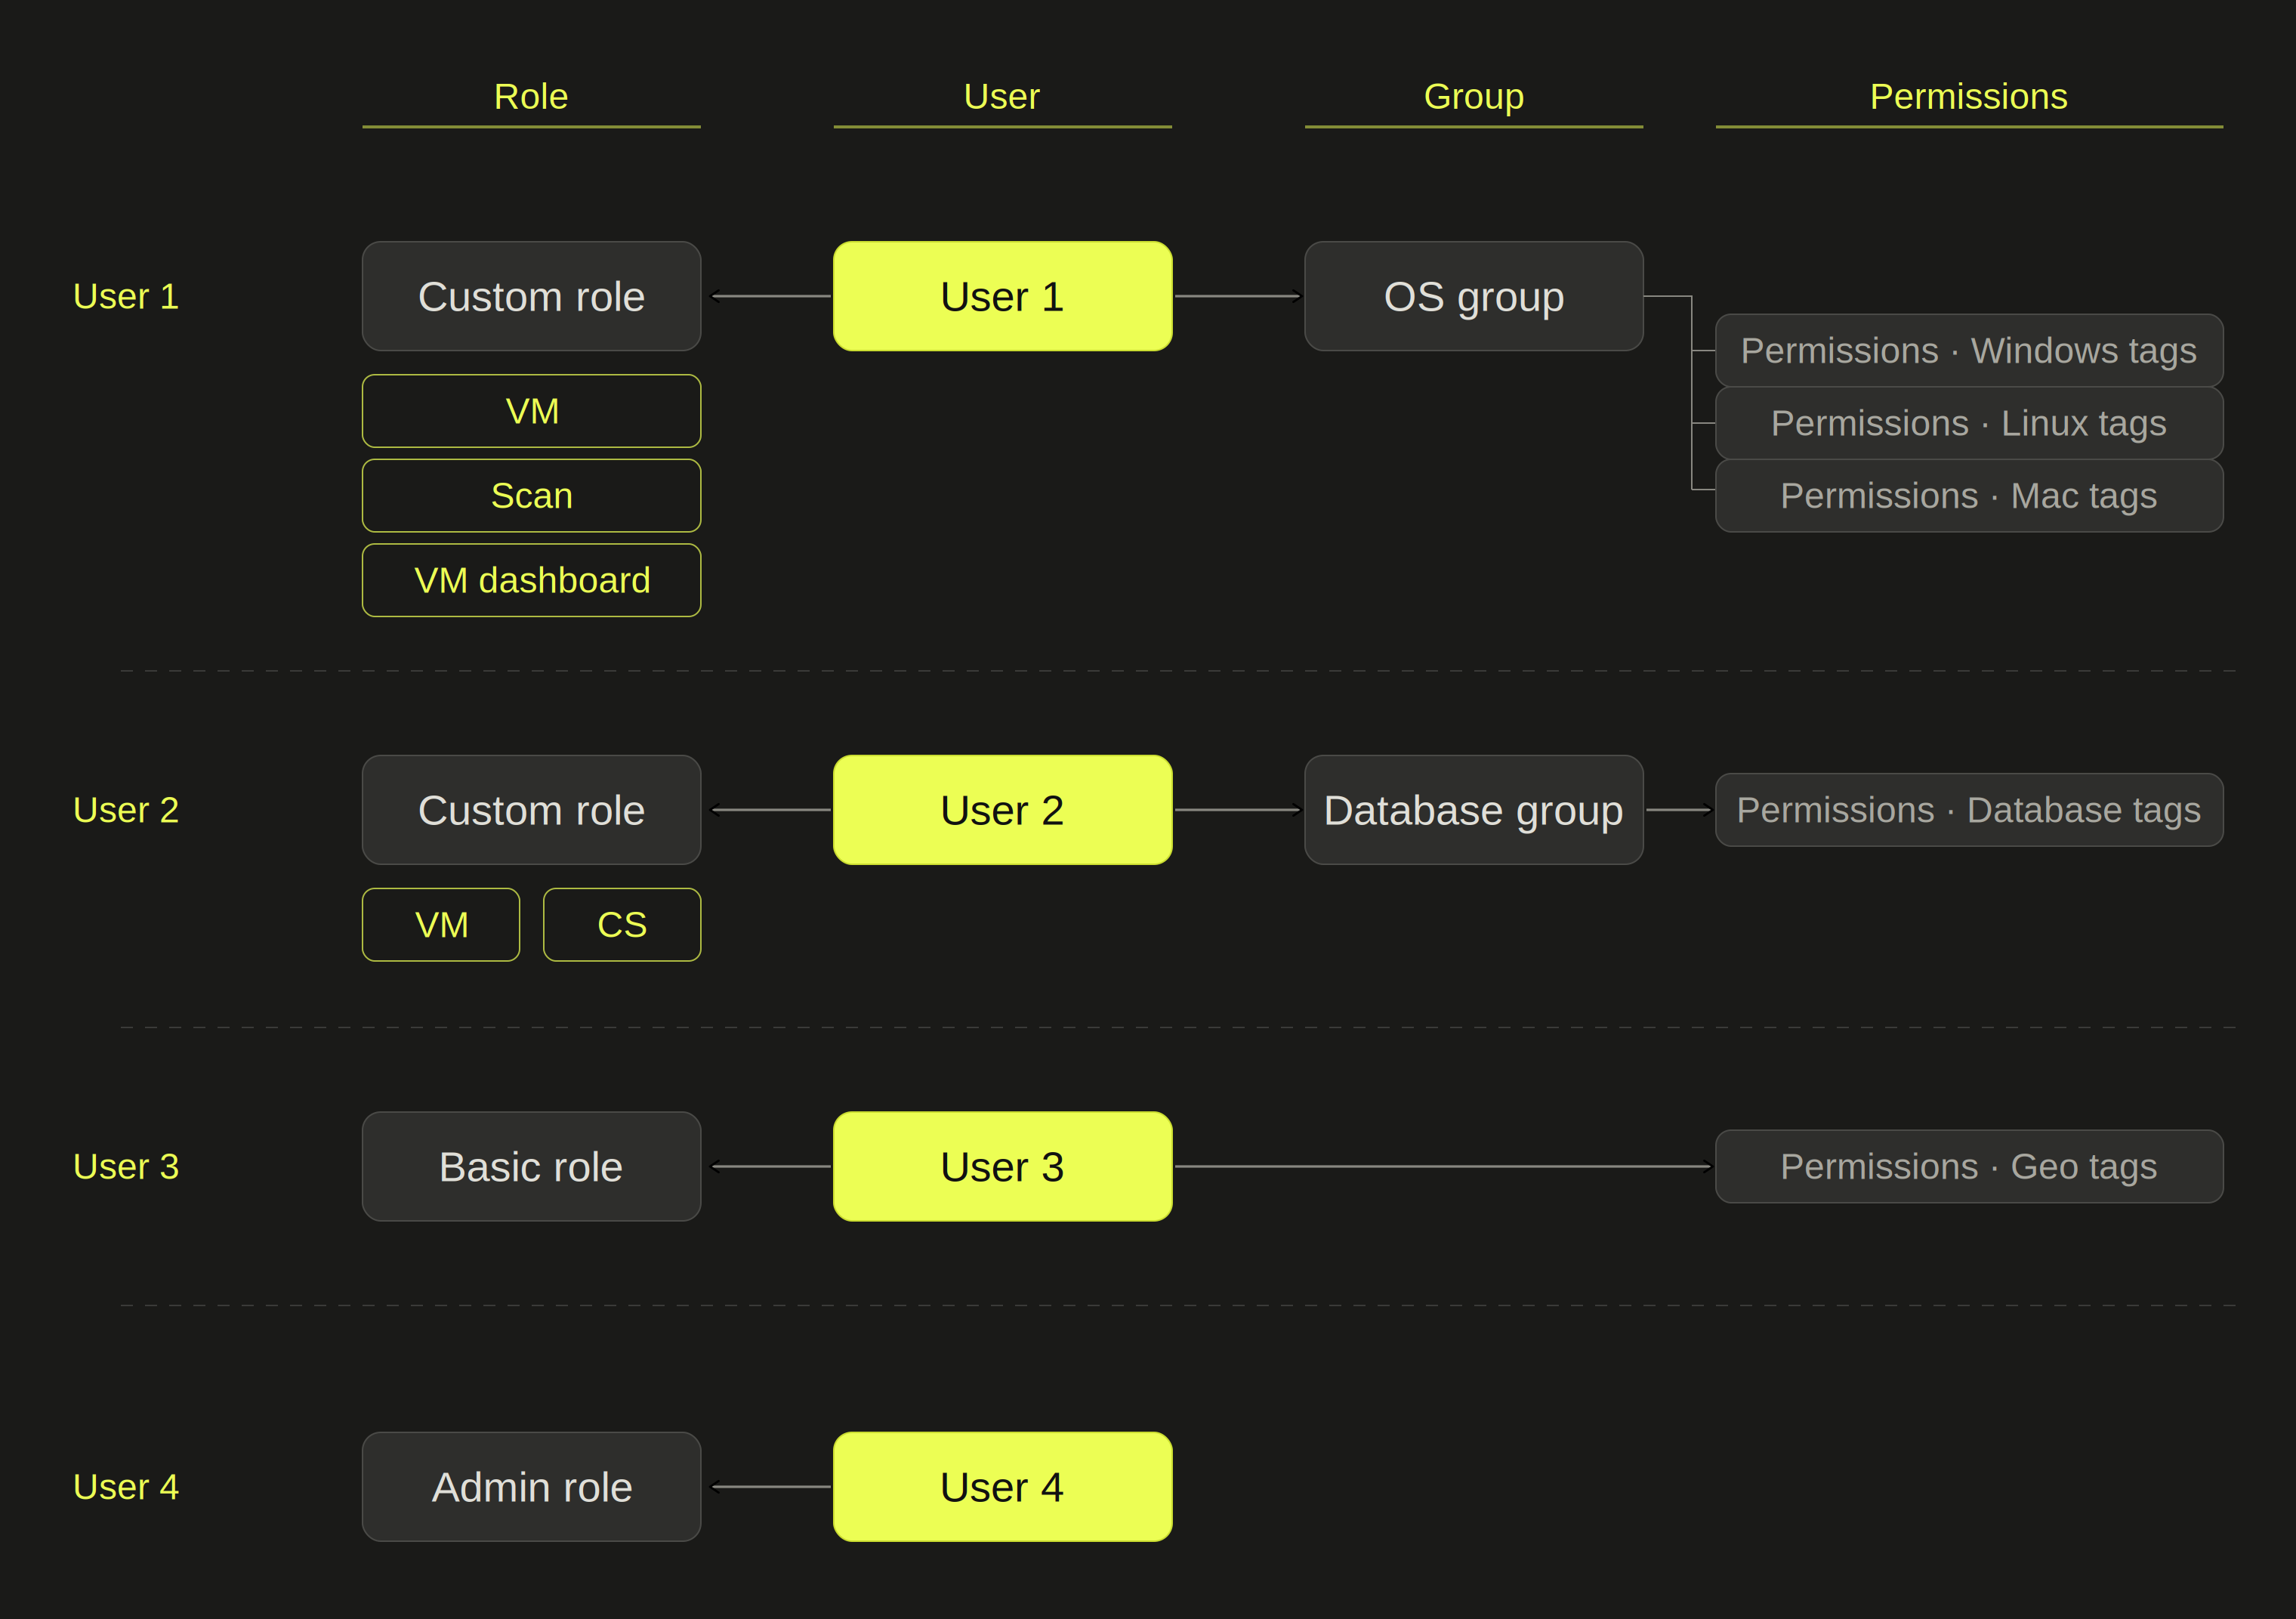
The following diagram highlights how different users can have a single role, but be part of one, several, or no groups.
Before configuring anything in Tenable One Vulnerability Management, define your access model:
- List the teams or personas who need access — for example: security analysts, remediation engineers, auditors, executives.
- Identify which assets each team should be able to see and act on.
- Define the actions each team needs to perform: view only, scan, configure scans, manage users.
- Map each team to a role and a tag-based asset scope.
Use the following table to guide your role and permission choices:
| Team / Persona | Suggested Role | Suggested Permissions |
|---|---|---|
| CISO / Executive | Read-Only | Can View → All Assets |
| Compliance officer / Auditor | Read-Only | Can View → relevant tag scope |
| Remediation engineer | Basic | Can View → assets they own |
| Junior scanner | Scan Operator | Can Scan → assigned asset tag |
| Security analyst | Standard | Can Scan + Can View → department tag |
| Scan team lead | Scan Manager | Can Edit → scan policies; Can Scan → full scope |
| VM platform owner | Administrator | Full access (no additional permissions required) |
Step 2 — Create Tags
Create tags that reflect your asset segmentation strategy — by geography, business unit, criticality, or team ownership.
To create a tag:
- In the left navigation, click Settings.
- Click the Tags tile.
- Click Create Tag and define a key-value pair, for example
Region:EMEAorTeam:CloudOps. - Add assets to the tag manually, or configure automation logic to dynamically assign assets.
For more information, see Tags in the Tenable One Vulnerability Management User Guide.
Step 3 — Create User Groups (Recommended)
If multiple users share the same data access requirements, create a user group and assign permissions to the group rather than individual users.
To create a user group:
- In the top navigation bar, click Settings > Access Control > Groups.
- Click Create Group, provide a name, and add members.
For more information, see User Groups in the Tenable One Vulnerability Management User Guide.
Step 4 — Create Users
When you create a user, you must assign a role that broadly determines the platform functions available to that user.
To create a user:
- In the top navigation bar, click Settings > Access Control > Users.
- Click Create User and provide the required details.
- In the Role field, select the appropriate Tenable-provided role, or select a custom role if one has been defined.
- Click Save.
For more information, see Users in the Tenable One Vulnerability Management User Guide.
Step 5 — Create Permission Configurations
A permission configuration links a permission type to a tag-scoped set of assets, then assigns that configuration to users or groups.
To create a permission configuration:
- In the left navigation, click Settings.
- Click the Access Control tile, then click the Permissions tab.
- Click Create Permission.
- Provide a name for the permission configuration.
- In the Objects section, select a tag (or All Assets for unrestricted access).
- In the Permissions section, select one or more permission types: Can View, Can Scan, Can Edit, or Can Use.
- In the Users or Groups section, add the users or groups to which this configuration applies.
- Click Save.
Step 6 — Assign Permissions
You can assign permission configurations to users or groups at creation time, or by editing an existing user or group record.
To assign a permission configuration to an existing user:
- On the Users tab of the Access Control page, click the user to which you want to add a permission configuration.
- In the Permissions section of the user details, click Add Permission.
- Select the permission configuration and click Save.
Step 7 — Validate Access
After completing configuration, verify that access is working as intended before communicating the change to your users.
- Log in with a test account that has the role and permissions you have configured.
- Confirm that only the expected assets are visible in the asset inventory and scan results.
- Confirm that the expected actions are available and that prohibited actions are not.
- Check dashboards and reports to confirm that vulnerability data is scoped correctly.