Permissions
Tenable One Vulnerability Management allows you to create and manage configurations that determine which users on your organization's account can perform specific actions with the organization's resources and data. This documentation refers to these configurations as permission configurations.
When you create a user or user group, you can assign existing permission configurations to them for assets that meet the criteria specified by a previously created tag. In Tenable One Vulnerability Management, these assets and the tags that define them are called objects.
Note:Tenable One Web App Scanning does not handle permissions reliant on a tag.
- Roles — Roles allow you to manage privileges for major functions in Tenable One Vulnerability Management and control which Tenable One Vulnerability Management modules and functions users can access.
- Permissions — Permissions allow you to manage access to data, such as Tags, Assets, and their Findings.
Simply put, roles are the actions you can take in a product, and permissions determine the data to which you can perform those actions.
Tenable-Provided Permissions
When you create a permission configuration, you must select one or more of the following predefined permissions. These permissions determine the actions users can take with the object or objects defined in the permission configuration.
For most actions in Tenable One Vulnerability Management (such as viewing results, editing configurations, or applying policies), permissions are evaluated based on the active user performing the action. However, when a scan is executed, the permission to access and scan target assets is evaluated based on the scan owner (the user who owns the scan configuration), regardless of who actually launched the scan.
Can View
Can View permissions are useful for auditors, compliance staff, or security analysts who need visibility into scans and results without risk of accidental changes.
When an active user is granted the Can View permission on an object, they can:
-
View Objects
-
See the scan configuration (targets, schedule, assigned policies, etc.).
-
View scan results, findings, and associated reports.
-
Browse dashboards and vulnerability data tied to that scan or asset group.
-
-
Generate Reports and Exports
-
Generate and export reports (PDF, CSV, etc.) from the results.
-
Use the data for remediation or compliance review.
-
Can Scan
The Can Scan permission allows a user to execute and manage the scans assigned to them. They cannot create global policies, configure scanners, or access scans outside their granted scope.
The user is an administrator
OR
The user has at least Scan Operator role privileges, AND
If the target does not exist within Tenable One Vulnerability Management, the scan owner must have Can Scan permissions on an object that refers to the target explicitly via IPv4, IPV6 or FQDN. If the object has more than one rule, the rules must be joined by the "Match Any" filter, OR
If the target already exists within Tenable One Vulnerability Management, then it must be tagged by an object for which the scan owner has Can Scan permissions.
When an active user is granted the Can Scan permission on an object, they can:
-
Run and Manage Scans
-
Launch (start, pause, stop, or resume) scans for which they have the Can Scan permission.
Note: The actual assets successfully scanned during execution are limited to the assets the scan owner has permission to target. -
Use scanners or scan zones already configured by administrators.
-
Set up or modify the schedule of scans for which they have the Can Scan permission.
-
-
View and Manage Results
-
Access results from the scans they run.
-
Generate reports based on those results.
-
-
Work with Assigned Assets
-
Target only the assets included in the scan asset group where the scan owner's permission applies.
-
Can Edit
The Can Edit permission allows a user to modify and manage an object, but not fully administer it. This means a user can update, configure, and run scans, assets, or reports they have access to - but they don’t have ownership-level or administrative control over the object.
When an active user is granted the Can Edit permission on an object, they can:
-
Modify Configurations
-
Change scan settings (targets, schedules, credentials, policies, notifications, etc.).
-
Update asset group definitions (add and remove assets).
-
Adjust dashboards, filters, or report templates they can edit.
-
Assign the object to other users with Can View or Can Scan permissions (if allowed by administrators).
-
-
Run and Manage Scans
-
Launch, pause, stop, and resume scans.
Note: While the active user can initiate these actions, the targets successfully scanned during execution are restricted by the scan owner's permissions. -
Rerun scans with updated settings.
-
Save and update scan templates or schedules (within the given scope).
-
-
View and Manage Results
-
View, analyze, and export results.
-
Share scan results with other users (depending on role).
-
Can Use
The Can Use permission in Tenable is often applied to scan policies, report templates, or other reusable objects. It’s more limited than Can Edit, but more powerful than just Can View. It lets a user apply an existing object (like a scan policy or template), but they cannot edit or manage the object itself.
When an active user is granted the Can Use permission on an object, they can:
-
Use Existing Policies or Objects
-
Apply an existing scan policy when creating or running a scan.
-
Use pre-built report templates or dashboards.
-
Leverage shared configurations without changing them.
-
-
Use Assigned Policies
-
Launch scans based on a policy they have Can Use rights for.
-
Maintain consistency in scan settings since the underlying policy or template can’t be altered.
-
-
View and Manage Results
-
View and export results from scans that use the assigned policy or template (if combined with scan permissions like Can Scan).
-
View Permission Configurations
On the My Accounts page, each user can view the permission configurations assigned to them. However, only users with an Administrator role can view or manage permission configurations for other users. For more information about roles, see Tenable-Provided Roles and Privileges.
To view your permission configurations in Tenable One Vulnerability Management:
Required User Role: Administrator
-
In the left navigation, click
 Settings.
The Settings page appears.
-
Click the Access Control tile.
The Access Control page appears. On this page, you can control user and group access to resources in your Tenable One Vulnerability Management account.
-
Click the Permissions tab.
The Permissions tab appears. This tab contains a table that lists all of the permission configurations on your Tenable One Vulnerability Management instance.
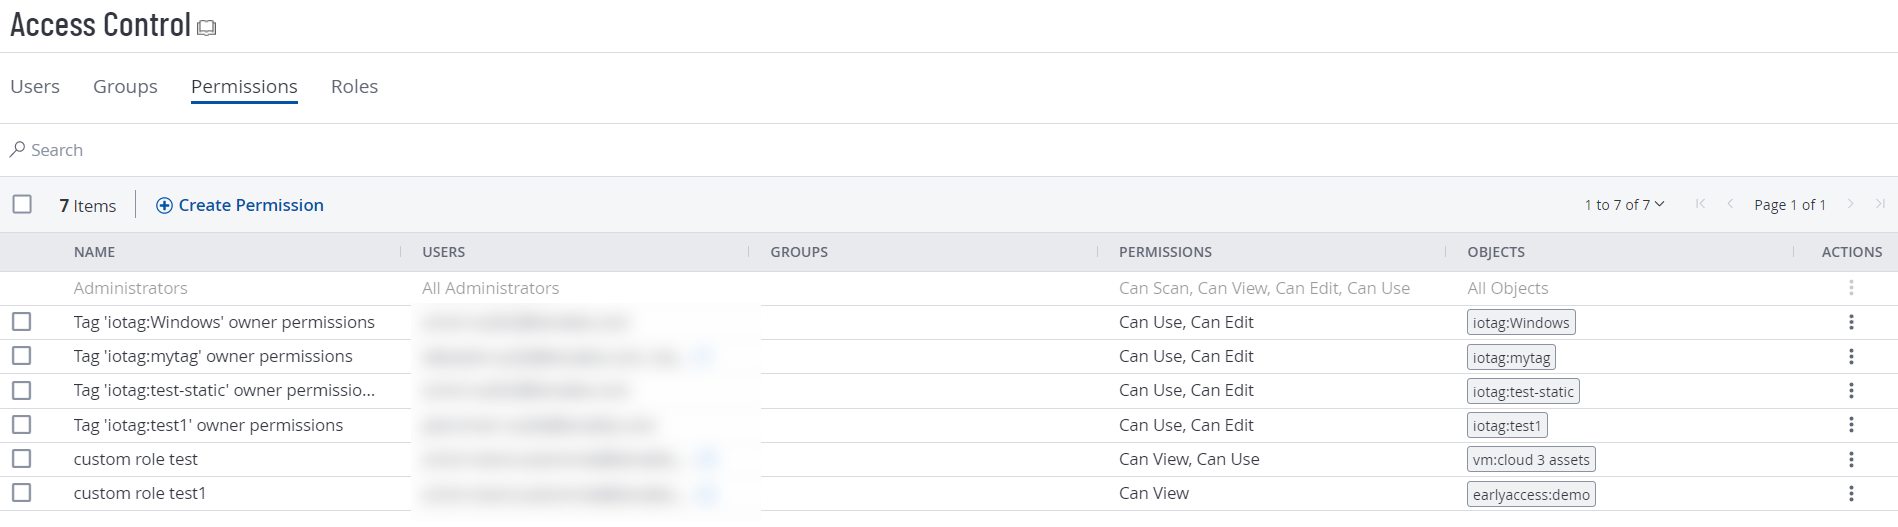
Note:The first row of the permissions table contains a read-only entry for Administrators. This entry exists to remind you that Administrators have all permissions for every resource on your account. For more information, see Roles.
Manage Permissions
For more information about managing user permissions, including creating, editing, deleting exporting, and more, see Manage Permissions.