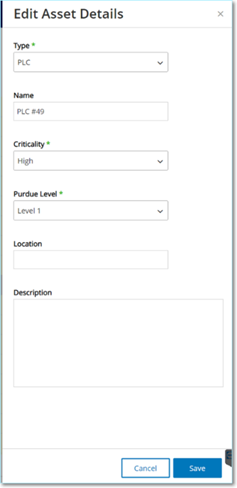
Edit Asset Details
OT Security automatically identifies the Asset Type and Name based on its internal data and based on its activity in the network. If the system couldn’t gather this information or if you feel that the automatic identification is not accurate, you can edit these parameters either directly through the UI or by uploading a CSV file. You can also add a general description of the asset and a description of the location of the unit.
Edit Asset Details through the UI
To edit asset details for a single asset:
-
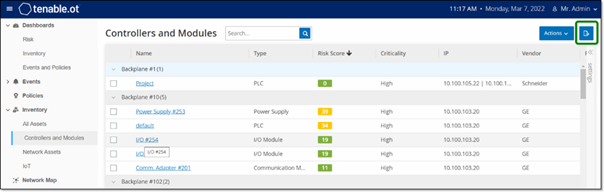
Under Inventory, click on Controllers or Network Assets.
-
Select the required asset.
-
In the header bar, click the Actions button.
-
From the drop-down list, select Edit.
The Edit Asset Details window opens.
-
In the Type box, select the asset type from the drop-down list.
-
In the Name box, type a name by which the asset will be identified in the OT Security UI.
-
In the Criticality box, type the level of criticality of this asset to the system.
-
In the Purdue Level box, enter the Purdue level based on the asset type.
-
In the Backplane box (for Controllers), type the name of the backplane on which the asset is installed.
-
In the Location box, type a description of the asset’s location. This is an optional field. The data is shown in the assets table as well as on the Asset Details screen for this asset.
-
In the Description box , type a description of the asset. This is an optional field. The data is shown on the Asset Details page for this asset.
-
Click Save.
OT Security saves the edited details.
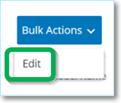
To edit multiple assets (bulk process):
-
Under Inventory, click Controllers or Network Assets.
-
Select the checkbox next to each of the desired assets.
Note: Alternatively, you can select multiple assets by pressing the Shift key while clicking on each of the desired assets. -
Click on the Bulk Actions menu and select Edit from the drop-down list.
The Bulk Edit screen is shown with the parameters that are available for bulk editing.
-
Select the checkbox next to each of the parameters that you want to edit (Type, Criticality, Purdue Level, Network Segments, Location, and Description).
Note: When bulk editing Network Segments, first filter your assets by Type, then select the assets you wish to bulk edit. Assets with multiple IP addresses can’t be included in a bulk edit for Network Segments; you must edit each asset manually. -
Set each of the parameters as required.
Note: Information entered in the Bulk Editing fields overrides any current content for the selected asset. If you select the checkbox next to a parameter but do not enter a selection, then the current values for that parameter is erased. -
Click Save.
OT Security saves the assets with the new configuration.
Edit Asset Details by Uploading a CSV
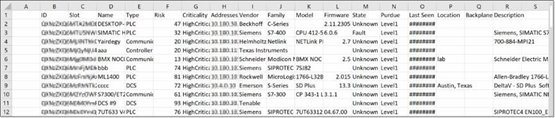
This method of editing asset details allows you to edit a large number of assets through a csv file instead of editing them manually in the UI. The following details can be edited using this method: Type, Name, Criticality, Purdue Level, Location, Description and custom fields.
To edit asset details through a CSV:
-
Under Inventory, click All Assets, Controllers and Modules, or Network Assets.
-
Click the Export button.
A csv file of the inventory is downloaded.
-
Navigate to the file that was just downloaded and open it.
-
Edit the allowable parameters by changing the content of the cells. Allowable parameters are: Type, Name, Criticality, Purdue Level, Location, Description and custom fields.
Note: You must enter valid data for parameters that require specific options (for example Type, Criticality, Purdue Level). Otherwise, the corresponding asset will fail to update. -
Save the file as a csv file type.
Note: Only the assets that you modify will be updated in the system. Assets that are not included in the csv, or rows that you did not modify will remain unchanged in the system. It is not possible to delete assets using this method. -
Under
The
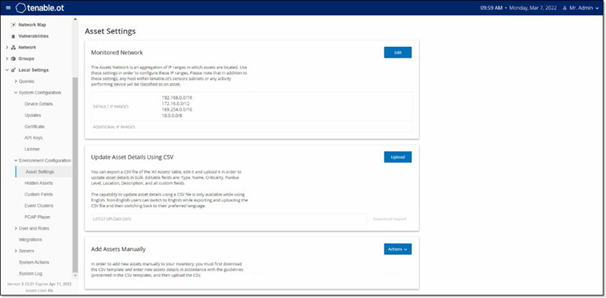
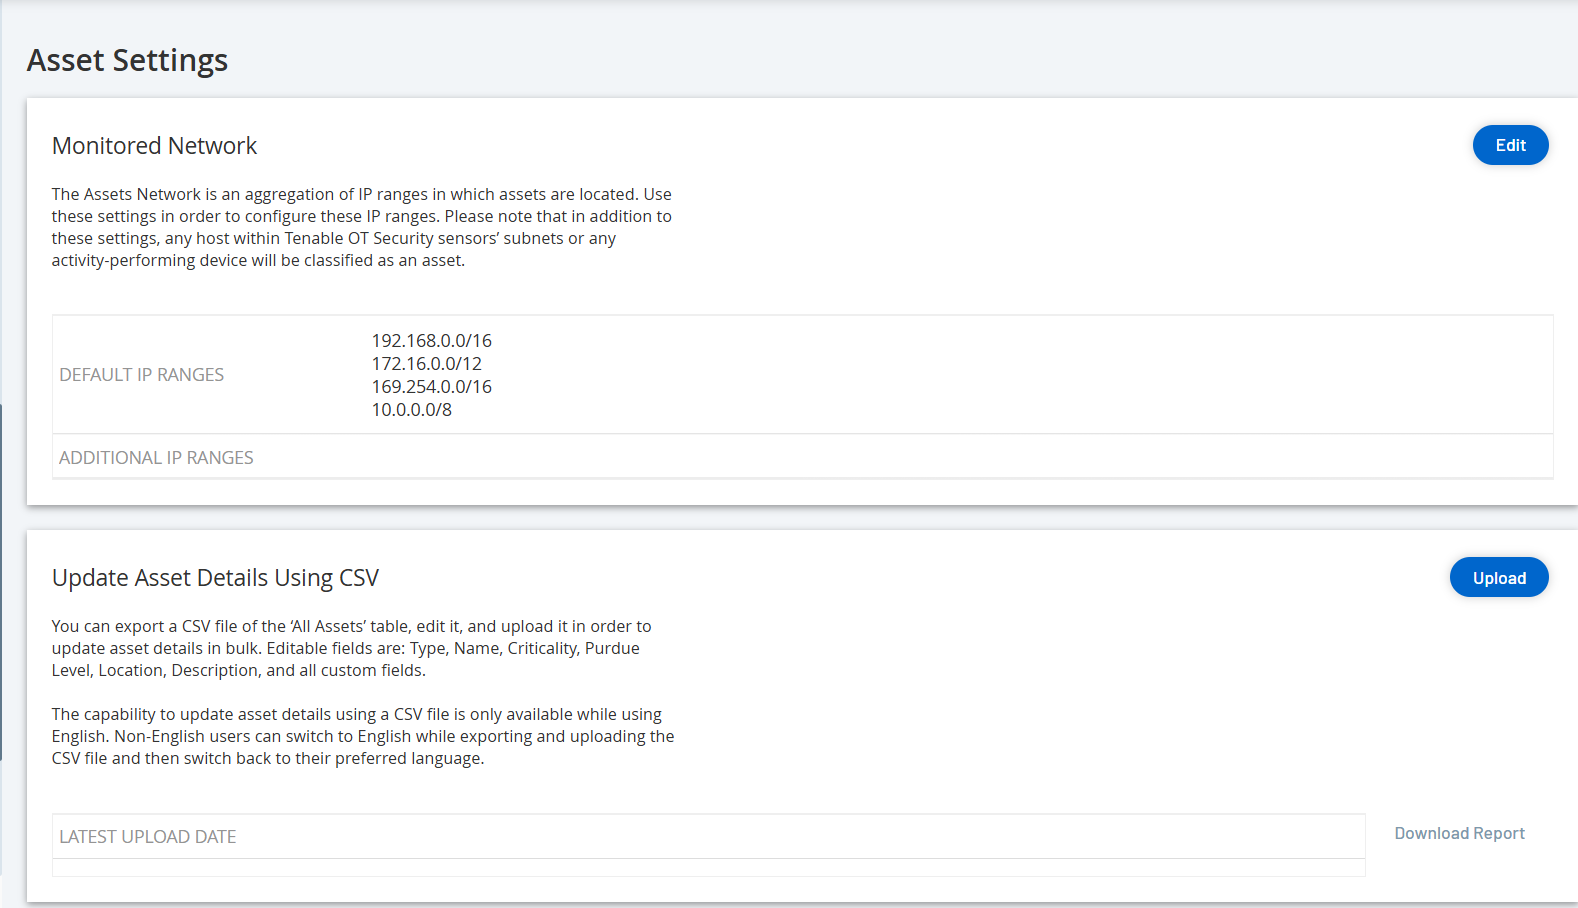
-
In the Update asset details using CSV section, click Upload.
-
Follow your device’s navigation prompts to upload the csv file that you just saved.
A confirmation appears indicating number of updated rows.
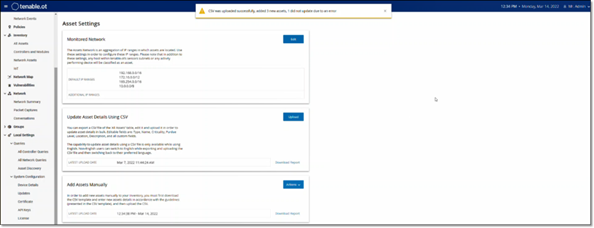
The Latest Upload Date box in the Update asset details using CSV section is updated.
-
To see more information about the results of the upload, in the Update asset details using CSV section, click Download Report.
OT Security downloads a csv file that lists the updated asset IDs and also lists the failed ones.
Hide Assets
You can hide one or more assets from the asset inventory. An asset that has been hidden isn’t shown in the Inventory and it is removed from Groups. However, Events and network activity are still shown for the hidden asset.
You can restore a hidden asset from the
To hide one or several assets:
-
Under Inventory, click Controllers or Network Assets.
-
Select the checkbox next to one or more assets that you want to remove.
-
In the Header bar, click Actions.
A menu appears.
-
Select Hide Asset.
The Hidden Assets page appears.
-
(Optional) In the Comments box, add text comments about the assets.
Note: The comments appear in the list of removed assets on the -
Click Hide.
OT Security hides the assets from the Inventory and Groups pages.