Create Policies
You can create custom policies based on the specific considerations of your ICS network. You can determine precisely what type of events must be brought to the attention of your staff and how the notifications are delivered. You have complete flexibility in determining how specific or broad a definition you want to give to each policy.
Note: Policies are defined by using groups configured in your system. If the drop-down list for a certain parameter doesn't show the specific grouping to which you want the policy to apply, then you can create a new Group according to your needs, see Groups.
When creating a new Policy, you start by selecting the Category and Type of Policy that you would like to create. The Create Policy wizard guides you through the setup process. Each Policy Type has its own set of relevant Policy condition parameters. The Create Policy wizard shows you the relevant Policy condition parameters for that selected Type of Policy.
For the Source, Destination, and Schedule parameters, you can designate whether to allowlist or block list the specified Group.
-
select In to allowlist the specified Group (that is, include it in the Policy), OR
-
select Not in to block list the specified Group (that is, leave it out of the Policy).
For Asset Group and Network Segment parameters (that is, Source, Destination and Affected Assets) you can use logical operators (and/or) to apply the Policy to various combinations or subsets of your pre-defined Groups. For example, if you want a Policy to apply to any device that is either an ICS Device or an ICS Server, then select ICS Devices or ICS Servers. If you want a Policy to apply only to Controllers which are located in Plant A, then select Controllers and Plant A Devices.
If you would like to create a new Policy with similar parameters to an existing Policy, you can Duplicate the original Policy and make the necessary changes, see section Create Policies.
To create a new policy:
-
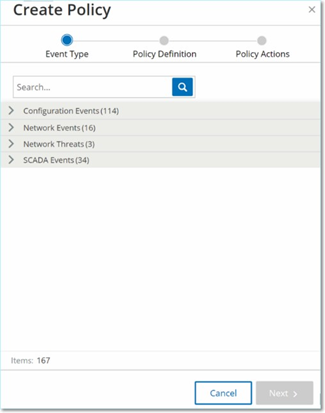
On the Policies screen, click Create Policy.
The Create Policy wizard opens.
-
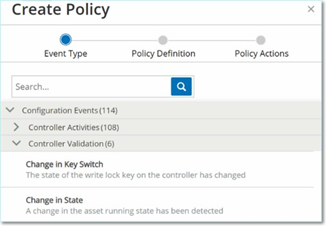
Click on a Policy Category to show the sub-categories and/or Policy Types.
A list of all sub-categories and/or Types included in that category are displayed.
-
Select a Policy Type.

-
Click Next.
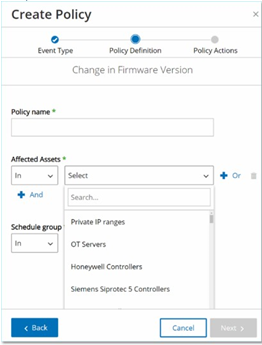
A series of parameters for defining the Policy are displayed. This includes all relevant Policy conditions for the selected Policy Type.
-
In the Policy Name field, enter a name for this Policy.
Note: Choose a name that describes the specific nature of the type of Event that the Policy is intended to detect.
-
For each parameter:
Caution: You cannot edit the Source and Destination asset groups for Intrusion Detection System (IDS) events.-
Where relevant, select In (default) to allowlist the selected element or Not in to block list the selected element.
-
Click Select.
A drop-down list of relevant elements (for example Asset Group, Network Segment, Port Group, Schedule Group etc.) appear.
-
Select the desired element.
Note: If the precise grouping to which you would like to apply the Policy does not exist, then you can create a new Group according to your needs, see Groups. -
For Asset parameters (that is Source, Destination and Affected Assets), if you want to add an additional Asset Group/Network Segment with an "Or" condition, click on the blue + Or button next to the field and select another Asset Group/Network Segment.
-
For Asset parameters (that is Source, Destination and Affected Assets), if you want to add an additional Asset Group/Network Segment with an "And" condition, click on the blue + And button next to the field and select another Asset Group/Network Segment.
-
-
Click Next.
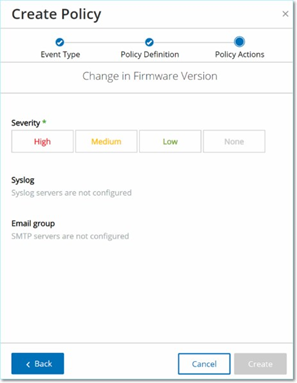
A series of Policy Action parameters (that is the actions taken by the system when a Policy hit occurs) are shown.
-
In the Severity section, click on the desired severity level for this Policy.
-
If you would like to send Event logs to one or more Syslog servers, in the Syslog section, select the checkbox next to each server where you would like to send the Event logs.
Note: To add a Syslog server, see Syslog Servers.
-
If you would like to send email notifications of Events, in the Email group field, select from the drop-down list the Email Group to be notified.
Note: To add an SMTP server, see SMTP Servers.
-
In the Additional Actions section, where the specified action is relevant:
-
If you would like to disable the Policy after the first time that a Policy hit occurs, select the Disable policy after first hit checkbox. (This action is relevant for some types of Network Event Policies and some types of SCADA Event Policies.)
-
If you would like to initiate an automatic snapshot of the affected asset whenever a Policy hit is detected, then select the Take snapshot after policy hit checkbox. (This action is relevant for some types of Configuration Events Policies.)
-
-
Click Create. The new Policy is created and automatically activated. The Policy is shown in the list on the Policies screen.
Create Unauthorized Write Policies
This type of Policy detects unauthorized writes to controller tags. The Policy Definition involves specifying the relevant Tag Groups and the type of write that generates a Policy hit.
To set the Policy Definition for an Unauthorized Write Policy:
-
Create a new Unauthorized Write Policy as described in Create Policies.

-
In the Policy Definition section, in the Tag Group field, select the Tag Group to which this Policy applies.
-
In the Tag value section, select the desire option by clicking the radio button and filling in the required fields. Options are:
- Any value – select this option to detect any change to the tag value.
-
Different from value – select this option to detect any value other than the specified value. Enter the specified value in the field next to this selection.
-
Out of allowed range – select this option to detect any value outside of the specified range. Enter the lower and upper limits of the allowed range in the respective fields next to this selection.
Note: The Different from value and Out of allowed range options are only available for standard tag types (for example Integer, Boolean etc.) but not for customized tags or strings.
-
Complete the Policy creation procedures as described in Create Policies.