Tenable One OT Exposure License Activation
Tenable calculates licenses based on the number of unique IPs in the system. Each IP address requires a separate license. For example, Tenable bases licensing on the number of unique IPs, even if multiple devices share the same IP address, or if several devices connected to the same backplane share the same three IPs. Therefore, you need three licenses, regardless of the number of devices.
After you install the Tenable One OT Exposure Appliance, you can activate your license.
For information about deploying and licensing Tenable One OT Exposure for Tenable One, see the Tenable One Deployment Guide.
Before you Begin
-
Make sure that you have the license code (20 characters letter/numbers), which you received from Tenable when you ordered your device.
-
Make sure you have access to the internet. If your Tenable One OT Exposure device is not connected to the Internet, you can register the license from any PC.
-
Make sure you have access to the Tenable Account Management portal. For access, contact your Tenable Customer Success Manager.
Activate your Tenable One OT Exposure license
You can activate your Tenable One OT Exposure license and facilitate the Tenable Account Management portal for creating new sites to manage your assets.
For more information about the Account Management portal, see the Account Management Portal documentation.
To activate your Tenable One OT Exposure license:
-
Log in to the Tenable Account Management portal using your community account.
The Account page appears with the options that you have permissions to view.
-
Click the Tenable One OT Exposure license.
The Tenable One OT Exposure Details page appears. The Tenable One OT Exposure licenses appear with details such as the purchase date, expiration date, and number of licensed IPs and sites.
-
From the Activation Code column, copy the 20-digit Tenable One OT Exposure license code.
-
Generate the activation certificate in Tenable One OT Exposure:
-
Go to the Tenable One OT Exposure License Activation page.
-
In step 1, click Enter new license code.
The Enter new license code panel appears.
-
In the License code box, paste the code (Activation Code) that you copied from the Account Management portal.
-
Click Verify.
Tenable One OT Exposure enables the Generate activation certificate section.
-
Click Generate Certificate.
The Generate Certificate panel appears.
-
Click Copy text to clipboard, then click Done.
Tenable One OT Exposure generates the certificate, which you must provide in the Tenable Account Management Portal to add your sites.
-
-
In step 3 Enter activation code, click the Self-service link to open the Tenable Account Management portal.
The Account Management portal page appears.
Note: To activate your evaluation period, click the Click here link. -
In the left navigation pane, click Products.
The My Products page appears.
-
Search for your product using the 20-digit license code from Tenable One OT Exposure.
The Tenable One OT Exposure product with the specific license code appears.
-
Click the Sites tab.
The Sites tab appears.
-
To create a site, click Manage Sites > Create Site.
The Create New Site window appears.
-
(Optional) In the Label box, type a name for the site.
Tip: Use the Label field to include the name of the device or ICP, which can help you differentiate between the various sites. -
In the Size box, type the number of IP addresses you want to assign to this site.
Tip: To adjust the number of IP addresses assigned to the license, use the slider located under the Size box. -
In the Activation Certificate box, paste the certificate that you copied from Tenable One OT Exposure. See step f.
-
Click Create.
A dialog box appears with an activation code. This is a one-time generated code that you must copy to the Tenable One OT Exposure instance.
-
Click Confirm.
-
-
Navigate back to the Tenable One OT Exposure instance.
-
In the step 3 Enter activation code section, click Enter Activation Code.
The Enter Activation Code panel appears on the right.
-
In the Activation Code box, paste the one-time generated code that you copied from the Tenable One OT Exposure Account Management page. See step 8e.
-
Click Activate.
Tenable One OT Exposure shows a confirmation message that the system activated successfully and the Tenable One OT Exposure interface appears.
-
Click Enable.
Tenable One OT Exposure is now enabled and ready to use.
-
Navigate back to the Tenable Account Management portal and in the one-time generated activation code dialog box, click the I confirm I have saved the activation license checkbox.
-
Click Confirm.
The newly added site appears in the Sites tab for Tenable One OT Exposure.
Update your license
When you increase your asset limit, extend your license period, or change your license type, you can update your license. When you update your license, you use your existing 20-digit license code.
Before you Begin
-
Your Tenable Account Manager must have already updated your license information in their system before you can update the new license.
-
You need access to the internet. If your Tenable One OT Exposure device cannot reach the Internet, you can register the license from any PC.
To update your license:
-
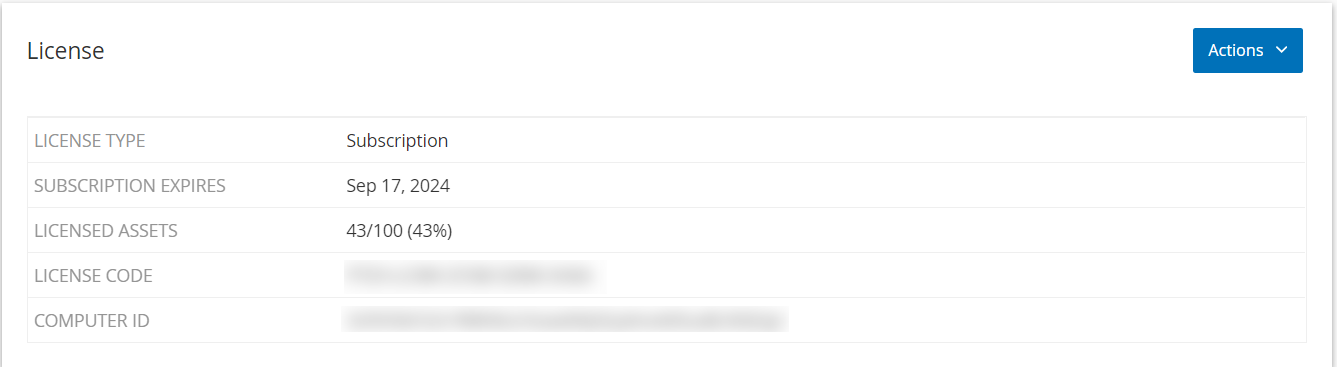
Go to Settings > System Configuration > License.
The License window appears.
-
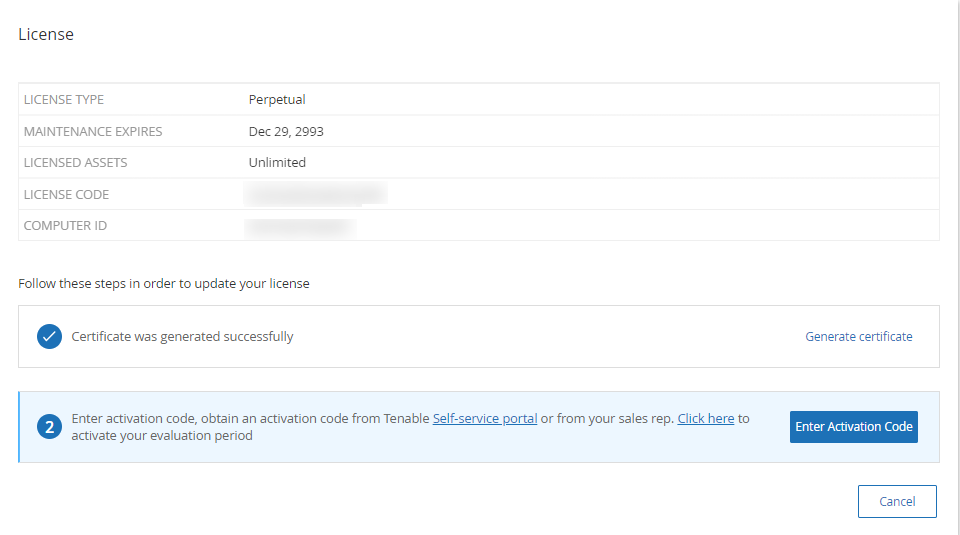
From the Actions menu, select Update license.
The Generate Certificate and Enter Activation Code steps appear.
-
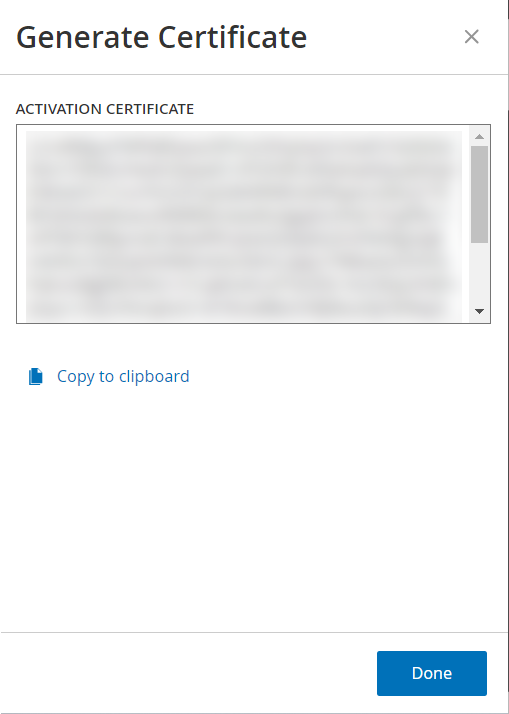
In the (1) Generate activation certificate box, click Generate Certificate.
The Generate Certificate panel appears with the Activation Certificate.
-
Click Copy text to clipboard, then click Done.
The side panel closes.
-
In the (2) Enter Activation Code box, click the Self-service portal link.
Tenable One OT Exposure redirects you to the My Account page on the Tenable Account Management portal.
Note: If you are on evaluation period, click the second link. See Update your license in offline mode. -
Edit the site details in the Tenable Account Management portal:
-
In the left navigation pane, click Products.
The My Products page appears.
-
Search for your product using the 20-digit license code from Tenable One OT Exposure.
The Tenable One OT Exposure product with the specific license code appears.
-
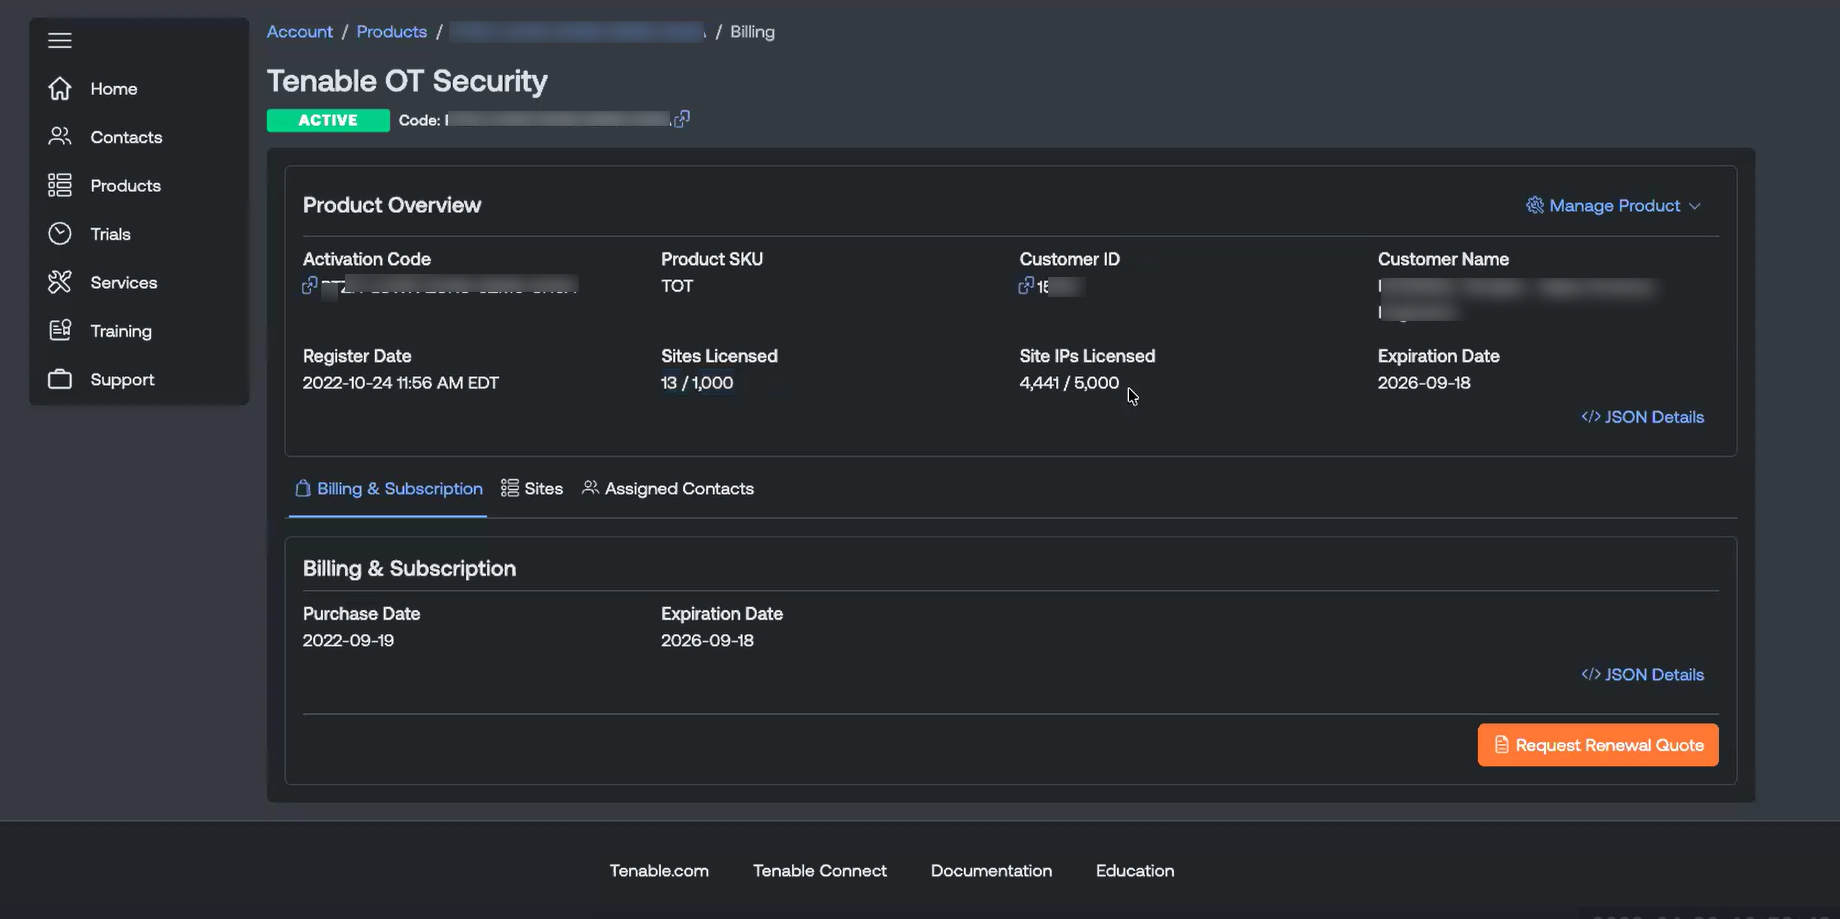
Click the license code to view the product details.
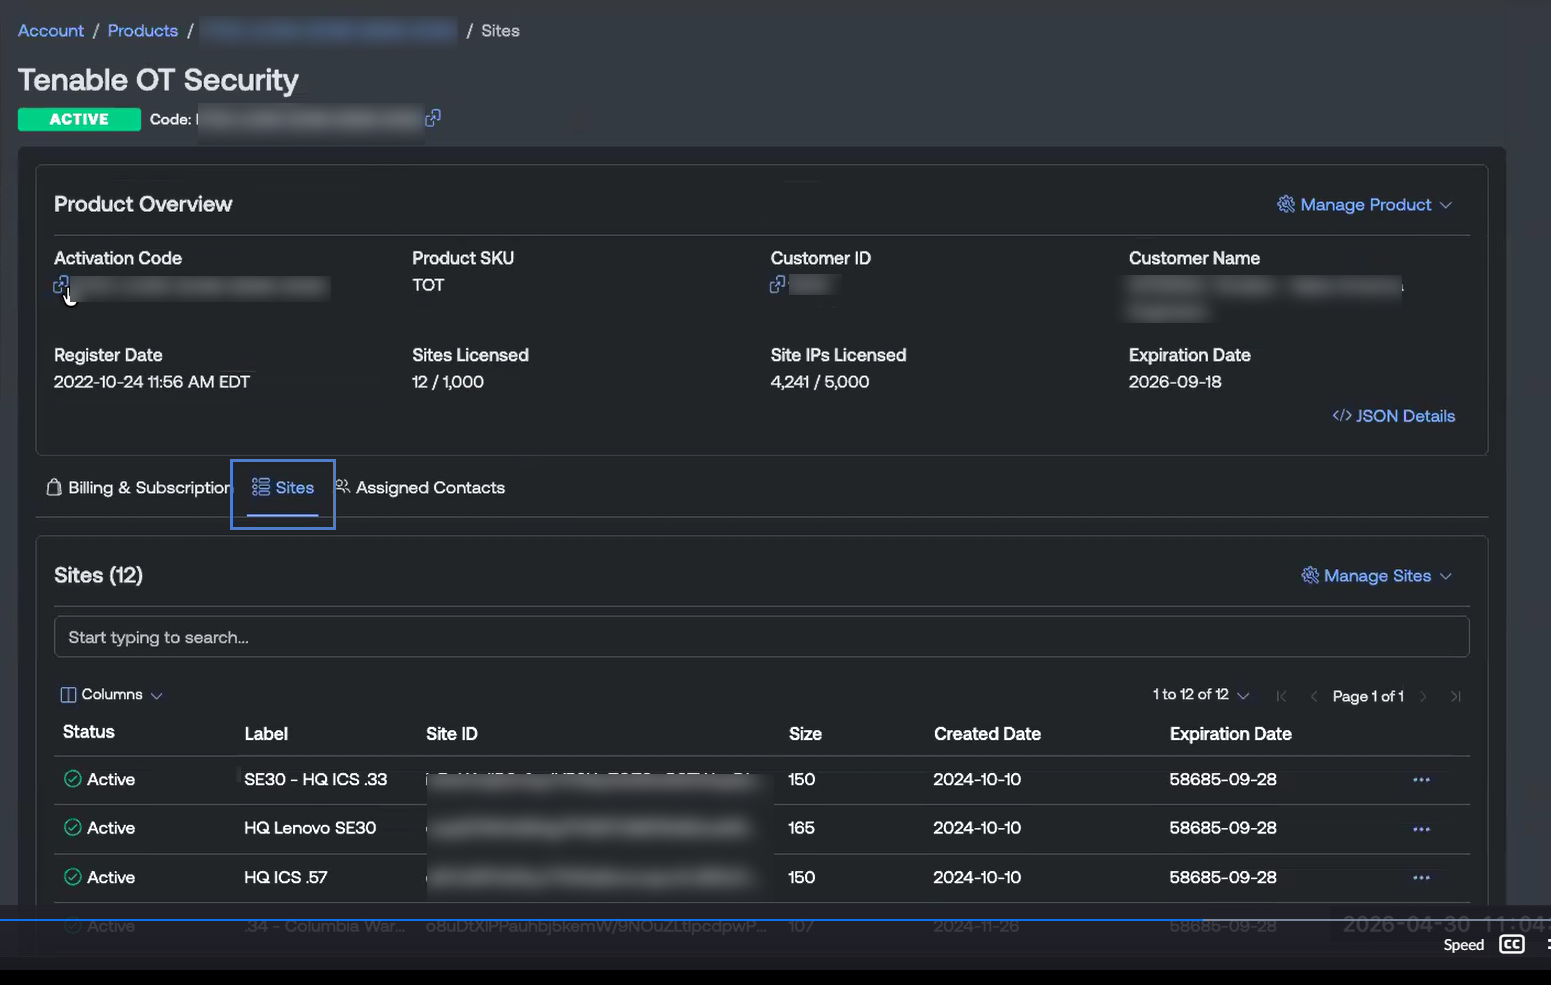
The Tenable One OT Exposure page appears with details such as Product Overview, Billing & Subscription, and Sites.
-
Click the Sites tab.
The Sites section appears.
-
In the row of the site you want to edit, click the
 button.
A menu appears.
-
Click
 Edit Site.
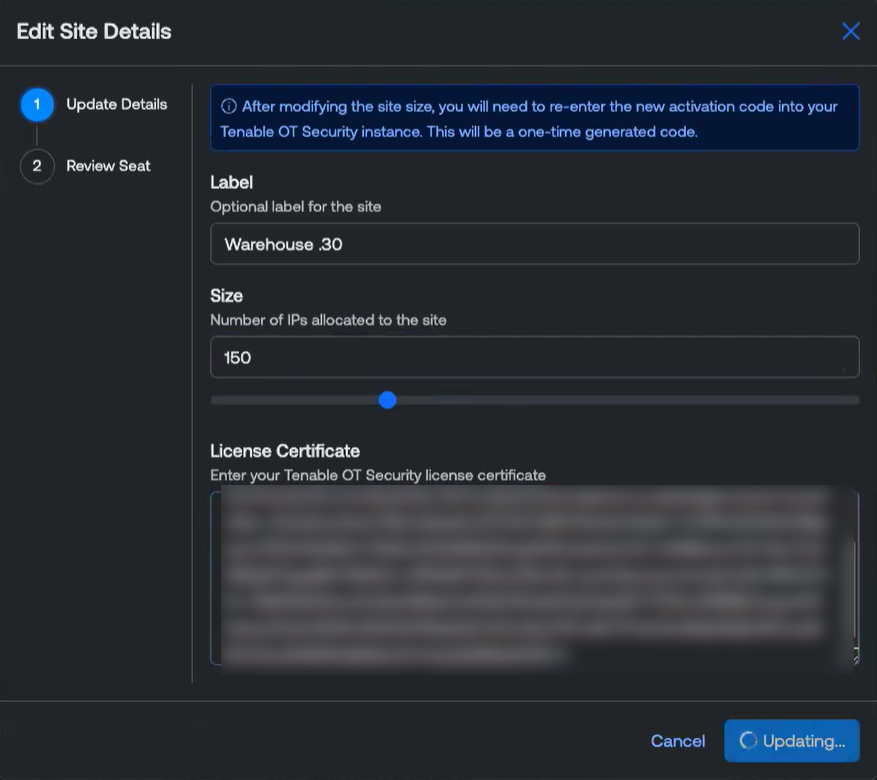
The Edit Site Details page appears.
-
Adjust the details as needed.
-
In the Activation Certificate box, paste the certificate that you copied from the Generate Certificate window in Tenable One OT Exposure.
-
Click Update.
The portal displays a dialog box with an activation code. This is a one-time generated code that you must copy to the Tenable One OT Exposure instance.

-
Click the
 button, then click Confirm.
-
-
Navigate back to the Tenable One OT Exposure instance.
-
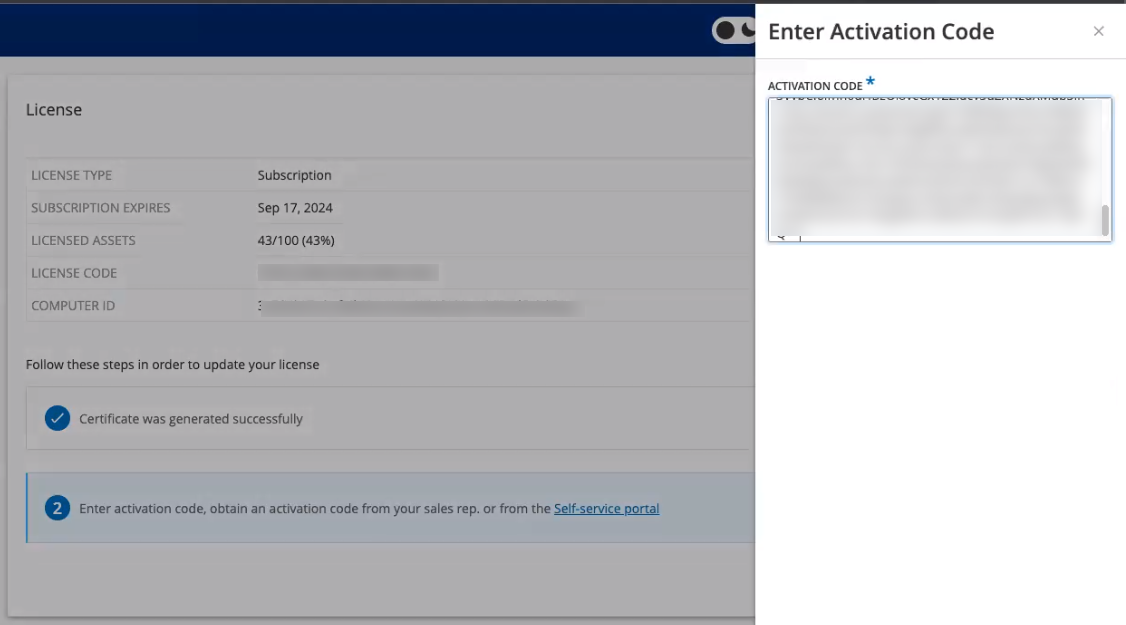
In the (2) Enter activation code box, click Enter Activation Code.
-
In the Activation Code box, paste the one-time generated code that you copied from the Tenable One OT Exposure Account Management page.
-
Click Activate.
Tenable One OT Exposure shows a confirmation message that the system activated successfully and the License page shows the updated license details.
Update your license in offline mode
- Perform steps 1 to 4 as described in the Update your license section.
-
In the (2) Enter activation code box, click the Self-service portal link.
The Activate Tenable One OT Exposure Offline window opens in a new tab.
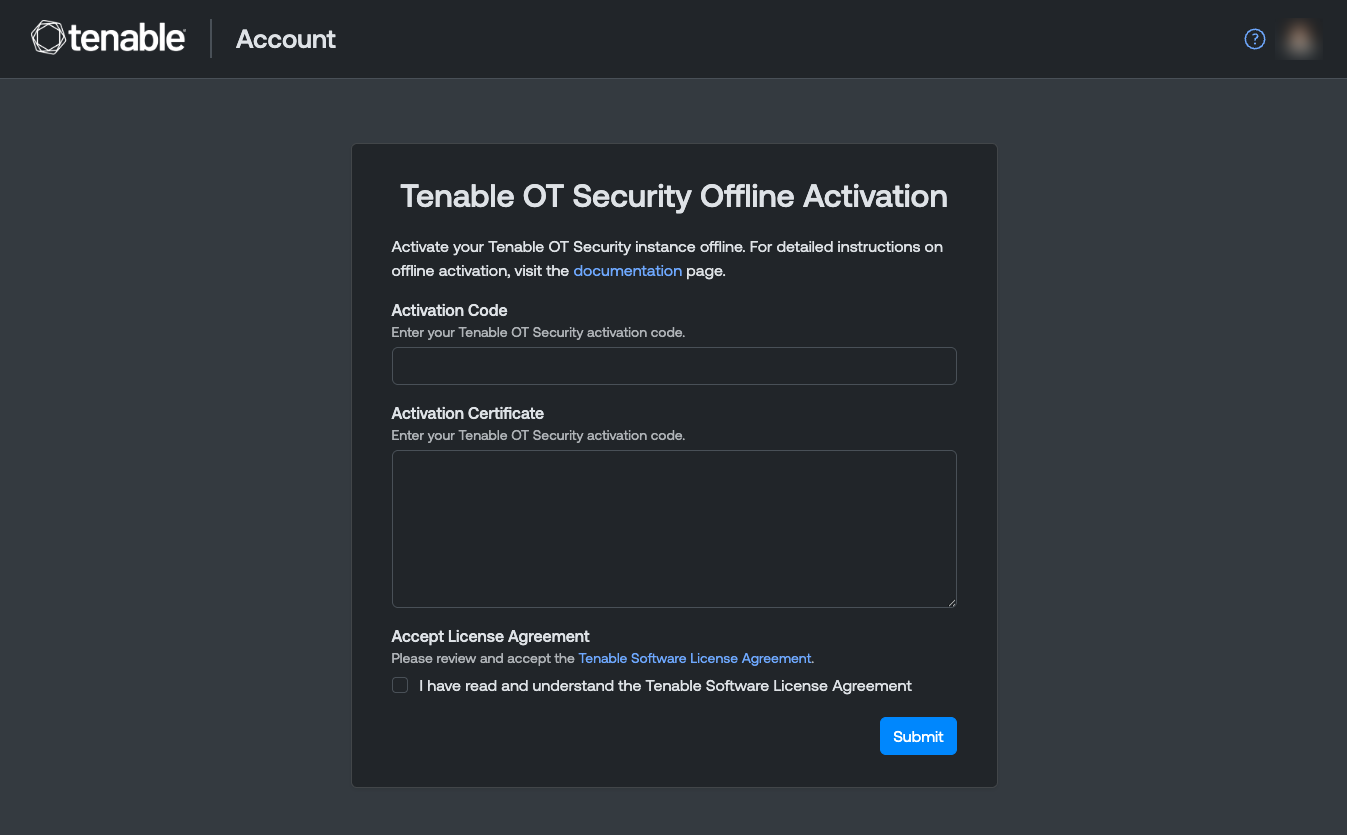 Note: You can access the Activate Tenable One OT Exposure Offline screen from an Internet-connected device using the following URL: https://account.tenable.com/offline-activation/ot-security.Note: If you are not logged in to tenable.com, you can log in using your email address and password. Use the email account where you received your License Code. If you do not have the login credentials, you can either click on Don’t remember your password (and follow the prompts) or reach out to your Tenable account manager.
 -
In the Activation Code box, type your 20-character License Code (which you can copy and paste from the License window).
-
In the Activation Certificate box, paste the Activation Certificate.
-
Click the I have read and understand the Tenable Software License Agreement checkbox.
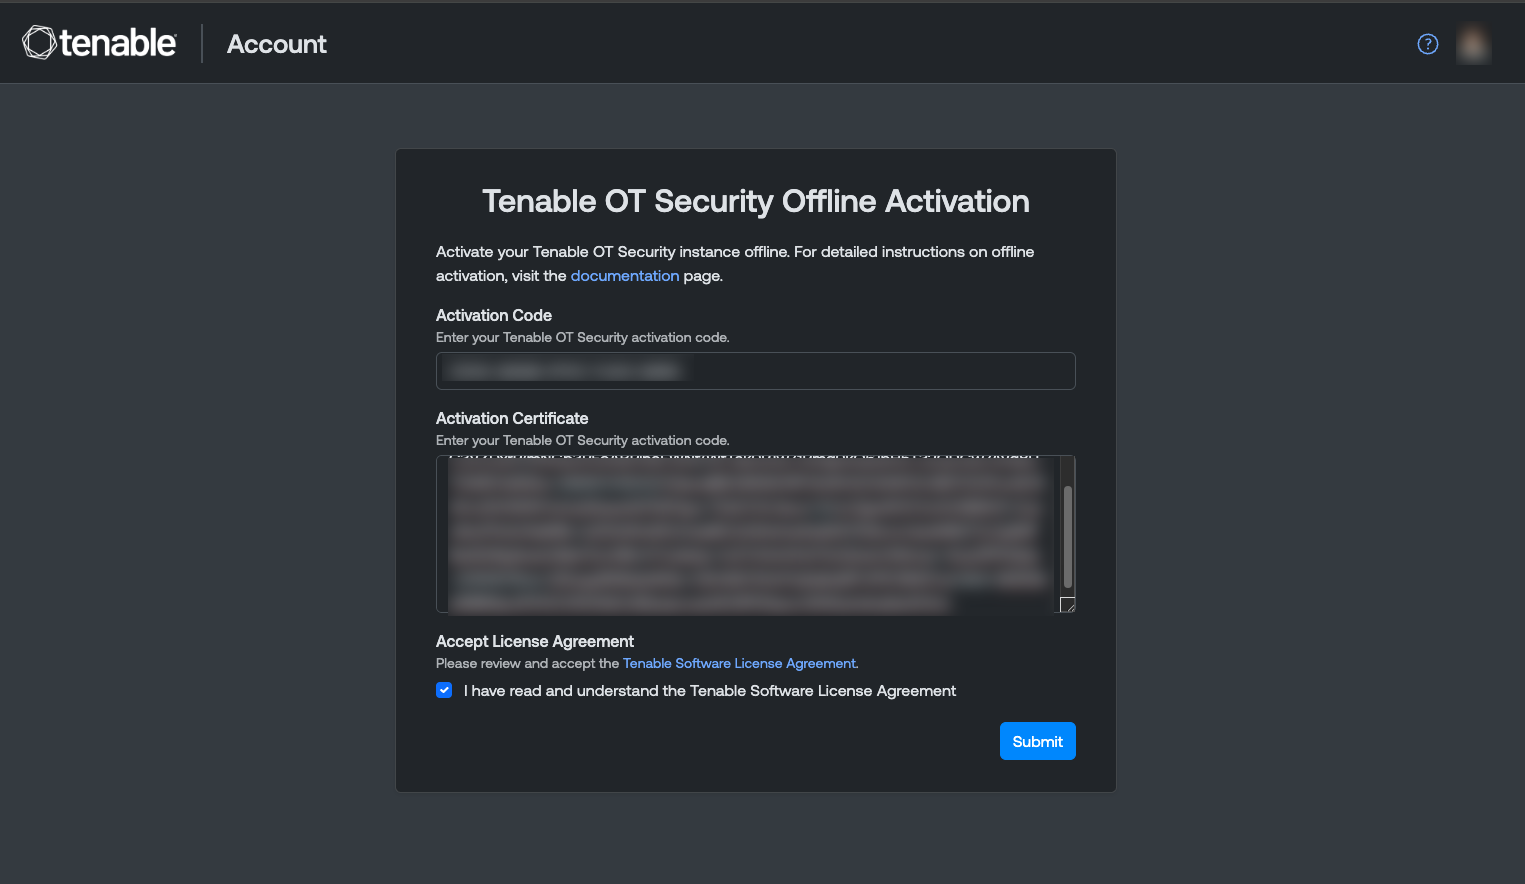 Note: To view the license agreement, click the Tenable Software License Agreement link.
 -
Click Submit.
Tenable One OT Exposure generates the activation code.
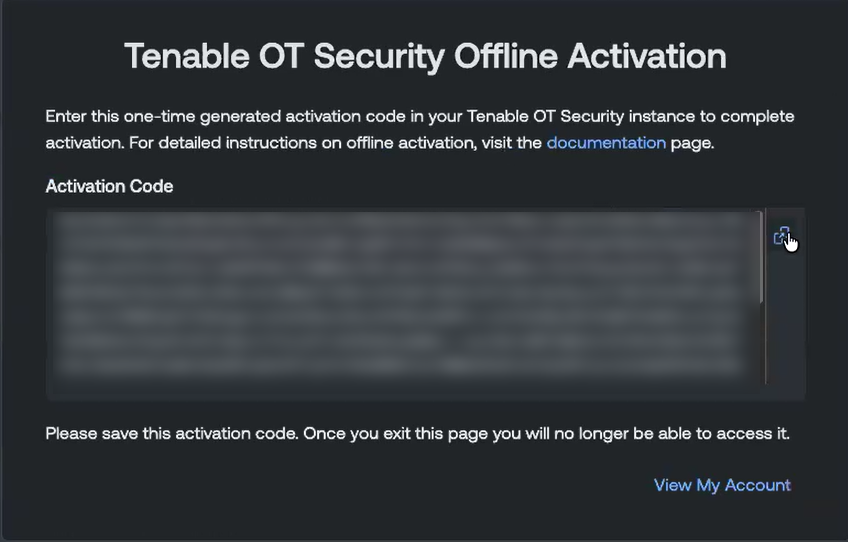
-
To copy the activation code, click the
button. -
Navigate back to the License tab in Tenable One OT Exposure, and click Enter Activation Code.
The Enter Activation Code side panel appears.
-
In the Activation Code box, paste your activation code and click Activate.
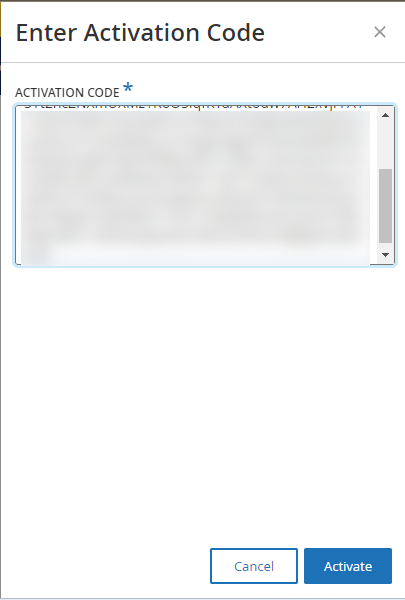
The side panel closes, and Tenable One OT Exposure updates the license.
Reinitialize your license
Reinitializing your license removes your current license from the system and activates a new license, similar to the license activation during your system startup. If you need to reinitialize your license (that is, if you receive a new license), use the following procedure.
Before you Begin
-
Your Tenable account manager must have already issued your new license in their system and provided you with a License Code (20 characters (letters / numbers)).
-
You need access to the Internet. If you cannot connect the Tenable One OT Exposure device to the Internet, you can register the license from any PC.
To reinitialize your license:
-
Go to Settings > System Configuration > License.
-
From the Actions menu, select Reinitialize license.
A confirmation window appears.
-
Click Reinitialize.
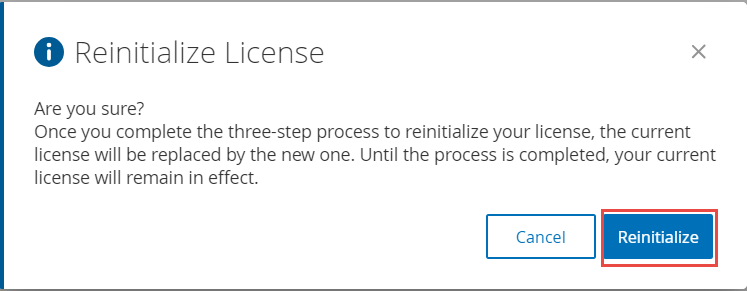
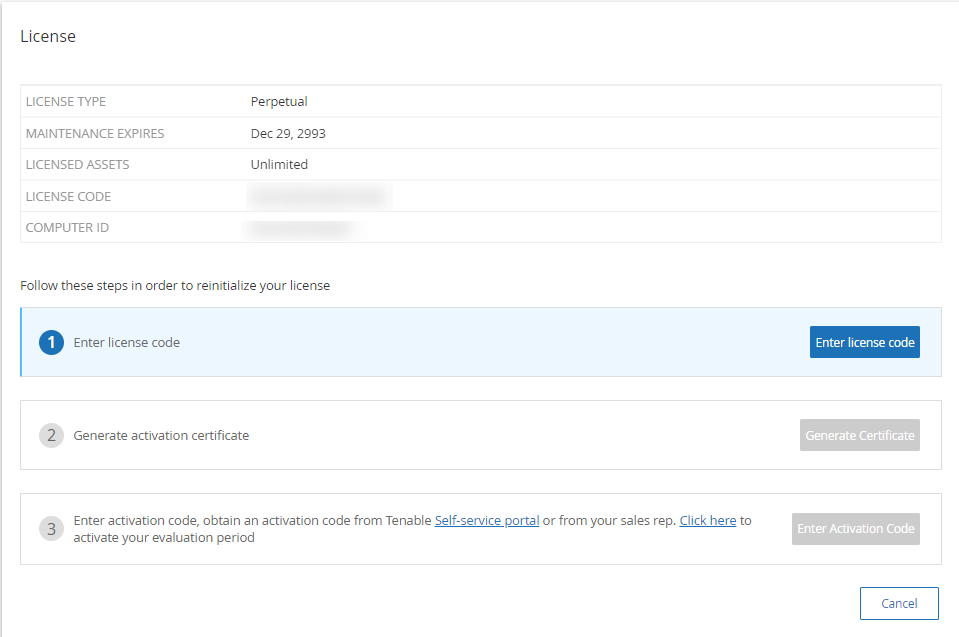
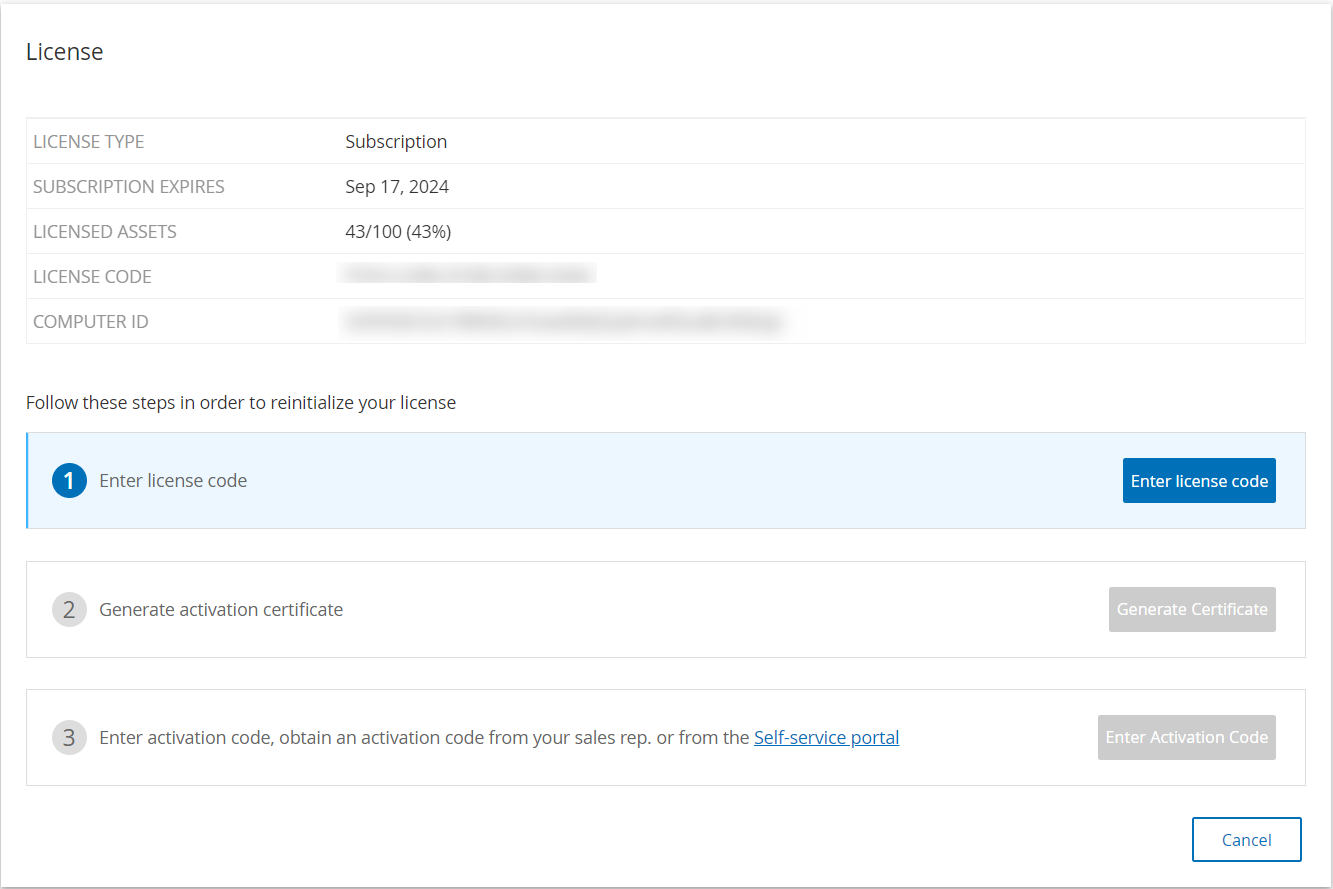
The License window appears with the three reinitialization steps.
-
Follow the system start-up steps ( Step 1 to Step 17 ) for activating your license in the Activate your License section.
After you provide your Activation Code, your new license replaces your current license.
Configure Security Center Reporting Console
You can provision a Tenable Security Center license when you deploy Tenable One OT Exposure using the Tenable Account Management portal. In the portal, create a reporting console and download a license key, which you can use to activate the Tenable Security Center license.
This procedure applies to Tenable One customers who purchase and use Tenable One OT Exposure, but want to continue using the Tenable Security Center companion license (referred to as the Reporting Console in the Account Management portal).
This procedure is not applicable for standalone Tenable One OT Exposure customers.
Before you begin
Ensure you meet the following requirements:
-
You have an active Tenable One Foundation or Tenable One Advanced license.
-
You have activated your ICP. You cannot create a license key for the reporting console until you activate an ICP. To activate your ICP, follow the steps in the Activate your Tenable One OT Exposure License section.
-
You are either a primary contact on the account or a user assigned to administer the activation code under Tenable One.
To configure a reporting console and download the license key, do the following:
-
Create a reporting console.
- In the Account Management portal, click the Reporting Consoles tab.
The Reporting Consoles section appears.
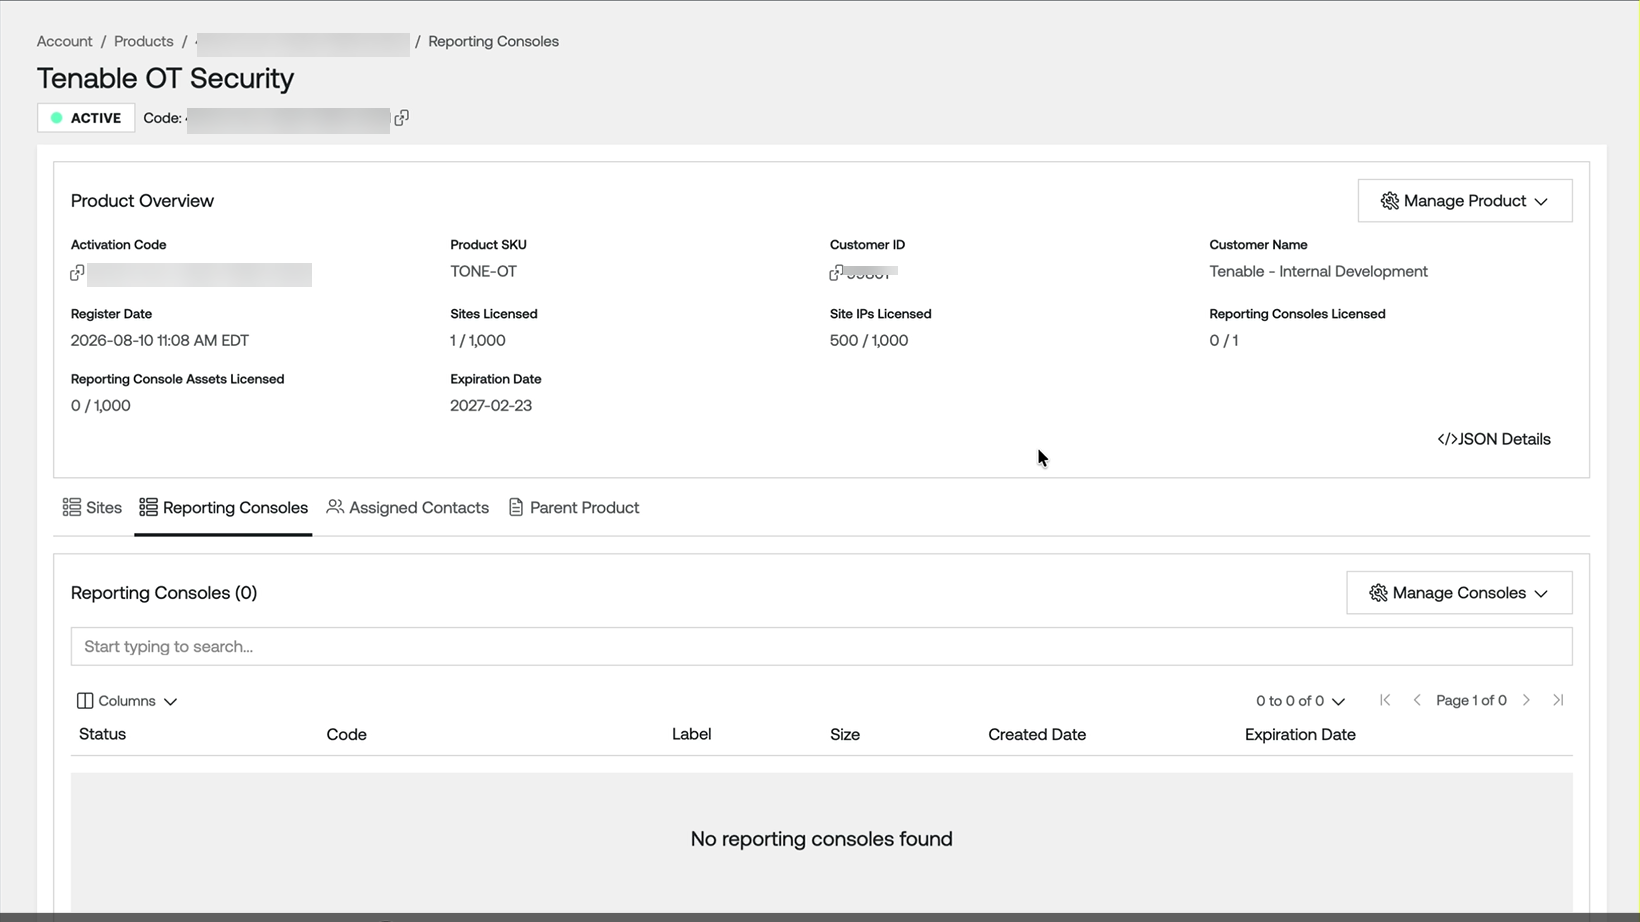
- In the upper-right corner of the Reporting Consoles tab, click Manage Consoles > Create Console.
The Create Reporting Console window appears.
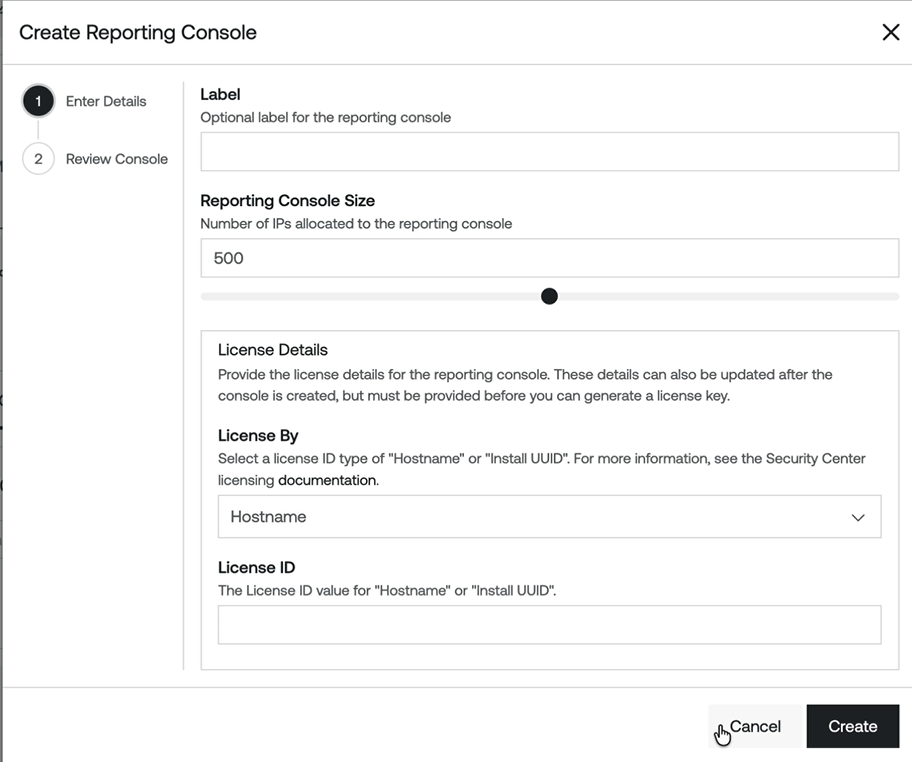
- (Optional) In the Label box, type a label for the reporting console.
- In the Reporting Console Size box, type the number of IP addresses you want to allocate to the reporting console.
Tip: You can also drag the slider located below the Reporting Console Size box to adjust the number of allocated IP addresses.
- From the License By dropdown list, select the license ID type:
- Hostname — Licenses the console by the hostname of the server.
- Install UUID — Licenses the console by the install UUID generated during installation. Use this option if the console's hostname is not stable, for example in containerized or cloud-hosted deployments.
Tip: For more information, see the Tenable Security Center licensing documentation. - In the License ID box, type the hostname or install UUID value that matches your License By selection. This appears in the License ID column for the console across the Tenable Account Management portal.
Note: You can leave License By and License ID blank during creation and configure them later from the Reporting Consoles list. However, you must populate both fields before you can generate a license key.
- Click Create.
The Tenable Account Management portal creates the reporting console and displays the activation code in the Review Console tab.Note: The reporting console status in the account portal changes from Unactivated to Activated after you use the 20-digit activation code during the Tenable Security Center console setup.
- In the Account Management portal, click the Reporting Consoles tab.
-
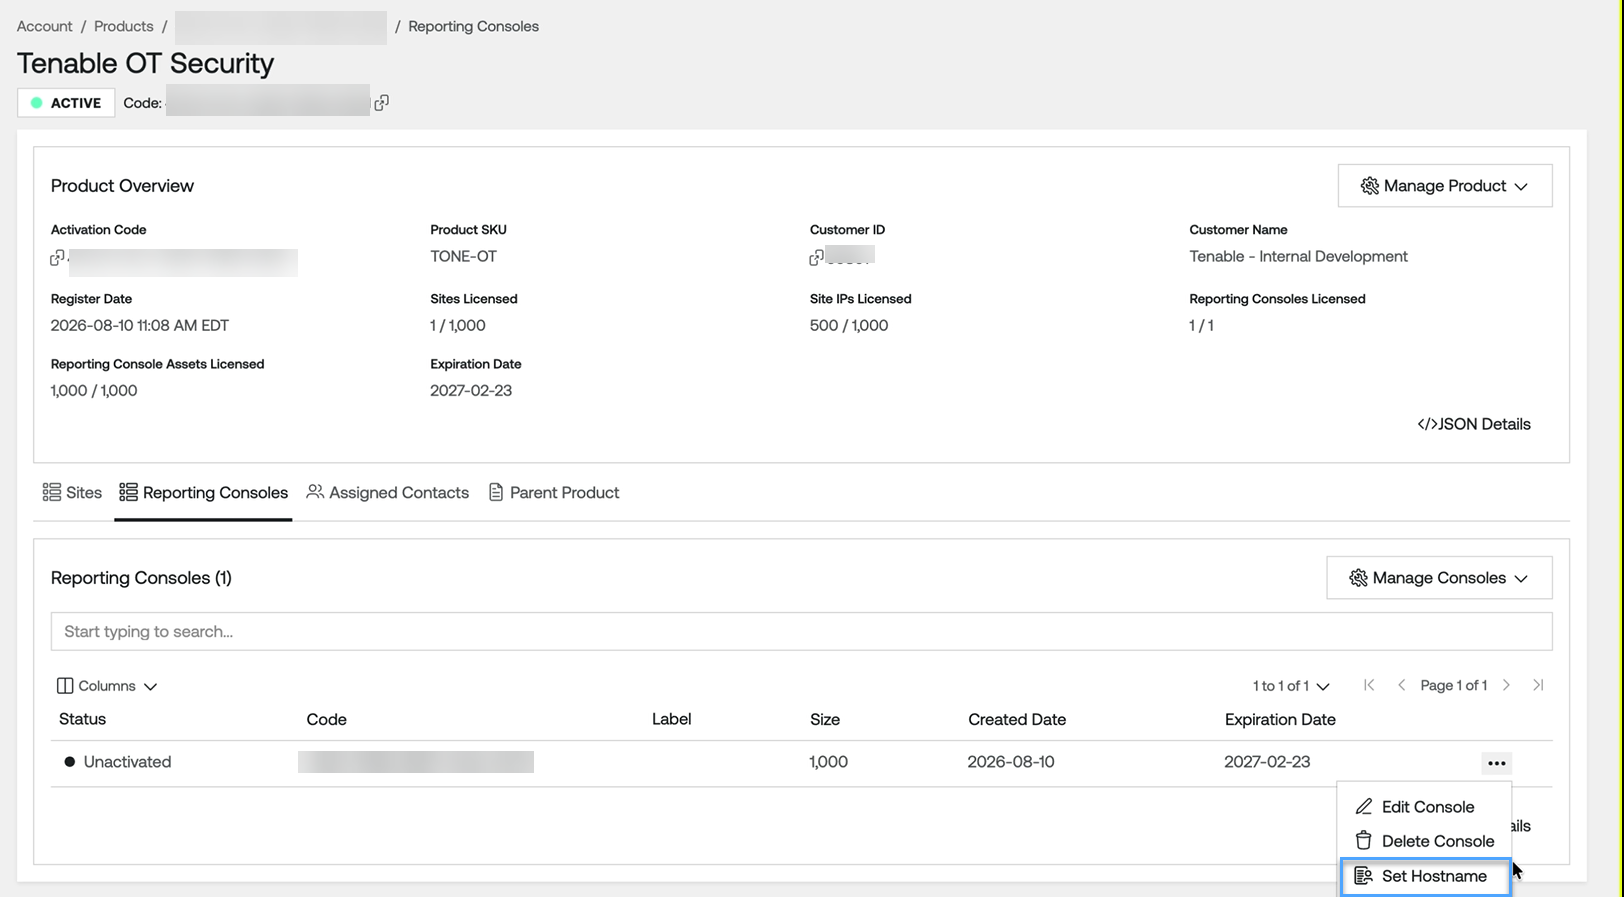
Set a Hostname. You can skip this step if you already set this when you created the reporting console.
-
In the Reporting Consoles list, in the row for the console you want to update the hostname, click the
button.A menu appears.
-
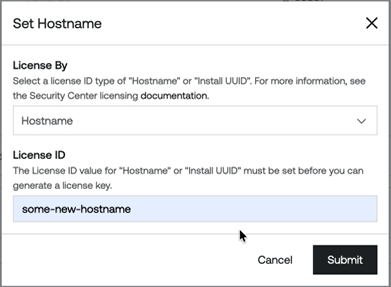
Click Set Hostname.
The Set Hostname window appears.
-
In the License ID box, type the Hostname or Install UUID value. This value is required to generate a license key.
-
Click Submit.
The Tenable Account Management portal saves your changes and updates the information in the Consoles list.
-
-
Download the License Key.
-
In the Reporting Consoles list, in the row for the console you want to activate, click the
button.A menu appears.
-
Click
 Download License Key.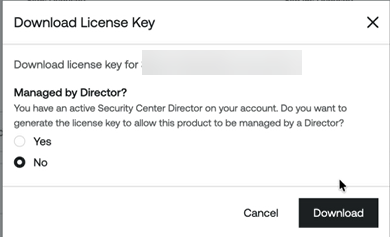
A confirmation message appears.
-
Click Download.
The Tenable Account Management portal downloads the key to your local downloads folder. You can use this license key within Tenable Security Center to activate the reporting console in Tenable One OT Exposure. For more information, see the Tenable Security Center documentation.
-
For more information about managing reporting consoles, see Manage Reporting Consoles in the Tenable Account Management User Guide.
What to do next