OT Agents
OT Agents are software components you can install on remote Windows machines to actively query and discover OT Security assets in environments where sensor installation is not possible or practical. OT Agents leverage active queries to scan duplicated and active query networks listed under Monitored Networks. This allows the agent, running on a Windows-based gateway, an engineering workstation, or Human-Machine Interface (HMI) to identify critical OT / IoT, and embedded devices on the network.
Every OT asset the OT Agent discovers is associated with that specific agent as its discovery source. This provides traceability for asset identification within your network.
To scan networks, first install and configure the OT Agent. The following sections describe how to install, configure, and run scans using the OT Agent.
View OT Agents
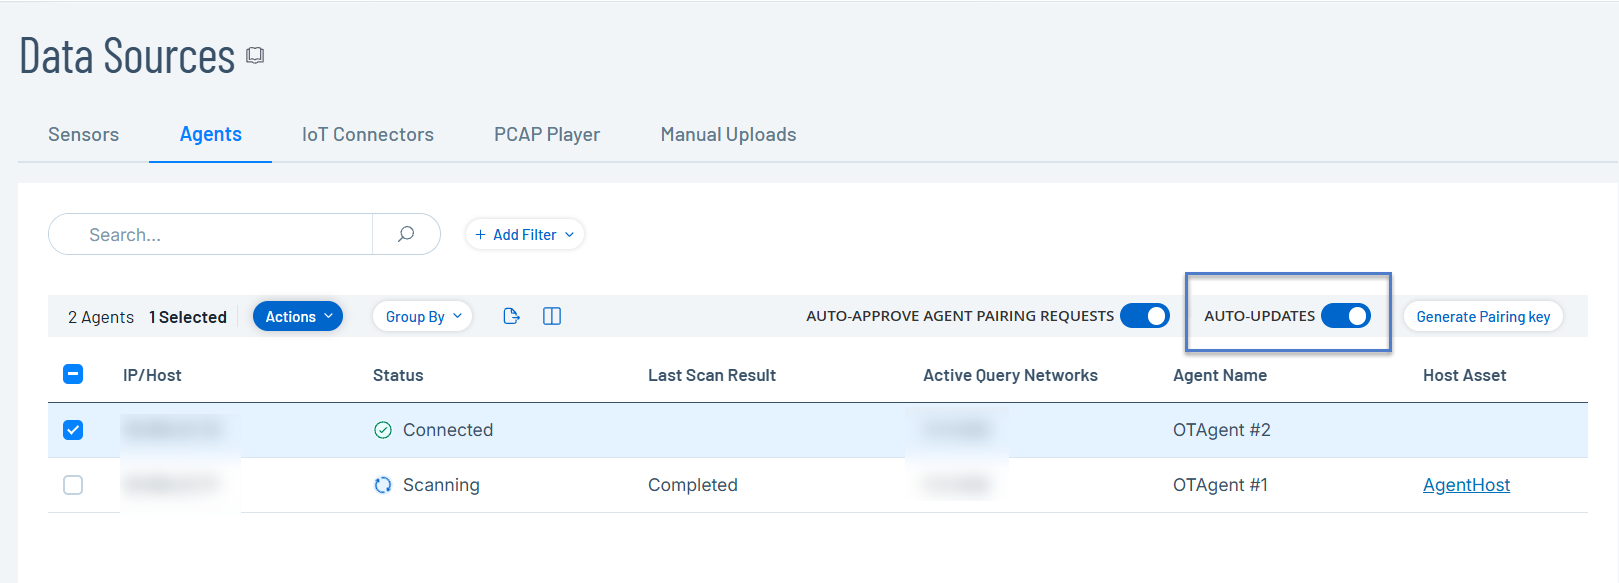
The OT Agents page acts as the central hub for monitoring and configuring the agents that you deploy to monitor your network.
To access the OT Agents page:
-
In the left navigation menu, click Data Collections > Data Sources.
The Data Sources page appears.
-
Click the Agents tab.
The Agents page appears displaying a list of your deployed OT Agents.
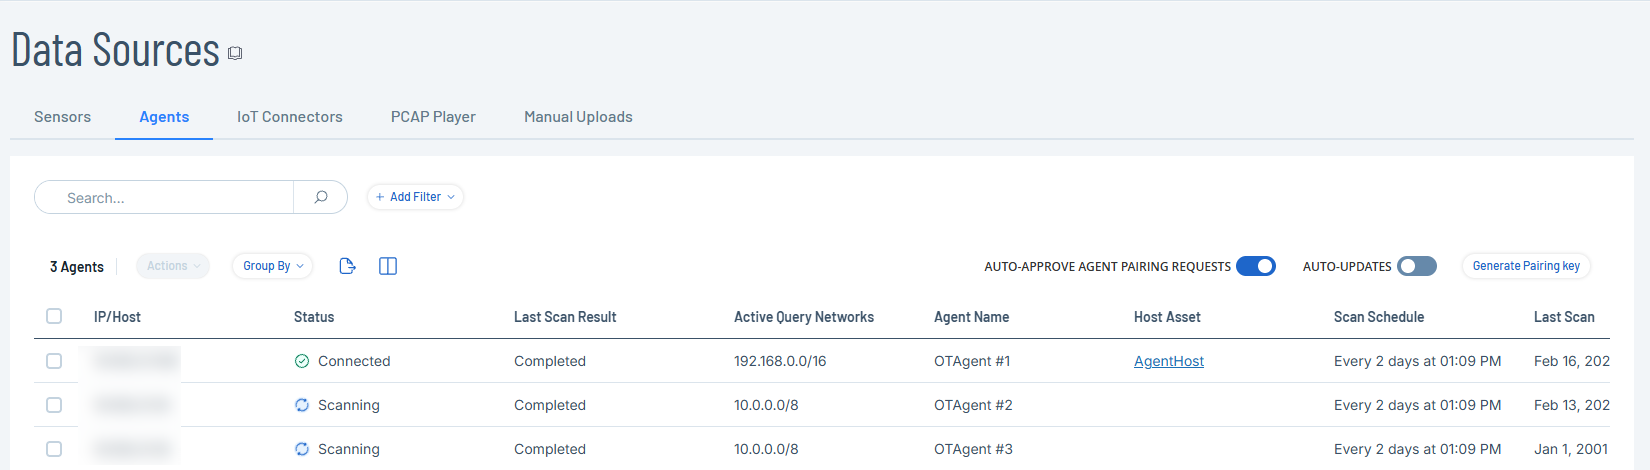
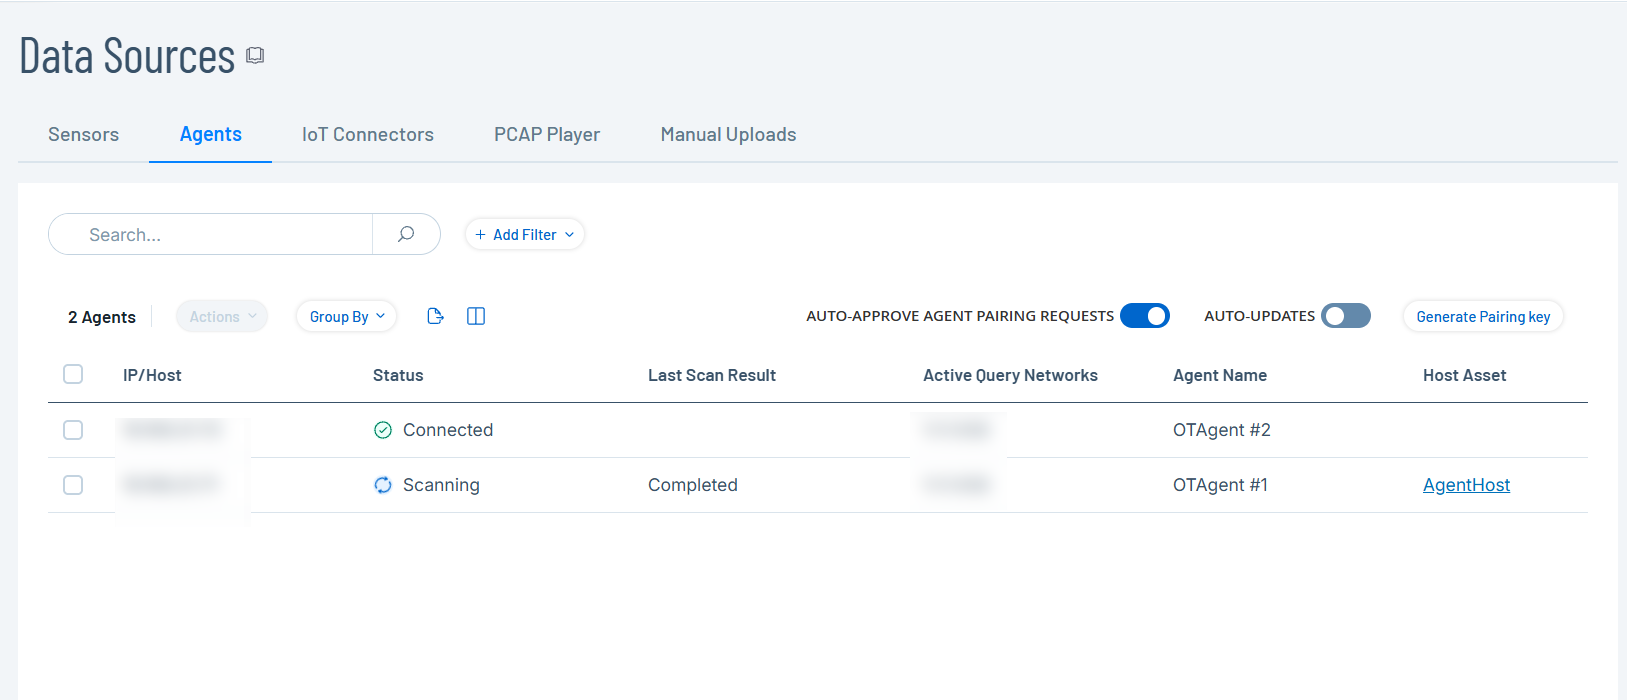
The Agents page includes the following details:
Parameter Description IP/Host The IPv4 address of the machine where the OT Agent is installed. Status The status of the agent:
-
Connected
-
Paused
-
Disconnected
-
Pending Configuration
-
Pending Approval
-
Preparing Connection
-
Waiting for Connection
-
Updating
-
Scanning
Last Scan Result The status of the last scan: Completed or Failed. Active Query Networks The specific network segments that OT agents are targeting in the current scan. Agent Name The unique name assigned to the OT agent. Host Asset A direct link to host asset's details page. Scan Schedule The configured frequency for the scan. The column displays Disabled if there are no schedules. Last Scan The date and time the most recent scan was initiated. Last Scan Duration The time taken to complete the last scan. Credentials The credentials the agents use to scan the devices. Reported Assets The number of assets detected in the scan. Agent Version The version of the OT Agent. OTD Version The version of the OT Discovery engine. Host OS The operating system on the host machine. -
Install OT Agent
Install the OT Agent on a Windows machine to scan OT environments.
Before you Begin
-
Download the OT Agent from the Tenable downloads portal.
-
Make sure you have administrator permissions on the Windows machine.
To install the OT Agent:
-
Transfer the install file (Tenable-OT-Agent-version.msi) to the Windows machine.
-
Click the .msi install file to open the installation wizard.
-
In the OT-Agent Setup Wizard window, click Next.
The Enter ICP Details window appears.
-
Select one of the following:
-
 Use Pairing Key
This is the default option. If you selected this option, perform the following steps:
-
In OT Security, navigate to Data Collection > Data Sources.
The Data Sources page appears.
-
Click the Agents tab.
The Agents page appears.
-
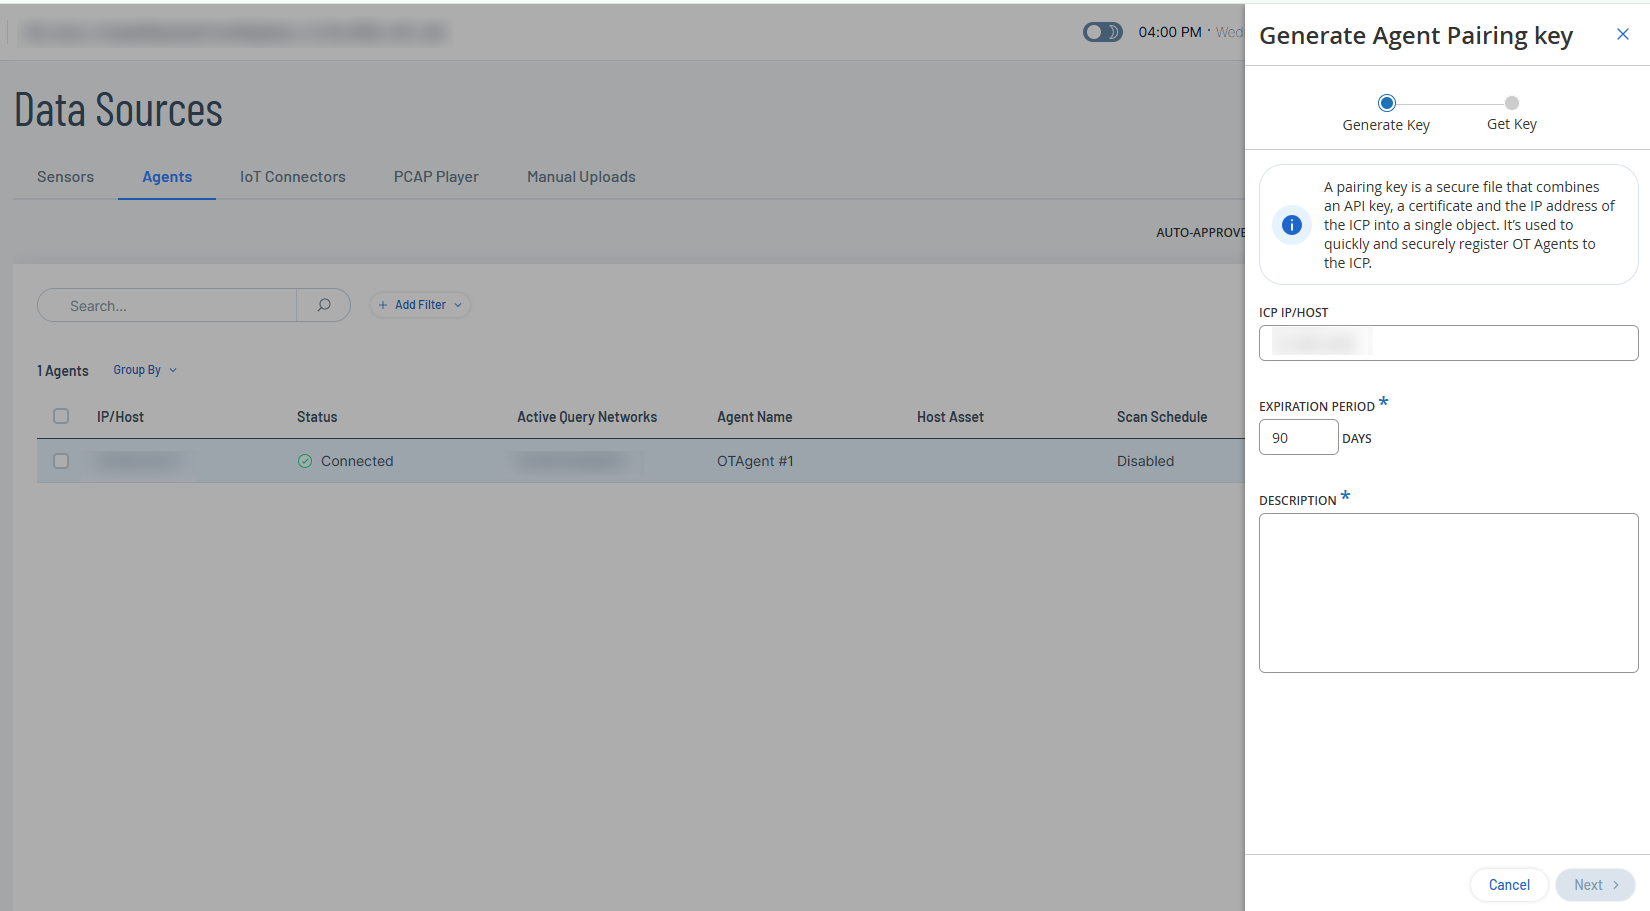
In the upper-right corner, click Generate Pairing Key.
The Generate Agent Pairing Key panel appears.
-
In the ICP IP/Host box, provide the IP address or the hostname of the ICP.
-
In the Expiration Period drop-down box, retain the default 90 days or specify the number of days after which the key expires.
-
In the Description box, provide a description for the key.
-
Click Next.
OT Security generates the pairing key.
-
Click the
 button to copy the pairing key.
 -
Click Done.
OT Security closes the panel.
-
Navigate back to the Windows host machine.
-
In the Pairing Key box, paste the pairing key you copied from the ICP.

-
-
Pair Using Username and Password
If you select this option, the relevant fields appear where you can provide the required details for the ICP.
-
In the Hostname/IP of the ICP box, type the hostname or IP address of the ICP.
-
In the Username box, provide your ICP username.
-
In the Password box, provide your ICP password. To keep an existing saved password, leave this field empty.
-
In the Certificate Fingerprint box, provide the fingerprint generated from the ICP.
You can find the fingerprint in the ICP under Settings > System Configuration > Certificates. See Certificates.
-
Click Submit.
-
-
Pair Using API Secret
If you select this option, the relevant fields appear where you can provide the required details for the ICP.
-
In the Hostname/IP of the ICP box, provide the hostname or IP address of the ICP.
-
In the API Secret box, provide the API key generated from the ICP. To keep an existing saved API key, leave this field empty.
You can generate the API key in the ICP under Settings > System Configuration > API Keys. See Generate API Keys.
-
Click Submit.
-
Note: The pairing key and certificates are only required for the pairing process. Once pairing is complete, you can delete the pairing key and certificate, if needed. -
-
Click Next.
The Destination Folder window appears.
-
In the Install OT-Agent to: box, retain the default destination or provide the path to install the OT Agent and click Next.
-
Click Install.
The installer installs the OT Agent and lists it on the Agents tab in OT Security with the status Pending Configuration.
-
Click Finish to close the installer.
Note: If there are issues with the pairing, you can use the Repair option in the OT Agent installation wizard to provide the pairing details again. -
To automatically approve the pairing request, click to enable the Auto-Approve Agent Pairing Requests toggle.
If this option is not enabled, do the following:
-
Right-click the newly added OT Agent.
A menu appears.
-
Select the checkbox next to the OT Agent.
OT Security enables the Actions > Approve menu.
-
-
Click Approve.
OT Security approves the agent pairing and changes the status to Pending Configuration.
Note: Before you run the OT Agent, ensure that its configuration is complete, even if the Auto-Approve Agent Pairing Requests option is enabled.
What to do next
Configure OT Agent
After installing the OT Agent, configure it to define its name, specify the networks it scans, and set a schedule for active queries.
Before you Begin
-
Install the OT Agent.
To configure the OT Agent:
-
In the Agents tab, do one of the following:
-
Right-click the newly added OT Agent.
A menu appears.
-
Select the checkbox next to the OT Agent.
OT Security enables the Actions > Configure menu.
-
-
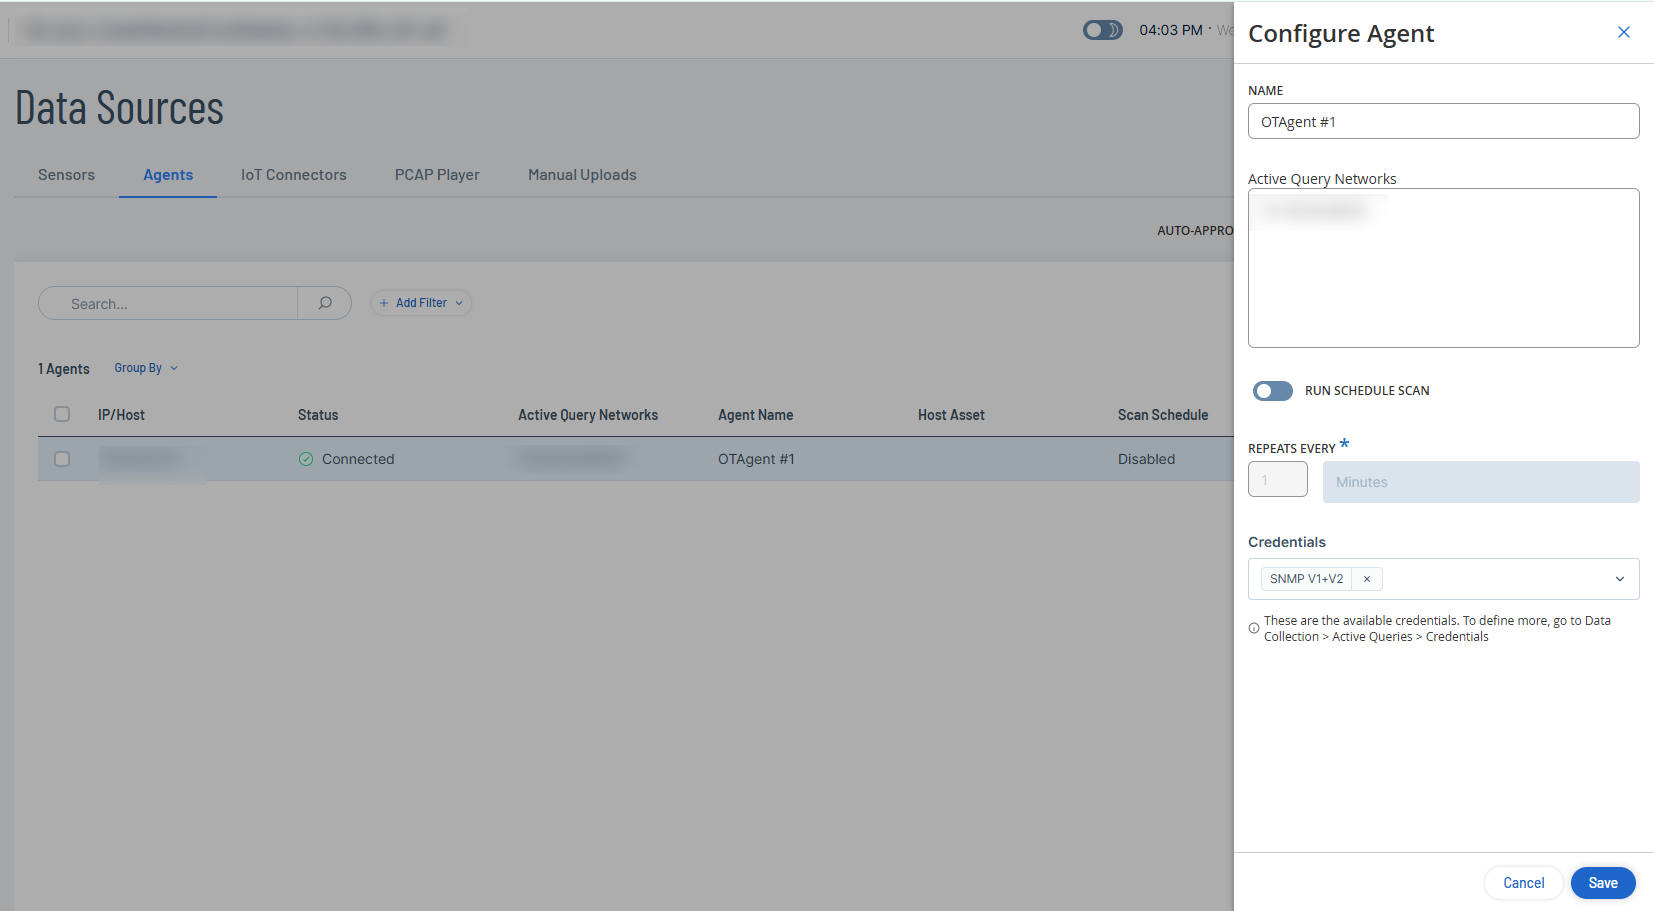
Click Configure.
The Configure Agent panel appears.
-
In the Name box, type a name for the agent.
-
In the Active Query box, provide the IP addresses of the networks to scan.
Note: The OT Agent scans only those active query network IP addresses that are part of the Monitored Networks (Environment Settings > Network Definitions > Monitored Networks). -
(Optional) To enable scheduled scans, click the Run Schedule Scan toggle.
OT Security enables the Repeats Every drop-down box.
-
(Optional) Specify the minutes, hours, days, or weeks as required.
-
In the Credentials drop-down box, select the required credentials.
Note: Only credentials you create in Active Queries > Credentials appear in this list. For more information, see Credentials. -
Click Save.
OT Security updates OT Agent's status to Connected.
What to do next
Run Scans using OT Agent
When you initiate an Agent scan, it triggers the following active queries:
-
Discovery: Detects live assets in the monitored network.
-
Open ports check: Scans the most frequently used ports of the active query clients.
-
Initial Enrichment: Identifies newly discovered assets with Dynamic Fingerprinting Engine (DFE).
-
OT Queries:Gathers device information, such as PLC running state and other modules connected to the backplane.
-
IT Queries: Obtains data from IT devices monitored by OT Security.
For more information, see Manage Active Queries.
To run an agent scan:
-
In the Data Sources > Agents tab, do one of the following:
-
Right-click the newly added OT Agent.
A menu appears.
-
Select the checkbox next to the OT Agent.
OT Security enables the Actions button in the header.
Note: To initiate scans for multiple agents, select more than one OT Agent, then click Bulk Actions > Scan Now. -
-
Click Actions > Scan Now.
The status of the agent changes to Scanning and scan begins on the specified networks. After the scan completes, click the link in the Reported Assets column in the Agents table to view the filtered results on the Inventory page.
Abort a scan
If you need to stop a scan in progress:
-
In the Data Sources > Agents tab, do one of the following:
- Right-click the agent and select Abort Scan.
- Select the checkbox next to the agent, and then click Actions > Abort Scan.
OT Security stops the scan and the Last Scan Result column shows Failed.
Update OT Agent
OT Agents use the OT Discovery (OTD) engine for actively scanning your environment. You can update the OT Discovery engine versions either manually or automatically from the Agents page.
Automatic Updates
To automatically update the OTD versions when an ICP update is available, enable the Auto-Updates toggle. The toggle is disabled by default. When you enable Auto-Updates, OT Security automatically pushes the latest OTD engine version to connected agents whenever a new release is available.
Manual Updates
Use manual updates when you need to update the OTD engines between official releases or bulk-update multiple agents simultaneously.
Before you Begin
-
Upload the OTD file in the System Configuration > Updates > OT Discovery Engine (OTD) Update section as mentioned in OT Discovery Engine (OTD) Updates.
-
Ensure that the OT Agent is online and the status is Connected.
To manually update the OTD engine:
-
In the left navigation bar, click Data Sources > Agents.
The Agents tab appears.
-
To update agents, do one of the following:
-
Right-click the agent you want to update.
A menu appears.
-
Select the checkbox next to the agent you want to update.
OT Security enables the Actions menu.
Note: To bulk-update OTD engines, select multiple agents, and then click Bulk Actions > Update.
-
-
Click Actions > Update.
The Update OTD Version dialog box appears.
-
Click Update to confirm.
OT Security updates the OT Discovery engines to the latest version.
Delete an OT Agent
Uninstalling the OT Agent from the Windows machine changes the status of the agent to Disconnected in OT Security.
To delete an OT Agent:
-
In the Windows machine, open the installer and click Remove.
-
Follow the steps in the wizard to uninstall the agent.
OT Agent gets uninstalled from the Windows machine.
-
Navigate to the Data Sources > Agents tab in OT Security.
OT Security updates the status of the agent to Disconnected.
-
Do one of the following:
-
Right-click the newly added OT Agent.
A menu appears.
-
Select the checkbox next to the OT Agent.
OT Security activates the Actions > Delete menu.
Note: To delete OT agents in bulk, select more than one OT Agent, then click Bulk Actions > Delete.
-
-
Click Delete.
OT Security deletes the OT Agent.
Note: If there are associated duplicated networks, you must first delete them before deleting the agent.
Install OT Agents Using CLI
Use CLI commands to install OT Agent with pairing key, ICP credentials, or API key. You can also uninstall OT Agent via CLI.
Before you begin
-
Download the OT Agent installer from the Tenable Downloads portal.
To install OT Agent with a pairing key, run the following command:
msiexec.exe /i "<OtAgentInstaller.msi>" /qn PAIRING_KEY="<PairingKey>"Where:
-
OtAgentInstaller.msi is the installation file.
-
PairingKey is the key that you generate from the Data Collection > Data Sources > Agents tab in OT Security.
Example:
msiexec.exe /i "OtAgentInstaller.msi" /qn PAIRING_KEY="xxxxxxxxxxxxxxxxxxxxxxxxxxxxxxxxxxoxxxxxxxxxxxx"To install OT Agent with username and password, run the following command:
msiexec.exe /i "<OtAgentInstaller.msi>" /qn ICP_ADDRESS="<IpAddress>" ICP_USERNAME="<Username>" ICP_PASSWORD="<Password>" ICP_FINGERPRINT="<CertFingerprint>"Where:
-
OtAgentInstaller.msi is the installation file.
-
IpAddress is the IP address of the ICP.
-
Username is the username to log in to the ICP.
-
Password is the ICP password.
-
CertFingerprint is the certificate that you generate in OT Security.
Example:
msiexec.exe /i "OtAgentInstaller.msi" /qn ICP_ADDRESS="XX.XXX.XX.XX" ICP_USERNAME="admin" ICP_PASSWORD="xxxxxxx" ICP_FINGERPRINT="XX:XX:XX:XX:XX:XX:XX:XX:XX:XX:XX:XX:XX:XX:XX:XX:XX:XX:XX:XX"To install with an API Key, run the following command:
msiexec.exe /i "<OtAgentInstaller.msi>" /qn ICP_ADDRESS="<IpAddress>" ICP_APIKEY="<APIKey>" ICP_FINGERPRINT="<CertFingerprint>"(Optional parameter) INSTALLBASE='"<FullDirPath>"'
Where:
- OtAgentInstaller.msi is the installation file.
-
IpAddress is the IP address of the ICP.
-
APIKey is the API Key generated from the ICP.
-
CertFingerprint is the certificate generated from the ICP.
-
FullDirPath is the path of the installation directory.
Example 1:
msiexec.exe /i "OtAgentInstaller.msi" /qn ICP_ADDRESS="XX.XXX.XX.XX" ICP_APIKEY="kxxxxxxxxxxxxxxxxx_xxxxxxxx=" ICP_FINGERPRINT="XX:XX:XX:XX:XX:XX:XX:XX:XX:XX:XX:XX:XX:XX:XX:XX:XX:XX:XX:XXExample 2: Using the INSTALLBASE parameter:
msiexec.exe /i "OtAgentInstaller.msi" /qn ICP_ADDRESS="xx.xxx.xx.xx" ICP_APIKEY="xxxxxxxxxxxxxxx_xxxxxxxxxxx=" ICP_FINGERPRINT="XX:XX:XX:XX:XX:XX:XX:XX:XX:XX:XX:XX:XX:XX:XX:XX:XX:XX:XX:XX" INSTALLBASE='"C:\Program Files\AAA"'To uninstall OT Agent, run the following command:
msiexec.exe /x "<OtAgentInstaller.msi>" /qnWhere:
-
OtAgentInstaller.msi is the installation file.
Enable, Disable, or Set Scheduled Scans for OT Agents
Enable or disable scheduled scans for multiple OT Agents simultaneously using the Bulk Actions option.
Before you Begin
-
Make sure that the OT Agents are online and that their Status column shows Connected.
To perform bulk actions on scheduled agent scans:
-
In the Agents table, select more than one OT Agent for your scan.
OT Security enables Bulk Actions in the header.
-
Select one of the following options:
Bulk Actions Option Description Enable Scheduled Scan Select this option to enable scheduled agent scans. The scheduled scan runs every minute by default. Disable Scheduled Scan Select this option to disable scheduled agent scans. Set Schedule Scan -
To configure a scheduled scan, click Bulk Actions > Set Schedule Scan.
The Set Schedule panel appears.
-
In the Repeats Every box, select the number of times you want the scan to repeat.
-
Specify the minutes, hours, days, or weeks as required.
Note: The schedule that you specify here overrides any existing schedules for the agents. -
Click Save.
-