Set Up OT Security EM
The Initial setup of OT Security EM involves two steps:
-
Run the Setup Wizard and provide relevant configuration information.
To initiate the OT Security EM setup:
-
From your Chrome browser, navigate to https://192.168.1.5.
The Welcome page of the OT Security EM setup wizard opens.
 Note: You can access the user interface from the latest Chrome browser version.
 -
Click Start Setup Wizard.
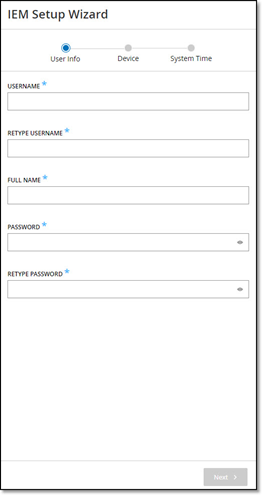
The setup wizard opens with the User Info page.
The OT Security EM Setup Wizard takes you through the process of configuring the basic system settings.
Note: To change the configuration later, you can do so from Local Settings in the Management Console (user interface).
Setup Wizard — User Information
On the User Info page, provide your user account information:
-
In the Username box, type a username for logging into the system.
The username must include only lowercase letters and numbers.

-
In the Retype Username box, re-type the identical username.
-
In the Full Name box, type your complete first and last name.
Note: This is the name that appears in the header bar and on logs of your activity in the system. -
In the Password box, type a password to be used for logging into the system.
The password must contain at least:
-
12 characters
-
One uppercase letter
-
One lowercase letter
-
One digit
-
One special character
-
-
In the Retype Password box, re-type the identical password.
-
Click Next.
The Device page appears.
Setup Wizard — Device
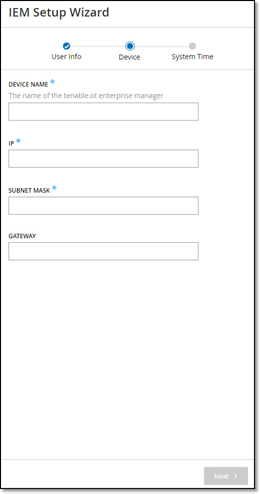
On the Device page, provide the information about the OT Security platform:
-
In the Device Name box, type a unique identifier for the OT Security EM.

-
In the IP box, type an IP address (within the network subnet) to apply to the OT Security EM.
This becomes the OT Security EM IP address.
-
In the Subnet Mask box, type the subnet mask of the network.
-
To set up a Gateway (optional), type the gateway IP for the network in the Gateway box.
Note: If you do not provide this value, OT Security cannot communicate with external components outside of the subnet. For example, email servers and syslog servers. -
Click Next.
The System Time page of the setup wizard appears.
Setup Wizard — System Time
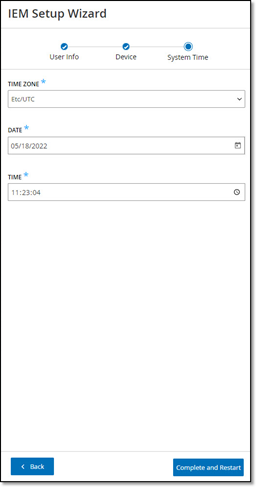
On the System Time page, the correct time and date are set automatically. If the correct date and time are not set, do as follows:
To set the date and time:
-
In the Time Zone drop-down box, select the local time zone at the site location.

-
In the Date box, click the calendar icon
 .
.A pop-up calendar appears.

-
Select the current date.
-
In the Time box, select hours, minutes, and seconds AM/PM respectively and type the values using either the keyboard or the up and down arrows.
Note: To edit any of the previous pages of the setup wizard, click Back. After you click Complete and Restart, you cannot return to the setup wizard. However, you can change the configuration settings on the Settings page of the user interface. -
To complete the setup procedure, click Complete and Restart.
-
Once the restart is complete, OT Security EM redirects you to the Login page.
After completing the setup wizard, contact Tenable Support to add your sites to OT Security EM.