AI Activity Issues
Use the Activity Issues page to view all the issues that Tenable One AI Exposure creates from your AI detections. This page displays all the critical and high-severity issues.
Activity Issues combine multiple related activity detections into one actionable risk.
When you repeatedly trigger the same activity rule, AI Exposure groups the resulting detections together. The system determines whether to create an issue based on the volume and severity of those combined detections.
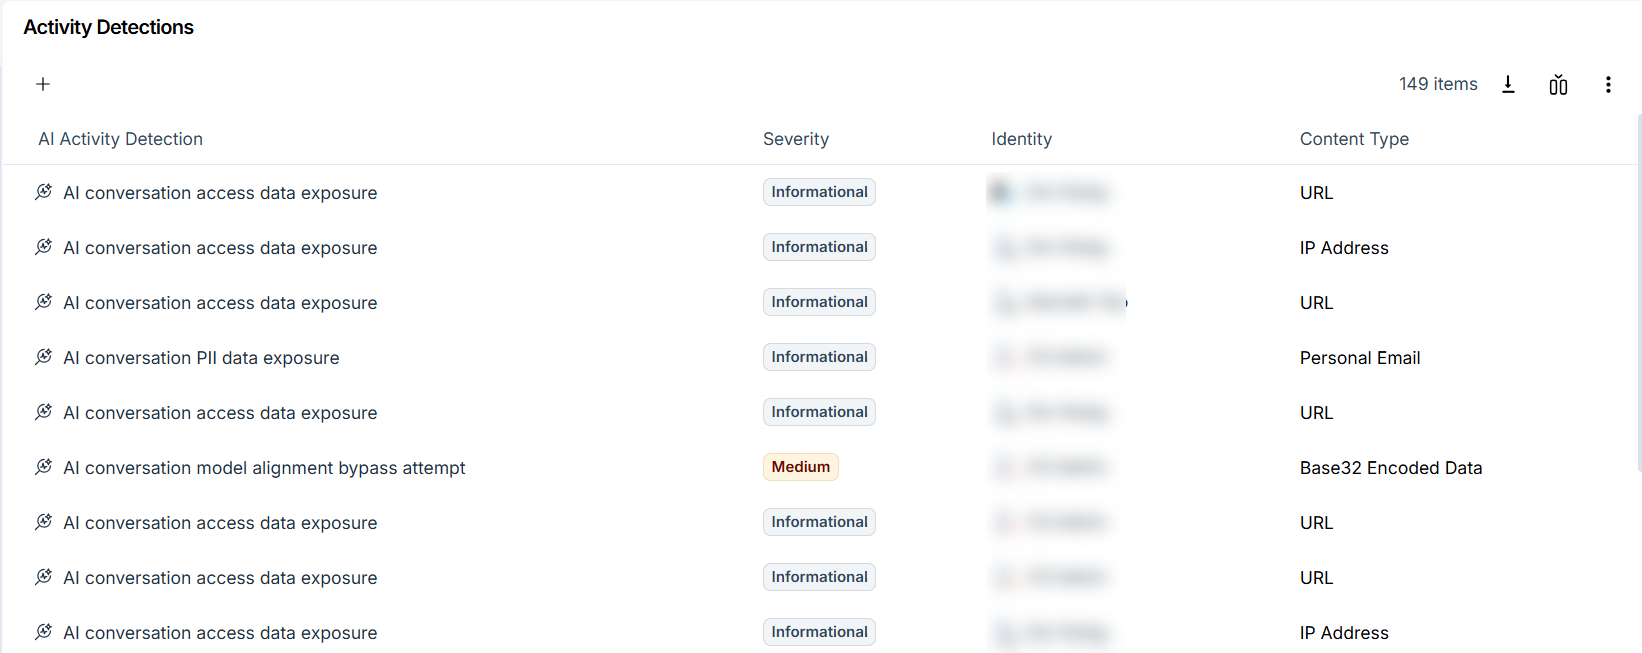
Navigate the Activity Detections Page
The Activity Detections page includes the following elements:
| Item | Description |
|---|---|
| AI Activity Issue | The AI Activity issue with critical or high severity that AI Exposure detected. |
| Severity | The color-coded risk severity of the activity issue. |
| Filters |
Filter issues by properties and rule type. Select from the following properties:
|
| Star | Star important or significant issues to mark them for later review. |
| Actions |
Perform actions on an activity issue, such as:
|
| Bulk actions | Apply an action to multiple issues simultaneously. |
| Export | Export data to a CSV for analysis or processing by an external tool. |
| Column picker | Choose which columns to display in the issues table. |
Export Activities Data
Export all issues related to AI activities to create a summary report of AI issues in your environment.
The data is exported according to the current filters applied to the table. The output data is in CSV format and contains all relevant data, including remediation steps.
For example, you can perform the following tasks:
- Create a report of all closed issues, containing sub-status information about the reason for closure, to share with relevant stakeholders in your company.
- Create reports for open or starred issues, or any other subset of issues using filters.
To export AI activities:
- In the AI Exposure Console, navigate to the relevant Risk > Activity Issues page.
- (Optional) Apply filters to narrow down the list of activities.
- Click
 Export to create and download the CSV summary report.
Comment on an Activity Issue
Add comments to an AI activity issue to provide additional context or flag important observations.
To add a comment to one or several activity issues:
- In the AI Exposure Console, navigate to the Risk > Activity Issues page.
-
From the Activity Issues table:
- Single activity issue: Click the three-dot icon next to it and select Comment.
- Multiple activity issues: Select the relevant issues and click Comment at the bottom.
- Enter your comment.
- Click Save.
The comments appear in the Activity tab within the Activity Details panel. You hcan edit or delete the comment from the Activity tab.
Close an Activity Issue Manually
When you resolve an AI issue and the underlying security issue, you can manually close the open issue.
When you manually close an issue, the issue is marked as Closed (Manually closed). If you do this and the issue is not fixed, its status reverts to Open (Reopened) during the next system synchronization.
To mark and see closed issues:
-
From the Activity Issues table:
- Single issue: In the row of the issue, click the three dots icon and then click Close.
- Multiple issues: Select multiple issues and then click Close at the bottom of the table.
-
In the Close Issue dialog box, select the reason for closing the issue:
- Benign — The flagged risk exists, but it does not pose a material threat or is already mitigated by other controls.
- False positive — The flagged risk does not actually exist, or the alert is incorrect.
- True positive — The flagged risk exists as reported, and poses a real threat.
- In the Comment box, add a description of the reason for closing the issue, which is added to the activity issue.
- Click Close.
Reopen an Activity Issue
You can reopen an issue that was manually closed. If you do so, the issue is marked as Open (Reopened)
To reopen an issue:
-
From the Activities Issues table:
- Single Issue: Click the three dots icon next to an individual issue, and then click Open.
- Multiple Issues: Select multiple issue and then click Open at the bottom.
- In the Open Issue dialog, add a comment to indicate the reason for reopening, which is added to the activity issue.
- Click Open.
Trigger Actions on AI Activity Issues
You can manually trigger actions associated with ticketing Integrations and/or send email notifications for individual activities.
Required AI Exposure User Role: You must have either the Collaborator or Administrator role in AI Exposure to perform this action.
Trigger an Action for a Single Activity Issue
To manually trigger an action for a single activity issue:
- In the AI Exposure Console, navigate to the Risk > Activity Issues page.
- Click the activity issue for which you want to trigger an action. The issues panel appears.
-
In the upper-right corner, click the three dots menu and select the relevant action.
(Click the
 icon below for instructions, per action)
 Send via email
- Enter one or more email addresses. You can choose to send the information to the owners of the associated resources. This may include numerous recipients. For example, if the owner is a group with no associated email address, Tenable sends an email to all group members.
- (Optional) Enter a message to the recipients.
- Click Send.
Create a Jira issue
- Select a Project, Issue Type, Assignee (optional), Labels, Epic (optional), and Environment (URL of Jira instance). The project you select determines which values are available in the other field drop-down menus. For labels, you can either choose from a list of labels already configured in the Jira instance or manually add new labels. Label names cannot contain spaces.
- (Optional) Edit the predefined content in the Summary and/or Description fields.
- (Optional) Click Add Optional Field to include non-mandatory data like labels, assignees, or epics.
- Click Create Issue.
Create a ServiceNow Incident
- Select an Instance, Assignment group, an Assignee, a Category , On hold reason, Service, Severity, and a Super user.
- (Optional) Edit the predefined content in the Summary and/or Description fields.
- (Optional) Click Add Optional Field to include non-mandatory data.
- Click Create Incident.
Send to Webhook
- If you have more than one webhook configured, select the webhook that you want to send the issue to.
- Click Yes to confirm.
Trigger an Action for Multiple Issues
Manually trigger an action for multiple activities. For Jira/ServiceNow, you can choose whether to:
- Create a single, unified ticket that includes all selected activities.
-
Create separate tickets, one per selected issue.
Note: When you trigger multiple Jira issues or ServiceNow incidents at once, you can’t edit the summary or description fields. Each issue/incident will contain the default summary/description provided by AI Exposure.
To manually trigger an action for multiple issues:
- In the AI Exposure Console, navigate to the Risk > Activity Detections page.
- Select the checkboxes next to the issues that you want to trigger an action for.
-
From the bottom menu panel that appears, select the relevant action:
- Send to Webhook
- If you have more than one webhook configured, select the webhook that you want to send the issues to.
- Click Yes to confirm.
- Share via email
- Enter one or more email addresses. You can send the information to the owners of the associated resources. This may include numerous recipients. For example, if the owner is a group with no associated email address, Tenable sends an email to all group members.
- (Optional) Enter a message to the recipient/s.
- Click Send.
- Create Jira issues
-
Choose whether to:
- Create a unified Jira issue which includes all issues
- Create separate Jira issues, one per issue
- Select a Project, Issue Type, Assignee, Epic (optional), Environment (URL of Jira instance), and Labels. The Project you select determines which values are available in the other field dropdowns.
- (Optional) Click Add Optional Field to include non-mandatory data like labels, assignees, or epics.
- Click Create Issue/s.
-
Choose whether to:
- Create ServiceNow incidents
-
Choose whether to:
- Create a unified ServiceNow issue which includes all issues
- Create separate ServiceNow issues, one per issue
- Select an Instance and an Assignee.
- Select an Impact and Urgency for the incident.
- Click Create Incident/s.
-
Choose whether to:
- Send to Webhook
View Activity Details
Click an activity issue to view granular information and remediate the associated risk.
From the details pane, you can perform the following actions:
- View the evidence that led to being flagged as a potentially harmful event.
- Click the View Conversation link to view the complete conversation with the AI platform.
- View a detailed historical account of the event, an expanded rationale for the potential risk it imposes, and specific remediation instructions.
View Activity Issue Details
View the AI activity issue to see information about the lifecycle of the conversation within AI Exposure. For example, you can see when:
- The conversation was created.
- The status changed (either by the system or manually).
- Tickets were created for third-party integrations.
To view details of activity issues:
-
In the Activity Issues table, click the activity issue for which you want to view the details. A panel appears with details about the issue.
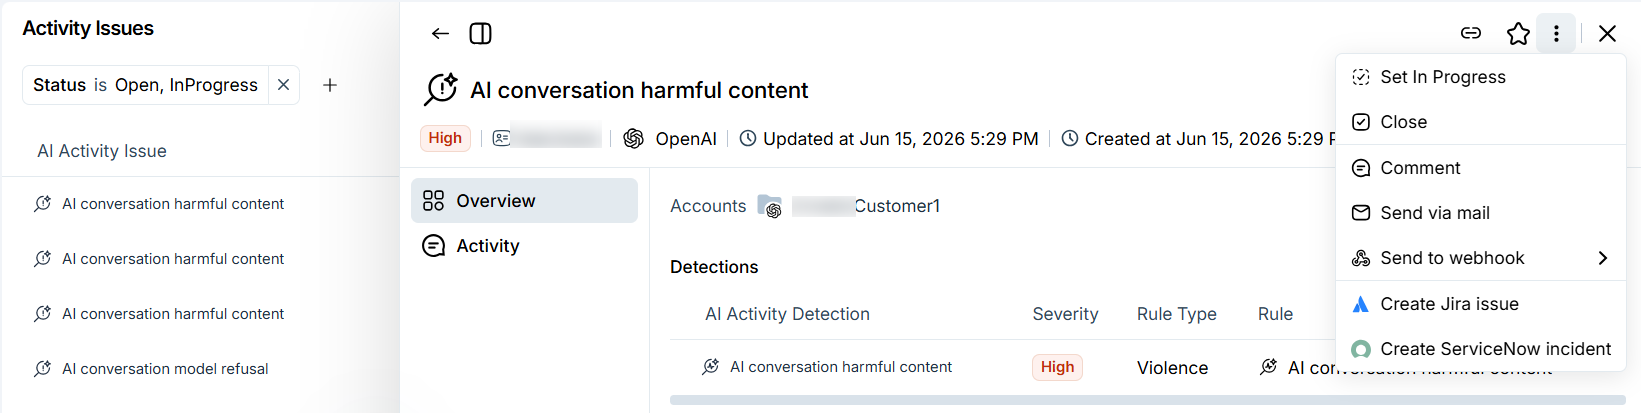
- Click the Overview tab to view the related Accounts and AI Activity Detections.
- Click the Activity tab to view all associated activities.
Add a Comment for an Activity Issue
To add a comment:
- From the Activity Issues table, click a relevant AI activity issue.
- Click Activity.
- (Optional) Write a comment and then click Save. AI Exposure saves the comment to the activity issue.