AI Posture Findings
Use the Findings page to efficiently triage findings across your AI services. You can discover and remediate critical findings in your production environment. Tenable One AI Exposure detects findings based on your configured policies.
Findings are posture-related, while activity detections and activity issues are activity-related.
Navigate the Findings Page
View findings from the Findings pages, grouped according to their current status:
- Open — Displays all active findings in your environment.
- Closed — Displays the findings that were closed, either manually or automatically by AI Exposure.
The navigational elements on the Findings page allow you to narrow down and organize the results to find specific data.
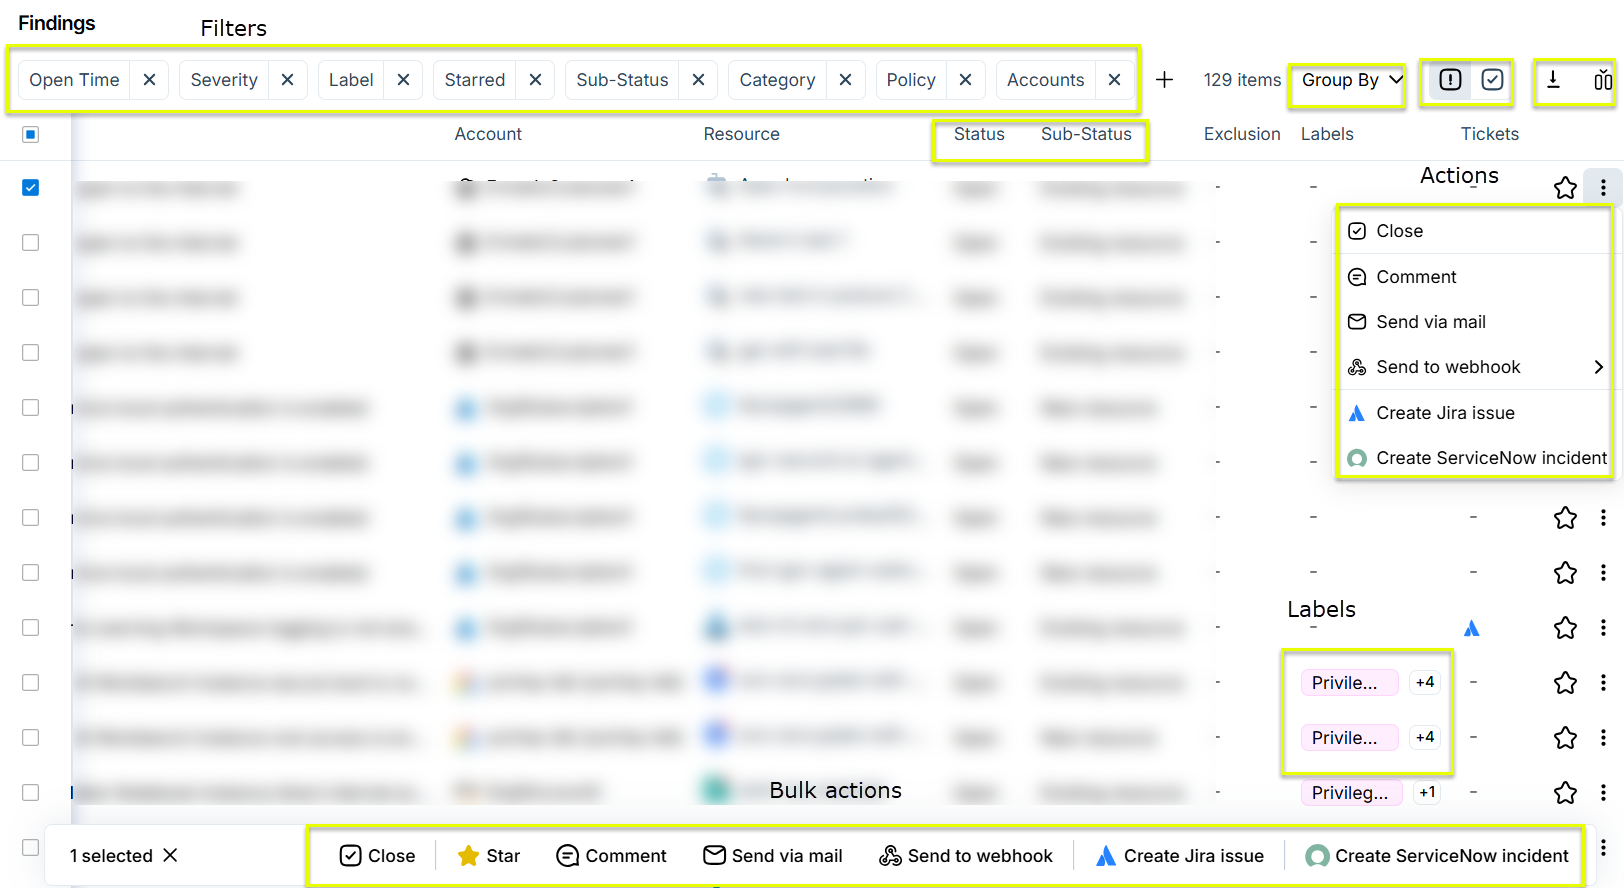
| Item | Description |
|---|---|
| View by Status | View Open or Closed findings. |
| Severity | The color-coded risk severity of the finding, used to filter findings in the default view when you do not apply the Group by option. |
| Status / Sub-Status column/filter | The current lifecycle state of the finding. For more information, see Finding Lifecycle. |
| Select all | Select all findings based on applied filters to perform bulk actions. For example, if you want to ignore or manually close a certain group of findings. This selection is limited to 10,000 findings. |
| Filters |
Use the filters to narrow the visible data. Available filters include:
|
| Group by |
Group findings by one of the following criteria:
For both filtering methods, grouped findings are listed in order of the percentage of severe findings they contain. For example, a group of findings where 75% percent have critical severity is listed before a group where 100% have high severity. |
| Labels | Labels applied to a resource associated with a finding automatically propagate to the finding. |
| Star | Star important or significant findings to mark them for later review. |
| Actions |
Perform actions on a finding, such as:
|
| Bulk actions | Apply an action to multiple findings simultaneously. |
| Export | Export data to a CSV for analysis or processing by an external tool. |
| Column picker | Choose which columns to display in the Findings table. |
Export Finding Data
Export finding data to create a summary report of findings in your environment. The data exports according to the current filters applied to the table.
The output data is in CSV format and includes all relevant findings along with remediation steps.
For example, you can perform the following tasks:
- Create a report of all closed findings containing sub-status information about the reason for closure (for example, Resource Deleted) to share with relevant stakeholders in your company.
- Create reports for open/starred findings, or any other subset of findings (using filters).
To export findings data:
- In the AI Exposure Console, navigate to the relevant Risk > Findings page and select Open or Closed.
- (Optional) Apply filters to narrow down the list of findings.
-
To export data for specific finding types that contain additional, non-standard information:
- Click Group by > Policy.
- Click a relevant type to expand the section. For example, Bot Service is exposed to the internet.
- In the upper-right corner, click the Export button.
- Click
 Export to create and download the CSV.
Manually Close a Finding
When you remediate a finding and solve the underlying security issue, AI Exposure automatically marks the finding as Closed (Fixed). In some cases, however, you may want to manually close an open finding.
Consider the following examples:
- Since the automatic identification and marking of a finding as resolved can take time, you can resolve the finding manually to remove it from the Findings page sooner.
- Some finding types are never automatically marked as resolved by AI Exposure. This applies to findings that serve primarily as alerts, such as anomaly findings. Due to the unique nature of anomaly findings, you can remediate them traditionally like most other findings. Instead, you can manually mark them as resolved after investigating whether they represent a real threat to your environment.
When you manually close a finding, the finding is marked as Closed (Manually closed). If you close a finding manually, but the issue is not fixed, the finding status reverts to Open (Reopened) during the next system synchronization.
To mark and see closed findings:
-
From the Findings table:
- Single finding: Click the three dots icon next to an individual finding and then click Close.
- Multiple findings: Select multiple findings and then click Close at the bottom.
- In the Close Finding dialog, add a comment to indicate the reason for closing, which is added to the finding activity.
- Click Close.
To see all closed findings, navigate to Findings > Closed.
Reopen a Finding
You can reopen a finding that was manually closed. If you do so, the finding status changes to Open (Reopened)
To reopen a finding:
-
From the Findings table, use one of the following methods:
- Single finding: Click on the three dots icon next to an individual finding, and then click Open.
- Multiple findings: Select multiple findings and then click Open at the bottom.
- In the Open Finding dialog, add a comment to indicate the reason for reopening, which is added to the finding activity.
- Click Open.
To see all reopened findings, navigate to Findings > Open, and then filter the Sub-Status by Reopened.
Trigger Actions Based on Findings
You can manually trigger actions associated with ticketing Integrations and/or send email notifications for individual findings.
Required AI Exposure User Role: You must have either the Collaborator or Administrator role in AI Exposure to perform this action.
Trigger an Action for a Single Finding
To manually trigger an action for a single finding:
- In the AI Exposure Console, navigate to the Risk > Findings page.
- Click the three dots menu icon next to the finding and select the relevant action:
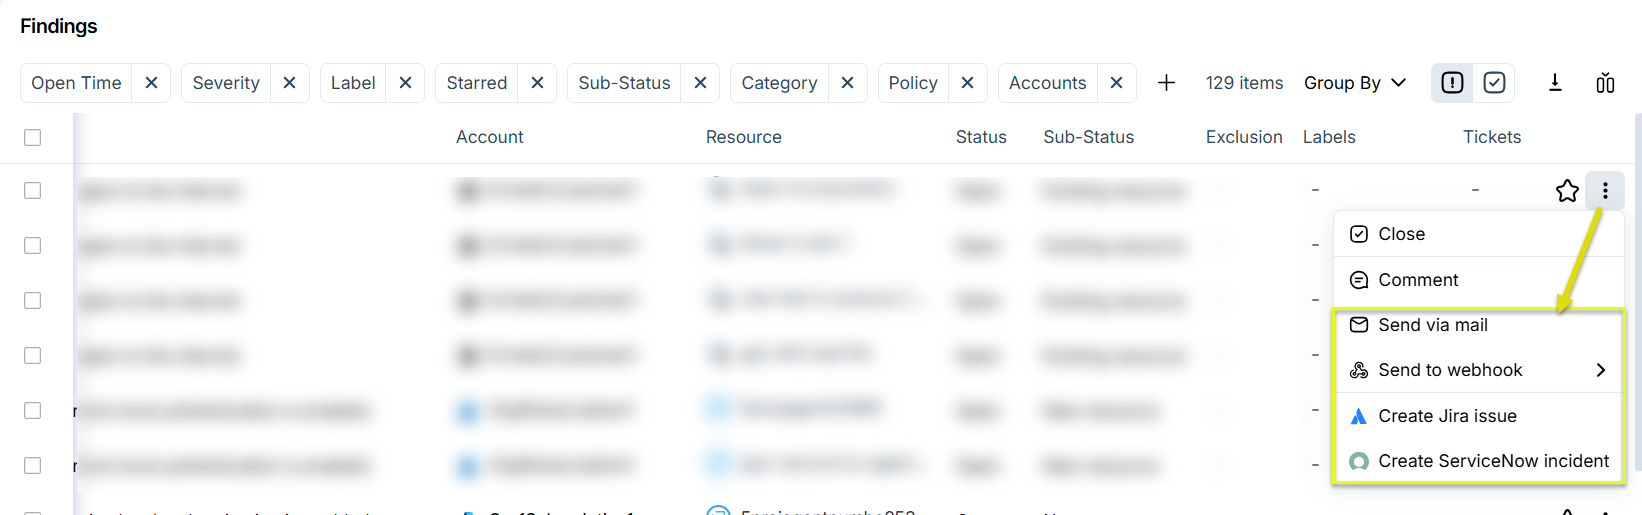
(Click the  icon below for instructions, per action)
 Send via email
- Enter one or more email addresses. You can also choose to send finding information to any owners of the associated resources. This may include numerous recipients. For example, if the owner is a group with no associated email address, Tenable sends an email to all group members.
- (Optional) Enter a message to the recipient/s.
- Click Send.
Create a Jira issue
- Select a Project, Issue Type, Assignee (optional), Labels, Epic (optional), and Environment (URL of Jira instance). The Project you select determines which values are available in the other field dropdowns. For labels, you can either choose from the existing list of labels in the Jira instance or manually add new labels. Label names cannot contain spaces.
- (Optional) Edit the predefined content in the Summary and/or Description fields.
- (Optional) Click Add Optional Field to include non-mandatory data like labels, assignees, or epics.
- (Optional) Add attachments to include a copy of any revised policy suggestions (according to the remediation steps).
- Click Create Issue.
Create a ServiceNow Incident
- Select an Instance and an Assignee.
- Select an Impact and Urgency for the incident.
- (Optional) Edit the predefined content in the Summary and/or Description fields.
- (Optional) Add attachments to include a copy of any revised policy suggestions (according to the remediation steps).
- Click Create Incident.
Send to Webhook
- If you have more than one webhook configured, select the webhook that you want to send the finding to.
- Click Yes to confirm.
Trigger an Action for Multiple Findings
Manually trigger an action for multiple findings. For Jira/ServiceNow, you can choose one of the following options:
- Create a single, unified ticket that includes all selected findings
-
Create separate tickets, one per selected finding
Note: When you trigger multiple Jira issues or ServiceNow incidents at once, you cannot edit the summary or description fields. Each issue or incident contains the default summary or description provided by AI Exposure.
To manually trigger an action for multiple findings:
- In the AI Exposure Console, navigate to the Risk > Findings page.
-
Select the checkboxes next to the findings for which you want to trigger an action.
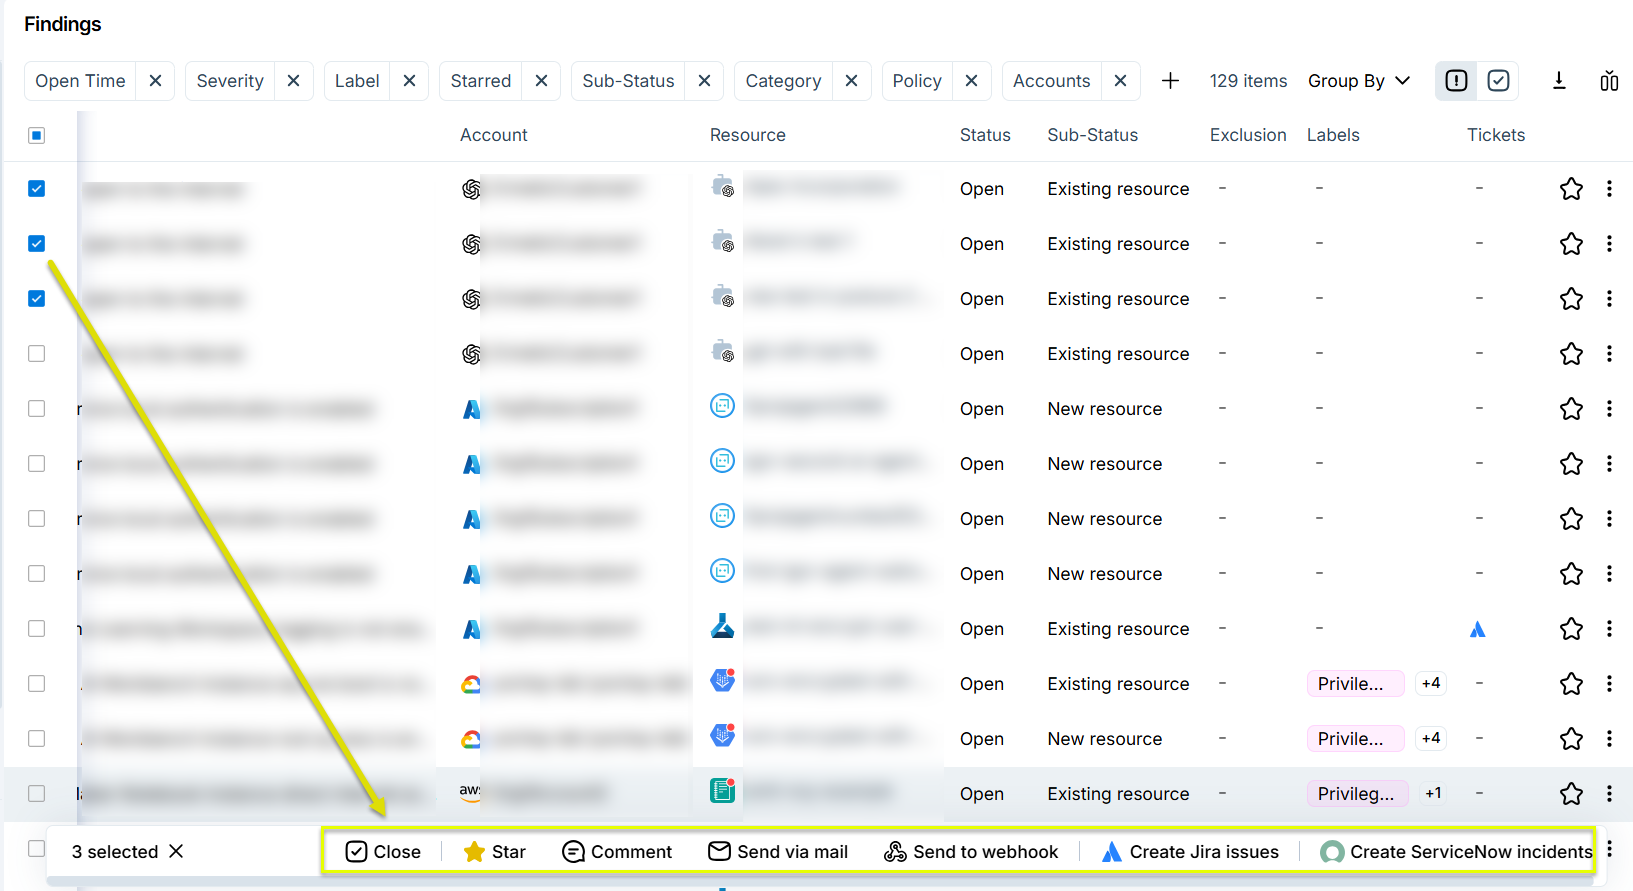
-
From the bottom menu panel that appears, select the relevant action:
- Send to webhook
- If you have more than one webhook configured, select the target webhook.
- Click Yes to confirm.
- Send via email
- Enter one or more email addresses. You can also choose to send finding information to any owners of the associated resources. This may include numerous recipients. For example, if the owner is a group with no associated email address, Tenable sends an email to all group members.
- (Optional) Enter a message to the recipient/s.
- Click Send.
- Create Jira issues
-
Choose whether to:
- Create a unified Jira issue which includes all findings
- Create separate Jira issues, one per finding
- Select a Project, Issue Type, Assignee, Epic (optional), Environment (URL of Jira instance), and Labels. The Project you select determines which values are available in the other field dropdowns.
- (Optional) Click Add Optional Field to include non-mandatory data like labels, assignees, or epics.
- Click Create Issue/s.
-
Choose whether to:
- Create ServiceNow incidents
-
Choose whether to:
- Create a unified ServiceNow issue which includes all findings
- Create separate ServiceNow issues, one per finding
- Select an Instance, Assignment group, an Assignee, Category, On hold reason, Service, Severity, and Super user.
- Select an Impact and Urgency for the incident.
- Click Create Incidents.
-
Choose whether to:
- Send to webhook
Track Jira and ServiceNow Tickets
When you connect your ticketing integrations (Jira, ServiceNow) and create automation rules to streamline remediation workflows, external tickets are created in those systems. You can track these external tickets directly from the Findings page.
To track external tickets:
- In AI Exposure, click on Risk > Findings.
- Navigate to the Open or Closed Findings page.
- In the Ticket filter, select Jira issue and/or ServiceNow incident to filter the table by findings that have tickets.
- (Optional) Apply other filters to narrow your search.
- Hover over the Jira
 or ServiceNow
 icon next to the relevant finding to see ticket details.
View Finding Details
Click a finding to view granular information and to remediate risks associated with it. You can view a detailed historical account of the event, an expanded rationale for the potential risk it imposes, and specific remediation instructions.
Each finding displays distinct information depending on the finding type and the specific circumstances that triggered its creation.
Review finding details to understand the following items:
- What the root cause of the finding is.
- The scope of the finding.
- The potential risk the finding imposes on your environment.
- An explanation of the severity of the finding.
View Finding Activity
View the finding activity to see information about the lifecycle of the finding within AI Exposure, such as when:
- The finding was created.
- The status changed (either by the system or manually).
- Tickets were created for third-party integrations.

To view finding activity:
- From the Findings table, click a relevant finding.
- Click Activity.
- (Optional) Write a comment, and then click Save.
Remediate Findings
AI Exposure allows you to perform manual remediation.
Manually Remediate Findings
For some findings, you may choose to remediate issues outside of AI Exposure.
To manually remediate a finding:
- On the Findings page, click to open the relevant finding.
- Navigate to the Remediation area.
- Follow the Remediation steps sequentially.
- Manually close the finding after you remediate it to remove it from the Open Findings page.
Remediate with One-Time Credentials
As an alternative to granting AI Exposure management permissions during account connection, you can instead provide temporary, one-time credentials that allow Tenable to automatically remediate findings.
- For AWS IAM configurations: Temporary credentials require an access key for IAM users, or an access key together with a session token for IAM roles. The IAM user or role must have sufficient permissions (often Administrative permissions) to perform remediation actions within that specific account.
- For GCP configurations: Temporary credentials require an access token that you can generate via the Google Cloud CLI.
By default, the credentials you provide apply to the remediation of the specific finding for which you entered them. To extend the credentials for the duration of your current browser session, you can choose to store them locally.