Single Sign-On
Allow individual users or group members to log in to the Tenable One AI Exposure Console via SSO by establishing trust between your external identity provider (IdP) and Tenable. This process eases user provisioning by leveraging the existing corporate identities of your users. It does not, however, provide for automatic user provisioning: after trust is established, you still need to add new users or groups via the console, or via API.
Leverage existing IdP groups to grant all users associated with the group identical permissions in AI Exposure. To add support for IdP groups in Tenable, first configure group mapping for your IdP to send group claims to Tenable using the relevant procedure below, and then add any relevant groups in Tenable.
You can enable Console login using any of the following IdPs:
- AWS Identity Center
- Microsoft Entra ID
- Okta
- OneLogin
- Ping Identity
- JumpCloud
If you work with a provider other than one of those listed above, you can enable login to the AI Exposure Console via that provider by leveraging the SAML 2.0 identity specification. See Enable Login via Custom SAML 2.0 Provider for more information.
For more information about enabling SSO login, contact Technical Support.
Enable Login via Tenable One
New Tenable One customers should follow these guidelines for setting up SSO via Tenable One.
Enable Login via AWS Identity Center (SAML 2.0)
Use AWS Identity Center as your identity provider (IdP) to enable login to the AI Exposure Console via SAML 2.0.
Before you begin:
-
Prerequisite: Authentication Domain The email domain used by your AWS Identity Center users must be added as an authentication domain in AI Exposure. If the domain is not configured, uploading the SAML metadata will fail during SSO setup.
To enable login using AWS Identity Center (SAML 2.0):
- In AWS, open AWS Identity Center.
- Navigate to Applications and click Add application.
- Select I have an application I want to set up, choose SAML 2.0, and then click Next.
- Under Configure application, enter a Display name and Description (for example, Enabling Console access via SSO for AI Exposure).
-
Under Application properties, enter the value of the Application start URL:
- Global (All regions): app.tenable.com
- United States Gov Cloud: app.tenable.us
-
Under Application metadata:
Enter the value of the Application ACS URL :
https://{URL}/api/console/authentication/saml2/customer/acsWhere {URL} is:
- Global (All regions): app.tenable.com
- United States Gov Cloud: app.tenable.us
For Application SAML audience, enter:
urn:app.ermetic.comNote: The Application SAML Audience (also known as the Entity ID) uniquely identifies AI Exposure as the service provider. This value is not region-specific.
- Click Submit to create the application.
-
Click Assign users and groups to assign any users or groups that should access the AI Exposure Console:
- From the search bar, add the relevant users or groups.
- Click Assign.
-
After the application is created, open it and select Actions > Edit attribute mappings:
Review or add the following attribute mappings*:
User Attribute in the Application Maps to This String Value or User
attribute in IAM Identity CenterFormat Subject (NameID) ${user:email} emailAddress http://schemas.xmlsoap.org/ws/2005/05/identity/claims/emailaddress ${user:email} unspecified http://schemas.xmlsoap.org/ws/2005/05/identity/claims/givenname ${user:givenName} unspecified http://schemas.xmlsoap.org/ws/2005/05/identity/claims/surname ${user:familyName} unspecified groups (optional) ${user:groups} unspecified *The groups attribute is case sensitive. Enter it exactly as shown if you plan to use AWS groups.
- Click Save changes.
- Still on the application page, select Actions > Edit configuration, and download the IAM Identity Center SAML metadata file.
- In the AI Exposure Console, navigate to Settings > Access Management > Single Sign-On.
- Click Add Identity Provider and then select SAML.
- In the Choose Application drop-down, select AI Exposure.
- Select File, upload the metadata file downloaded from AWS Identity Center, and click Add.
Enable Login via Google
Enable login to the AI Exposure Console via Google using one of the following identity specifications:
Enable Login via Google Using OIDC
To enable login using OIDC:
- In the AI Exposure Console, navigate to Settings > Access Management > Single Sign-On.
- Click Add Identity Provider and then click Google.
-
In the Add Identity Provider dialog, click Add.
Note: Adding Google as an IdP in this way enables login to both the AI Exposure Console and the JIT Portal.
Enable Login via Google Using SAML
To enable login using SAML:
- In the Google Admin console, navigate to Apps > Web and mobile apps.
- Click Add app > Add custom SAML app.
- Enter an App name and then click CONTINUE.
- On the Google Identity Provider details page, click to DOWNLOAD METADATA.
- In the AI Exposure Console, navigate to Settings > Access Management > Single Sign-On.
- Click Add Identity Provider and then click SAML.
- In the Add Identity Provider dialog, select AI Exposure from the dropdown.
- Select File, upload the metadata that you downloaded from Google, and then click Add.
-
In the Google Admin console, on the Service provider details page, enter the following values for the respective fields:
ACS URL: https://{URL}/api/console/authentication/saml2/customer/acs
Where {URL} is:
- Global (All regions): app.tenable.com
- United States Gov Cloud: app.tenable.us
- Entity ID: urn:app.ermetic.com
- Name ID format: EMAIL
- Name ID: Basic Information > Primary email
- Click CONTINUE.
-
On the Attribute mapping page, click ADD MAPPING, and then add the following attributes:
Google Directory Attributes to Mappings (App Attributes):
- First name — http://schemas.xmlsoap.org/ws/2005/05/identity/claims/givenname
- Last name — http://schemas.xmlsoap.org/ws/2005/05/identity/claims/surname
- Primary email — http://schemas.xmlsoap.org/ws/2005/05/identity/claims/emailaddress
- (Optional) Add Support for Google Groups.
- Click FINISH.
Add Support for Google Groups
To work with groups using Google as your IdP, you will need to use SAML and not OIDC.
To add support for Google groups:
- In the Google Admin console, navigate to Apps > Web and mobile apps and open the SAML application that you configured (See Enable Login via Google Using SAML).
- Expand the SAML attribute mapping section.
-
Under Group membership (optional), enter the following:
- The Google groups that you want to use as groups in AI Exposure.
- For App attribute, type groups.
- Click SAVE.
- After you finish, add the group/s in the AI Exposure Console.
Enable Login via Microsoft Entra ID
Enable login to the AI Exposure Console via Microsoft Entra ID using one of the following identity specifications:
Enable Login via Microsoft Entra ID Using OIDC
To enable login using OIDC:
- In the AI Exposure Console, navigate to Settings > Access Management > Single Sign-On.
- Click Add Identity Provider and then click Microsoft.
- In the Add Identity Provider dialog, grant access by clicking the link for AI Exposure.
- Pick an account associated with the AI Exposure administrator in your organization.
-
Accept the requested permissions.
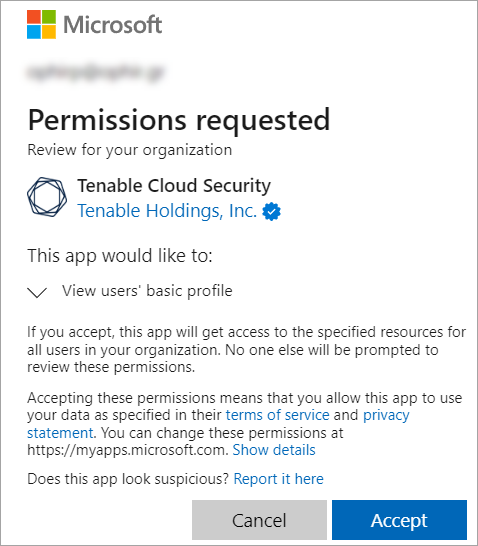
- Verify that I confirm that I granted access is selected, and click Add.
Enable Login via Microsoft Entra ID Using SAML
To enable login using SAML:
- In the Azure portal, navigate to Enterprise applications, and then add a New application.
- Click Create your own application, and then enter a name for the app.
- Select the default value of Integrate any other application you don’t find in the gallery (Non-Gallery) and then click Create.
- On the app Overview page that displays, in the Set up single sign on step, click Get started.
- Choose SAML as the SSO method.
-
Under Basic SAML Configuration, click Edit, and enter the following values for the respective fields:
- Identifier (Entity ID): urn:app.ermetic.com
Reply URL (Assertion Consumer Service URL): https://{URL}/api/console/authentication/saml2/customer/acs
Where {URL} is:
- Global (All regions): app.tenable.com
- United States Gov Cloud: app.tenable.us
- Click Save.
-
Under Attributes & Claims, click Edit, and then, under Additional claims, delete the user.userprincipalname claim.
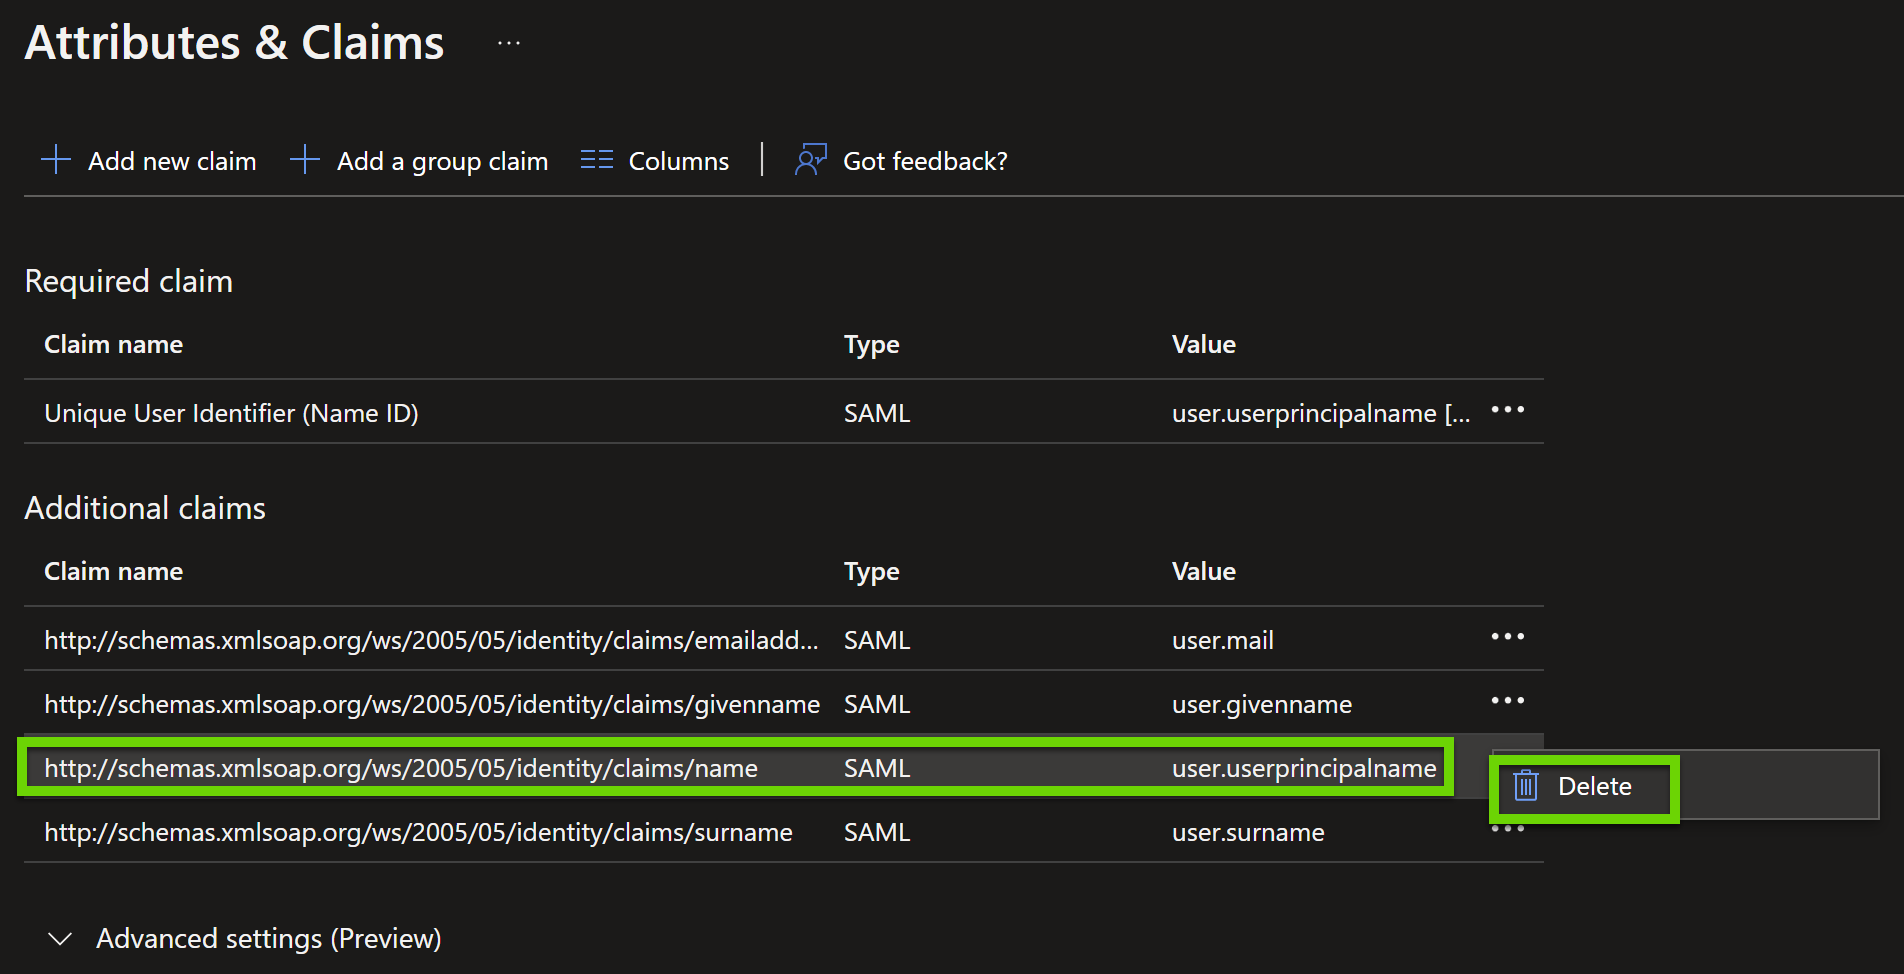
- Under SAML Certificates, click to download the Federation Metadata XML.
- In the AI Exposure Console, navigate to Settings > Access Management > Single Sign-On.
- Click Add Identity Provider and then click SAML.
- In the Add Identity Provider dialog, select AI Exposure from the dropdown.
- Select File, upload the metadata that you downloaded from Azure, and then click Add.
Add Support for Microsoft Entra ID Groups
To add support for Microsoft Entra ID groups, perform the relevant procedure below, depending on the identity protocol that you use with Microsoft Entra ID:
Doing so will send relevant group claims to AI Exposure, and allow you to then add those groups in Tenable, granting all users associated with the group identical permissions in Tenable.
Add Support for Microsoft Entra ID Groups Using OIDC
To add support for Microsoft Entra ID groups:
- Verify that you have enabled Console login via Microsoft Entra ID.
- In the Azure Portal, navigate to the Enterprise applications page, and then select the AI Exposure application.
- Under Manage, click Users and Groups.
- Click Add User/Group.
- In the Add Assignment page, under Users and groups, click None Selected.
- Select any relevant groups from the list of users and groups, and then click Select.
- After you finish, add the group/s in the AI Exposure Console.
Add Support for Microsoft Entra ID Groups Using SAML
Use the following procedure to add support for groups (SAML) in AI Exposure, either by sending:
- groups assigned to the AI Exposure SAML application
- all groups (not assigned to the app)
Be aware of relevant limitations when choosing which option to use. For example, if you choose all groups, there is a limitation in the number of groups that can be sent this way. Alternatively, if you choose groups assigned to the application, you will need to manually assign groups to the application, and there is no support for nested groups. Refer to the relevant Microsoft documentation for more information.
To add support for Microsoft Entra ID groups:
- Verify that you have enabled login via a custom SAML 2.0 provider.
- In the Azure Portal, navigate to the Enterprise applications page, and then select the relevant SAML application that you created for AI Exposure when you enabled login.
-
(Optional) Choose specific groups that you want to use with AI Exposure:
- Under Manage, click Users and Groups.
- Click Add User/Group.
- In the Add Assignment page, under Users and groups, click None Selected.
- Select any relevant groups from the list of users and groups, and then click Select.
- Navigate to the Single sign-on page for the SAML application.
- In Attributes & Claims, click Edit.
- Click Add a group claim.
-
Select which groups associated with the user should be returned in the claim. Select one of the following options:
- All groups — Selecting this option will send all groups to Tenable.
- Groups assigned to the application — Selecting this option will send any groups that you assigned to the Tenable SAML application earlier in this procedure to Tenable.
Refer to the relevant Microsoft documentation for more information.
- For the Source attribute, keep the default value of Group ID.
- Open the Advanced options.
-
Select Customize the name of the group claim, and for the Name, enter groups.
Important: The Name field is case sensitive. The groups value must be entered exactly as is. - Click Save.
- After you finish, add the group/s in the AI Exposure Console.
Enable Login via Okta
Enable login to the AI Exposure Console via Okta by leveraging the SAML 2.0 identity specification.
To enable login to the AI Exposure Console via Okta:
- In the Okta Admin Console, navigate to Applications > Applications.
- Click Browse App Catalog.
- Enter AI Exposure in the Search field, click the application tile, and then click Add Integration.
-
In the General Settings tab, enter a Console Domain, where the value you enter depends on the value in the URL you use to log in to the AI Exposure Console:
- app.tenable.com
- app.tenable.us
Note: If you don't enter a value, it will default to app.tenable.com. - In the SAML Setup section, click View SAML setup instructions.
- Under Configuration Steps, copy the URL value listed in step 2.
- In the AI Exposure Console, navigate to Settings > Access Management > Single Sign-On.
- Click Add Identity Provider and then click SAML.
- In the Add Identity Provider dialog, select AI Exposure from the dropdown.
- Select URL, paste the URL value from Okta, and then click Add.
Add Support for Okta Groups
To add support for Okta groups:
- In the Okta Admin Console, navigate to the AI Exposure application that you added in Enable Login via Okta
- Navigate to the Sign On tab, click Edit next to Settings, and then under SAML 2.0, expand the Attributes section.
-
Under Group Attribute Statements, in the Name field, type groups, and then enter a relevant filter to define which groups will be sent to AI Exposure. For example, if you want to send all groups, you can select Matches regex with a value of .*.
Important: The Name field is case sensitive. The groups value must be entered exactly as is. - Click Save.
- After you finish, add the group/s in the AI Exposure Console.
Enable Login via OneLogin
Enable login to the AI Exposure Console via OneLogin by leveraging the SAML 2.0 identity specification.
To enable login to the AI Exposure Console via OneLogin:
- In the OneLogin Admin Console, navigate to Applications > Applications.
- Click Add App.
- Search for and select SAML Custom Connector (Advanced).
- In the Configuration page, enter a Display Name (For example, 'AI Exposure'). and then click Save.
-
Navigate to the Configuration tab, and enter the following values for these application details:
- Audience (EntityID): urn:app.ermetic.com
ACS (Consumer) URL Validator / ACS (Consumer) URL: https://{URL}/api/console/authentication/saml2/customer/acs
Where {URL} is:
- Global (All regions): app.tenable.com
- United States Gov Cloud: app.tenable.us
-
Navigate to the Parameters tab, and click
 to add the following new fields/values:
Field name to Value:
- http://schemas.xmlsoap.org/ws/2005/05/identity/claims/emailaddress — Email
- http://schemas.xmlsoap.org/ws/2005/05/identity/claims/givenname — First Name
- http://schemas.xmlsoap.org/ws/2005/05/identity/claims/surname — Last Name
Important: Make sure to enable the Include in SAML assertion flag for each field/value.Note: The NameID value field appears out-of-the-box in OneLogin. You can leave this field as is.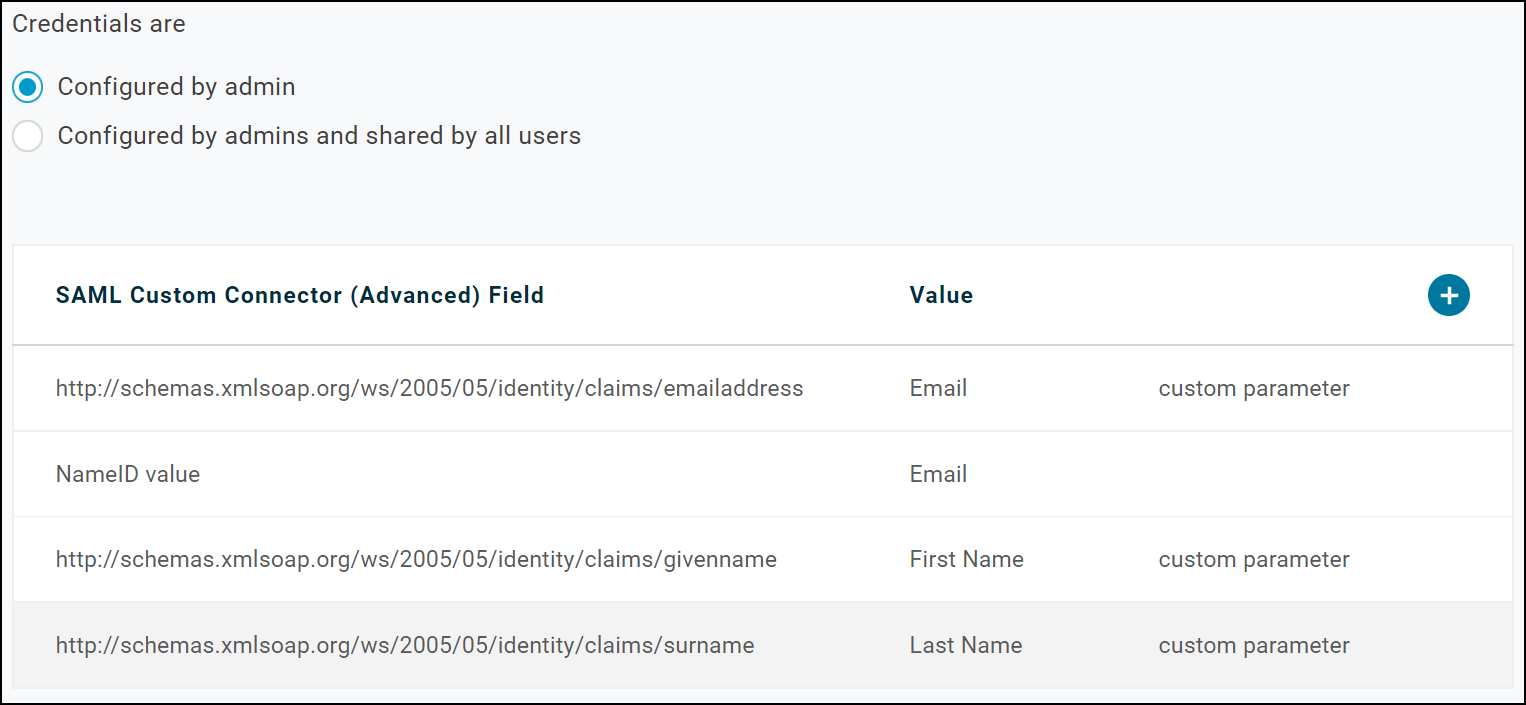
- Navigate to the SSO tab and set the SAML Signature Algorithm to SHA-256.
- Click on the More Actions dropdown and select SAML Metadata. Copy the metadata.
- In the AI Exposure Console, navigate to Settings > Access Management > Single Sign-On.
- Click Add Identity Provider and then click SAML.
- In the Add Identity Provider dialog, select AI Exposure from the dropdown.
- Select File, upload the metadata you copied from OneLogin, and then click Add.
Add Support for OneLogin Roles
In OneLogin, roles are used to assign users to one or more applications, and groups are used to assign a user security policy to users. OneLogin users can only belong to one OneLogin group at a time.
As a result of the fact that OneLogin groups function differently than in most other applications, to work with groups in AI Exposure, it is more likely that you would want to map OneLogin roles to AI Exposure groups, as opposed to OneLogin groups.
To add support for OneLogin roles:
- In the OneLogin Admin Console, navigate to Applications > Applications and then open the AI Exposure SAML application that you added in Enable Login via OneLogin.
-
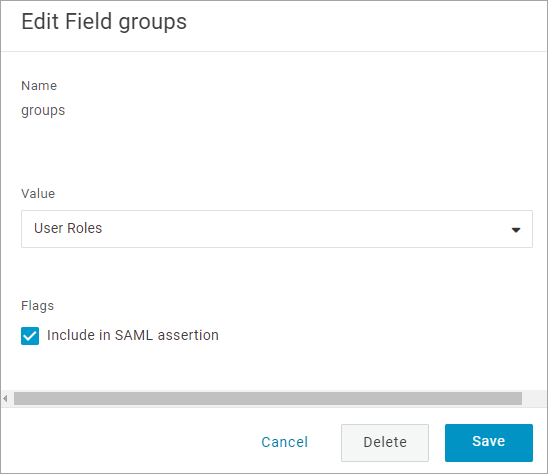
Navigate to the Parameters tab, and click to add the following new field/value:
Field name: groups
Important: The Name field is case sensitive. The groups value must be entered exactly as is.- Value: User Roles
- Flag: Include in SAML assertion enabled
-
Click Save.
- After you finish, add the group/s in the AI Exposure Console.
Enable Login via Ping Identity
Enable login to the AI Exposure Console via Ping Identity by leveraging the SAML 2.0 identity specification.
To enable login to the AI Exposure Console via Ping Identity:
- In the Ping Identity Admin Console, navigate to Connections > Applications.
- Click
 to add an application.
- Enter an Application Name. For example, ‘AI Exposure’.
- Choose SAML Application as the Application Type and then click Configure.
-
Under SAML Configuration, choose Manually Enter and then enter the following details:
ACS URL — https://{URL}/api/console/authentication/saml2/customer/acs
Where {URL} is:
- Global (All regions): app.tenable.com
- United States Gov Cloud: app.tenable.us
- Entity ID — urn:app.ermetic.com
- Click Save.
-
Navigate to the Attribute Mappings tab, click Edit
 and then add the following attributes:
Attributes to PingOne Mappings:
- http://schemas.xmlsoap.org/ws/2005/05/identity/claims/emailaddress — Email Address
- http://schemas.xmlsoap.org/ws/2005/05/identity/claims/givenname — Given Name
- http://schemas.xmlsoap.org/ws/2005/05/identity/claims/surname — Family Name
-
Click the radio button to enable the App.

- Navigate to the Configuration tab and click Download Metadata.
- In the AI Exposure Console, navigate to Settings > Access Management > Single Sign-On.
- Click Add Identity Provider and then click SAML.
- In the Add Identity Provider dialog, select AI Exposure from the dropdown.
- Select File, upload the metadata you copied from OneLogin, and then click Add.
Add Support for Ping Identity Groups
To add support for Ping Identity groups:
- In the Ping Identity Admin Console, navigate to Connections > Applications and then open the AI Exposure SAML application that you added in Enable Login via Ping Identity.
-
Navigate to the Attribute Mappings tab, click Edit and then add the following attribute:
- Attribute: groups
PingOne Mapping: Group Names
Important: The Attribute field is case sensitive. The groups value must be entered exactly as is.
- Click Save.
- After you finish, add the group/s in the AI Exposure Console.
Enable Login via JumpCloud
Enable login to the AI Exposure Console via JumpCloud by leveraging the SAML 2.0 identity specification.
To enable login to the AI Exposure Console via JumpCloud:
- In the JumpCloud Admin Portal, navigate to User Groups (under USER MANAGEMENT), create a new group for the AI Exposure SSO Application, and then add any relevant users.
- Navigate to SSO and click Add New Application.
-
Search for, and select Custom SAML App.
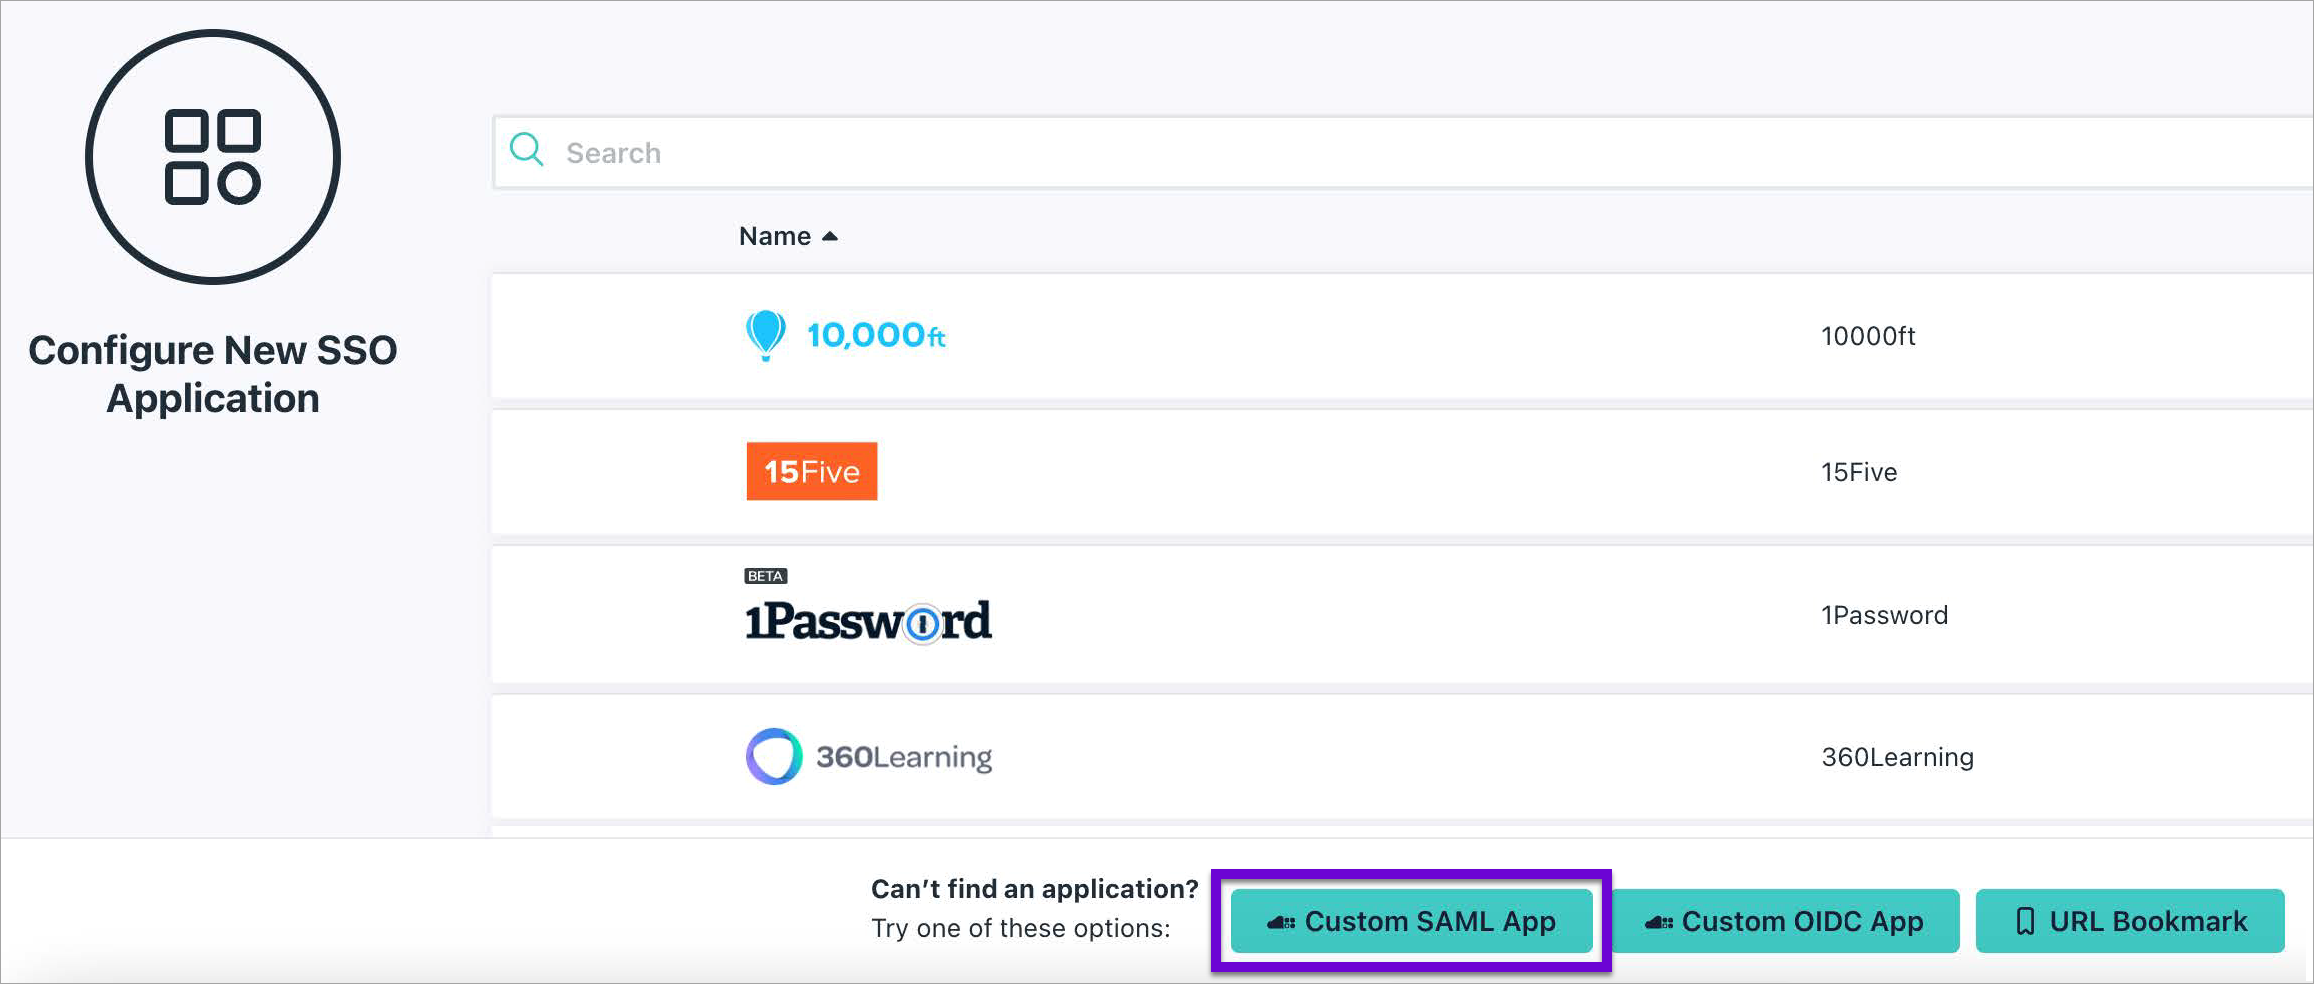
- In the General Info tab, enter a Display Label (For example, Tenable_SSO).
-
Navigate to the SSO tab, and enter the following values for each field:
Field Value IdP Entity ID* urn:{your-domain.com}
Where your-domain.com is the primary domain name of your company. For example, urn:ermetic.com.SP Entity ID* urn:app.ermetic.com ACS URL* https://{URL}/api/console/authentication/saml2/customer/acs
Where {URL} is:
- Global (All regions): app.tenable.com
- United States Gov Cloud: app.tenable.us
SAMLSubject NameID* email SAMLSubject NameID Format* urn:oasis:names:tc:SAML:1.0:nameid-format:unspecified (Default) Signature Algorithm RSA-SHA256 Sign Assertion Enabled/Selected -
Under Attributes > USER ATTRIBUTES MAPPING, click add attribute and add each of the following mappings:
Service Provider Attribute Name JumpCloud Attribute Name http://schemas.xmlsoap.org/ws/2005/05/identity/claims/emailaddress email http://schemas.xmlsoap.org/ws/2005/05/identity/claims/givenname firstname http://schemas.xmlsoap.org/ws/2005/05/identity/claims/surname lastname - Navigate to the User Groups tab, add the group you created earlier, and then click Activate.
- Click on the new app you created, navigate to SSO, and then click Export Metadata.
- In the AI Exposure Console, navigate to Settings > Access Management > Single Sign-On.
- Click Add Identity Provider and then click SAML.
- In the Add Identity Provider dialog, select AI Exposure from the dropdown.
- Select File, upload the metadata you copied from JumpCloud, and then click Add.
Add Support for JumpCloud Groups
To add support for JumpCloud groups:
- In the JumpCloud Admin Console, navigate to SSO and open the AI Exposure SAML application that you added in Enable Login via JumpCloud.
-
Navigate to the SSO tab, and under GROUP ATTRIBUTES, select include group attribute, and then type groups.
Important: The Attribute field is case sensitive. The groups value must be entered exactly as is. - Click Save.
Enable Login via Custom SAML 2.0 Provider
If you work with a provider other than one of those documented in the sections above, you can enable login to the AI Exposure Console via that provider by leveraging the SAML 2.0 identity specification.
To enable login to the AI Exposure Console via a custom SAML provider:
- Follow the steps outlined by the relevant provider to add a dedicated application for AI Exposure. Consult with any relevant documentation, if needed.
-
In the application, configure the following SAML details:
SAML Parameters Value Entity ID urn:app.ermetic.com ACS (Redirect URL) https://{URL}/api/console/authentication/saml2/customer/acs
Where {URL} is:
- Global (All regions): app.tenable.com
- United States Gov Cloud: app.tenable.us
Encryption SHA-256 SAML NameID Format Email -
Add the following SAML attributes, mapping them, as relevant, to the given provider:
Attributes Mappings Name Format http://schemas.xmlsoap.org/ws/2005/05/identity/claims/emailaddress Email Address Unspecified http://schemas.xmlsoap.org/ws/2005/05/identity/claims/givenname Given Name Unspecified http://schemas.xmlsoap.org/ws/2005/05/identity/claims/surname Family Name Unspecified - Download the metadata.
- In the AI Exposure Console, navigate to Settings > Access Management > Single Sign-On.
- Click Add Identity Provider and then click SAML.
- In the Add Identity Provider dialog, select AI Exposure from the dropdown.
- Select File, upload the metadata that you downloaded earlier, and then click Add.
Add Support for Groups
To add support for groups using a custom SAML 2.0 provider:
Map the native IdP group attribute to the AI Exposure groups attribute.