Users and Groups
Add new users/groups and assign them specific permissions within the Tenable One AI Exposure Console.
Tenable One customers:
- Tenable One users with the Administrator role are automatically assigned Administrator role permissions within AI Exposure with access to the entire Organization, even if such permissions were not explicitly granted in the AI Exposure Console.
- To allow non-Administrator users/groups to access the AI Exposure Console, they must first be defined and granted access in Tenable One, and then added in the AI Exposure Console.
- Tenable One users with any role can be granted access to AI Exposure at a specific account scope by assigning them the desired scope when you add a user/group.
New users/groups are added within a specific scope that defines which accounts the user has access to in AI Exposure. For example, you can add a user to the entire organization (all accounts) or a subset of accounts. See Account Hierarchy and Folders for more information.
If you add an individual user, and that user is also a member of a group that you added, the user will have the highest-level access granted by the role/scope assigned to the user/group, if they are different. For example, in the following situation:
- User X: Role = Administrator; Scope = All AWS accounts
- Group Y (User X is a member): Role = Collaborator; Scope = Entire Organization
User X will have Administrator permissions for the entire Organization.
Add a New User
To add a new user:
- Navigate to Settings > User Management.
-
Select a scope for the user in the Organization tree on the top of the page:
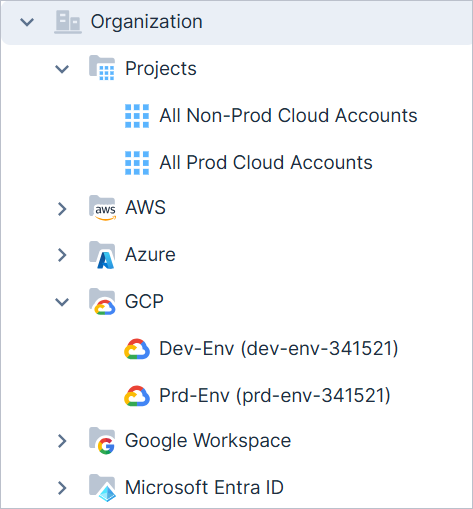
A scope can be any of the following:
- The entire Organization (all accounts onboarded to AI Exposure).
- A group of accounts. For example, all accounts belonging to a specific cloud provider (all AWS accounts) or identity provider (all Microsoft Entra tenants), or a group of accounts within a specific cloud provider (grouped by folder).
- A specific account/identity provider tenant.
- A project, or project folder.
- All IaC organizations, or a subset of individual repositories. This grants access to view code scan results for a specific scope.
Note: Adding a user within an IaC scope will only grant the user access to IaC-related features. Such a user will not have access to cloud resources, or to other features such as the Dashboard. The IaC hierarchy is only available within the context of Tenable RBAC (adding users/groups), and will not be visible in other contexts (for example, Policies or Reports).See Inherited Users for more information about how users created on a parent level are inherited to children accounts.
- Click Add Role Assignment, and for Principals, select User.
-
In the box, search for and select the user's email address.
If you have SSO configured for logging in to AI Exposure, the user email address that you add must be an existing user within your organization.
-
Assign a Role to the user and then click Save:
- Viewer - View access to AI Exposure (except for Administrative tabs)
- Collaborator - All Viewer permissions, plus the ability to categorize resources and respond to findings.
- Administrator- All Collaborator permissions, plus the ability to administer AI Exposure (add accounts, configure settings, view audit trail).
- JIT Administrator - Manage JIT eligibilities and view JIT audit trail via the JIT Portal.
Custom roles also appear in the Role drop-down box. For information about creating and managing custom roles, see Roles.
For a detailed list of permissions granted by each built-in role, see Roles and Permissions. -
If you need to change the permission level of a user, select the Edit icon
 next to the user, choose a new role, and then Save.Note: If you change your own role from an Administrator to either Collaborator or Viewer, you will no longer be able to access User Management to edit your role.
Add a New Group
Prerequisites:
Before you can add a new group in the AI Exposure Console, follow the steps to Single Sign-On by:
- establishing trust between your IdP and Tenable.
- configuring group mapping for your IdP to send group claims to AI Exposure.
To add a new group:
- Navigate to Settings > User Management.
-
Select a scope for the group in the Organization tree on the left:
A scope can be any of the following:
- The entire Organization (all accounts onboarded to AI Exposure).
- A group of accounts. For example, all accounts belonging to a specific cloud provider (all AWS accounts) or identity provider (all Microsoft Entra tenants), or a group of accounts within a specific cloud provider (grouped by folder).
- A specific account/identity provider tenant.
- A project, or project folder.
-
All IaC organizations, or a subset of individual repositories. This grants access to view code scan results for a specific scope.
Note: Adding a user within an IaC scope will only grant the user access to IaC-related features. Such a user will not have access to cloud resources, or to other features such as the Dashboard. The IaC hierarchy is only available within the context of Tenable RBAC (adding users/groups), and will not be visible in other contexts (for example, Policies or Reports).
See Inherited Users for more information about how users created on a parent level are inherited to children accounts.
-
Click Add Role Assignment, and for Principals, select:
- Group — Use this option for groups defined in your identity provider.
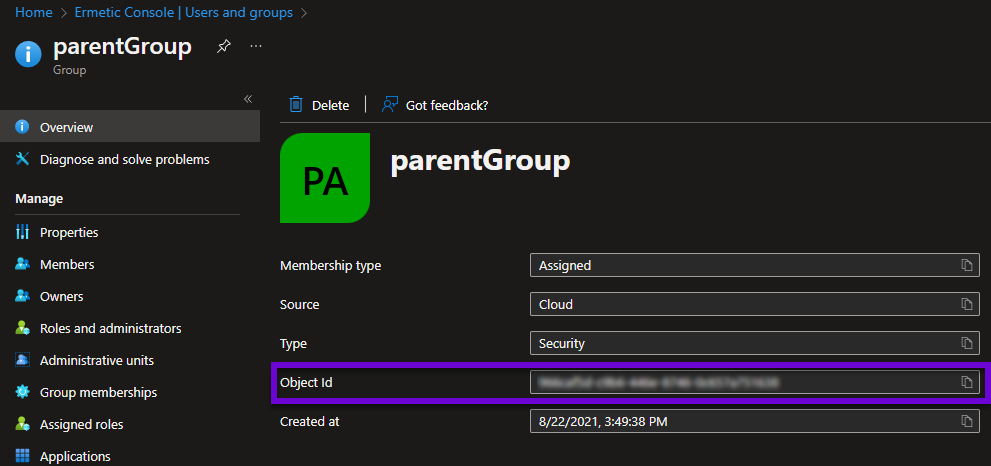
- Microsoft Entra ID Group — (only available if the Microsoft Entra ID integration is configured). Select this option only if you are adding a Microsoft Entra ID group, since these require a group ID in addition to a group name.
-
Enter the group information. The fields depend on the option you selected in step 3.
- Group Name — For groups added using the Group option, this is the group name as defined in your identity provider. For groups added using the Microsoft Entra ID Group option, this is the name that will appear in the AI Exposure Console.
Group ID (Microsoft Entra ID Group only). The Microsoft Entra ID Group Object ID (GUID) of the group you want to add.
-
Assign a Role to the group and then click Save:
- Viewer - View access to AI Exposure (except for Administrative tabs)
- Collaborator - All Viewer permissions, plus the ability to categorize resources and respond to findings.
- Administrator- All Collaborator permissions, plus the ability to administer AI Exposure (add accounts, configure settings, view audit trail).
- JIT Administrator - Manage JIT eligibilities, and view JIT audit trail.
Custom roles also appear in the Role drop-down box. For information about creating and managing custom roles, see Roles.
For a detailed list of permissions granted by each role, see Roles and Permissions. -
If you need to change the permission level of a group, select the Edit icon
next to the group, choose a new role, and then Save.Note: If you change your own role from an Administrator to either Collaborator or Viewer, you will no longer be able to access User Management to edit your role.
Inherited Users
Users created on the organization level or within a group of accounts are inherited to all children accounts, including to any children accounts created at a later time. For example, if you create “User X” on the organization level and assign it the Collaborator role, “User X”, with the same role, will exist and have permissions to all children accounts. If, at a later time, you add a new account/s to the organization, “User X” will have permissions to the new account as well.
In the User Management table, under a child account, “User X” will appear, and the Role column will indicate that the user is inherited.
Within a child account, you can only edit an inherited user’s role to increase the user’s permission level. For example, a user with the Collaborator role can be changed to “Administrator”, but not cannot be reduced to “Viewer”. Likewise, a user granted the “Administrator” role within a parent account/group cannot have their role changed at all. See Roles and Permissions for more information.
Built-in Roles and Permissions
There are three built-in roles that can be assigned to users/groups.
- Viewer
- Collaborator
- Administrator
In addition, an Owner role exists to provide greater clarity and definition to the single person responsible for owning and managing the AI Exposure environment at any given time:
- The Owner role has the same permissions as an Administrator.
- Only one user can have the Owner role at any given time.
- A user with this role can transfer ownership to another user.
Administrators can also create custom roles with granular, module-level permissions. See Roles for more information.
Each role provides a different level of access within the AI Exposure Console. The following table provides a detailed list of permissions granted by each role.
| Permission | Sub-Permission | Viewer | Collaborator | Administrator | JIT Administrator |
|---|---|---|---|---|---|
| Dashboards | |||||
| View | ✔ | ✔ | ✔ | — | |
| Manage — Private Dashboards | ✔ | ✔ | ✔ | — | |
| Manage — Public Dashboards | — | ✔ | ✔ | — | |
| Inventory | |||||
| View | ✔ | ✔ | ✔ | — | |
| Manage | — | ✔ | ✔ | — | |
| Workload Resources | |||||
| Scan Now | — | ✔ | ✔ | — | |
| Data Resources | |||||
| Scan | — | ✔ | ✔ | — | |
| Events | |||||
| View | ✔ | ✔ | ✔ | — | |
| CI/CD Scans | |||||
| View | ✔ | ✔ | ✔ | — | |
| Queries | |||||
| View | ✔ | ✔ | ✔ | — | |
| Manage — Private Queries | ✔ | ✔ | ✔ | — | |
| Manage — Public Queries | — | ✔ | ✔ | — | |
| Risks | |||||
| View | ✔ | ✔ | ✔ | — | |
| Manage — Comment | — | ✔ | ✔ | — | |
| Manage — Status | — | ✔ | ✔ | — | |
| Manage — Star | — | ✔ | ✔ | — | |
| Manage — Remediation | — | ✔ | ✔ | — | |
| Manage — Share | — | ✔ | ✔ | — | |
| Threats | |||||
| View | ✔ | ✔ | ✔ | — | |
| Manage — Comment | — | ✔ | ✔ | — | |
| Manage — Change Status | — | ✔ | ✔ | — | |
| Manage — Share | — | ✔ | ✔ | — | |
| Manage — Star | — | ✔ | ✔ | — | |
| Vulnerabilities | |||||
| View | ✔ | ✔ | ✔ | — | |
| Malicious Files | |||||
| View | ✔ | ✔ | ✔ | — | |
| Policies | |||||
| View | — | ✔ | ✔ | — | |
| Manage | — | ✔ | ✔ | — | |
| Exclusions | |||||
| View | ✔ | ✔ | ✔ | — | |
| Manage | — | ✔ | ✔ | — | |
| AI Activity | |||||
| View | ✔ | ✔ | ✔ | — | |
| Manage | — | ✔ | ✔ | — | |
| Automation | |||||
| View | ✔ | ✔ | ✔ | — | |
| Manage | — | ✔ | ✔ | — | |
| Reports | |||||
| View | ✔ | ✔ | ✔ | — | |
| Manage | — | ✔ | ✔ | — | |
| Compliance | |||||
| View | ✔ | ✔ | ✔ | — | |
| Manage | — | ✔ | ✔ | — | |
| Integrations | |||||
| View | ✔ | ✔ | ✔ | — | |
| Manage | — | — | ✔ | — | |
| Settings | |||||
| View | — | — | ✔ | — | |
| Manage | — | — | ✔ | — | |
| Settings - Organization | |||||
| View | ✔ | ✔ | ✔ | — | |
| Manage | — | — | ✔ | — | |
| Settings - Audit | |||||
| View | ✔ | ✔ | ✔ | — | |
| JIT - Eligibility | |||||
| View | — | — | ✔ | ✔ | |
| Manage | — | — | ✔ | ✔ | |
| JIT - Audit | |||||
| View | — | — | ✔ | ✔ |
* Administrators who were assigned a limited account scope (anything less than the entire Organization) may have partial access to certain Settings pages. See Settings Access for Administrators: Full vs. Limited Scope for more information.