Projects
Projects simplify the management of accounts and resources by logically grouping them, allowing you to align Console data with your organizational structure.
This is a how-to guide for configuring projects. For a conceptual overview, see How Projects Work.
Who Can Create a Project?
To create or edit a project, a user must have the Administrator role on both:
- The project or folder scope where the project is being created or modified.
- The account scope for each account included in the project.
This means:
- Admin users assigned the Organization scope can create or edit projects in any scope.
- Admin users assigned to the root Project folder scope can manage any project or folder within that root.
- Admin users assigned to a specific project folder scope can manage any project or subfolder within that folder.
- Admin users assigned to a specific project cannot create new projects. They can only edit the project they've been assigned to.
Example: Delegating Project Ownership
Suppose you’re the Organization-level admin for your environment and want to delegate project ownership to another team member. You can:
- Add a Project Folder. For example, Development.
-
Add a user role assignment granting the user the Administrator role on the new Development folder.
Note: Verify that this user also has the Administrator for any accounts that should be included in the project. - That user can now create and manage projects or subfolders within Development.
Supported Features
Many Tenable One AI Exposure features support projects, allowing you to perform actions within a specific project scope. Only users assigned a matching project scope can view/manage these features.
For example, you can perform the following for a project scope:
- Grant AI Exposure users access
- Create integrations and automations
- Create reports
- Create a custom compliance
- Create API tokens and query the AI Exposure API
- View licensing data
- Create custom policies
So, for example, only a user assigned to Project A can create an API token for that scope.
Add a Project Folder
Required AI Exposure User Role: Administrator. For more information, see Who Can Create a Project? and Roles and Permissions.
Add a project folder to organize one or more projects logically. Console users granted access to a project folder will have access to all of its child projects. For example, you may want to create projects for each product group in your organization, and group them together in folders by region. You can then grant relevant users access to either a specific project, or to the entire project folder.
-
In the AI Exposure Console, navigate to Settings > Accounts > Projects.
Any existing folders/projects appear in the tree on the left-hand side of the page.
- Navigate to the location where you want to add the folder.
- Click Add > Add folder.
- Enter a Folder name and then click Add.
Add a Project
Before you add a project, ensure that you onboard any accounts containing the cloud resources that you want in the project. After adding a project, you can only use it after the next data synchronization in your environment.
Required AI Exposure User Role: Administrator. For more information, see Who Can Create a Project? and Roles and Permissions.
-
In the AI Exposure Console, navigate to Settings > Accounts > Projects.
Any existing projects appear in the tree on the left-hand side of the page.
- Navigate to the location where you want to add the project.
- Click Add > Add project.
-
In the Add Project dialog, enter project details:
- Enter a unique and meaningful Name to display in AI Exposure.
- (Optional) Enter a Description.
- Scopes. Define one or more scope groups. Users assigned to the project will be able to access resources in these scopes.
Select Accounts that you want to include in the project. An account scope can be, for example, an onboarded cloud account, IdP tenant, or code repository.
Note: When you select a folder (or the entire organization), the project will contain all existing and future accounts in that folder.Define one or more Condition to narrow the scope of the project:
- Account name pattern — Enter a name pattern, based on text patterns found in cloud account names. Accounts with patterns in their names that match the pattern you define are included in the project. For example, entering dev* will cause an account named development to match.
- Account tag pattern — Enter a tag key-value pair, based on text patterns found in account tag keys or patterns. Accounts tagged with key-value pairs that match the pattern you define are included in the project. For example, entering a key of type and a value of prod will cause accounts with that key-value pair to match.
- Resource tag pattern — Enter a tag key-value pair, based on text patterns found in resource tag keys or patterns. Resources tagged with key-value pairs that match the pattern you define are included in the project. For example, entering a key of business_unit and a value of finance will cause resources with that key-value pair to match.
- Azure resource group name pattern — Enter a name pattern, based on text patterns found in resource group names. Resource groups with patterns in their names that match the pattern you define are included in the project. For example, entering cust-facing-apps-* will cause a resource group named cust-facing-apps-europe-prod to match.
Azure resource group tag pattern — Enter a tag key-value pair, based on text patterns found in Azure resource group tag keys or patterns. Resource groups tagged with key-value pairs that match the pattern you define are included in the project. For example, entering a key of environment and a value of production will cause resource groups with that key-value pair to match.
Important: When you define a resource-based condition for a project, the system not only includes resources that directly match the condition but also related resources. These are additional resources that have a meaningful relationship to the matched resources, ensuring broader visibility into relevant dependencies. For example, if a key vault matches the defined condition, its associated secrets may also be included as related resources. This allows you to see a more complete picture when filtering the Console by a project.- See Common Project Use Cases to see examples of common ways to use conditions when creating projects.
- Use * to indicate zero or more characters, or ? to indicate a single character.
- Use either the is or is not operator, as required. For key/value pairs, you can use different operators for each. For example, where a resource tag key pattern is: environment, and value pattern is not: test. This would include only production resources that are not for testing.
- If you select multiple conditions, you can use either AND (default) or OR operator logic.
As you enter a condition/s, you can see how many accounts match the criteria that you are entering.
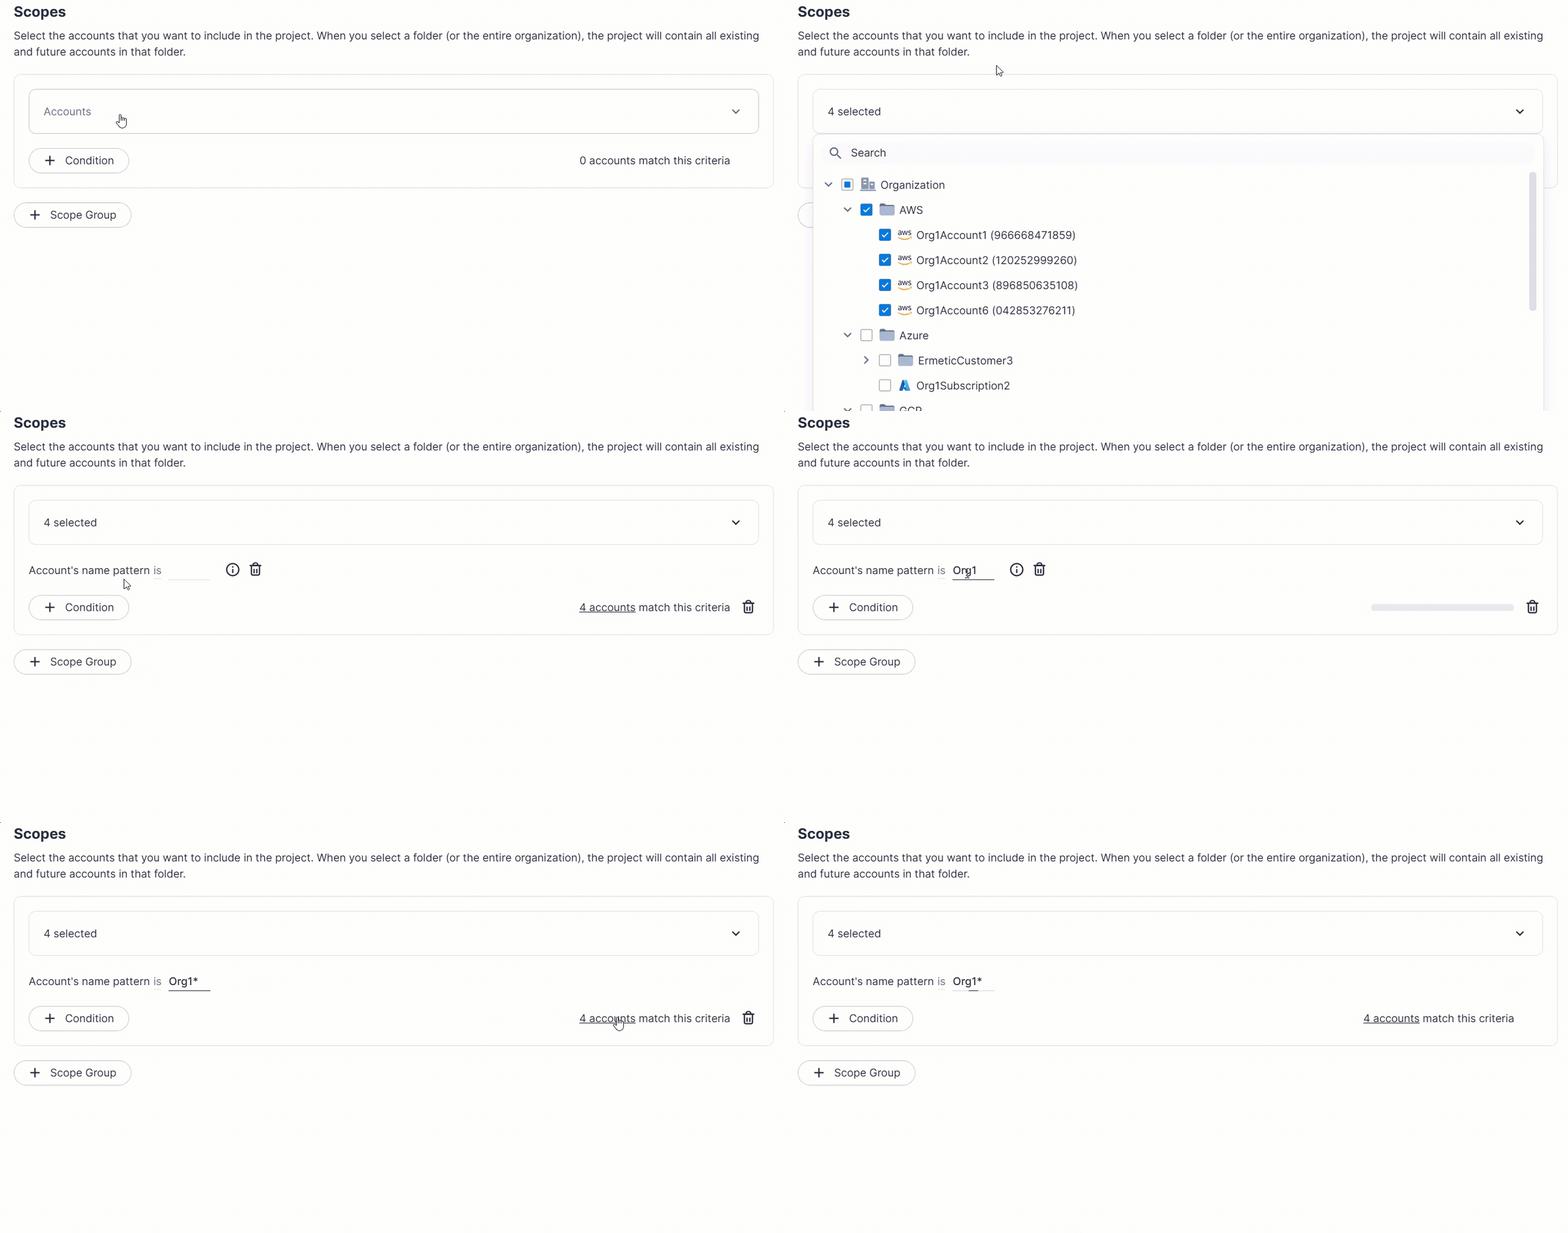
Click Scope Group to add another logical group of accounts to the project.
Note: If you add multiple scope groups, the operator logic used is OR.
-
Decide whether to extend user access to scopes in project. This determines whether users assigned to this project are also automatically assigned to accounts within the project.
Note: This applies only to accounts not filtered by resource-based conditions defined in this project.- Do not enable automatic assignment
- Automatically assign to eligible scopes
- When finished, click Add.
After adding a project, it will be available for use after the next data synchronization in your environment.
Grant Access to a Project Scope
To allow a system user to manage or view a specific project or project folder, you must assign them a role (such as Administrator or Viewer) at the relevant project scope.
For example, to delegate access to a Development project:
- Navigate to Settings > Access Management > User Management and add a role assignment.
-
Select the Development project as the scope.
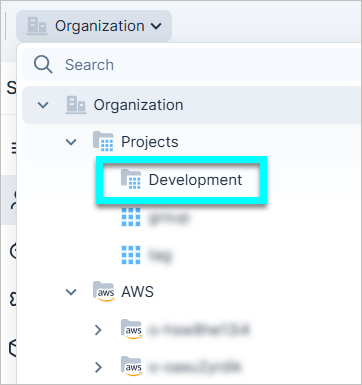
- Select the appropriate role.
For more details, see Users and Groups.
Move a Project
Required Tenable One AI Exposure User Role: Administrator. For more information, see Users and Groups.
You can move:
- A project or project folder to an existing folder
- A project or project folder to the root Projects folder
-
In the AI Exposure Console, navigate to Settings > Accounts > Projects.
Any existing projects appear in the tree on the left-hand side of the page.
- Select the project/s or project folder/s that you want to move.
- At the bottom of the page, click Move.
- Select the destination folder location, or select Projects to move to the root folder.
Delete a Project
Required Tenable One AI Exposure User Role: Administrator. For more information, see Users and Groups.
To delete folders that contain child projects/folders, first delete or move the child projects/folders.
To delete a project:
- In the AI Exposure Console, navigate to Settings > Accounts > Projects.
- Select the project/s or project folder/s that you want to delete.
- At the bottom of the page, click Delete.
Filter Console Data by Projects
Data throughout the Console is filtered by scope, via a dropdown visible on every Console page. A user who was assigned a role for a specific, single project scope, will automatically see the AI Exposure Console filtered by that scope. Users assigned more than one project scope can view and configure specific features in the AI Exposure Console within a specific project scope.
You can use projects/project folders to:
- Filter data throughout the AI Exposure Console.
- View and configure specific features in the AI Exposure Console.
To filter data by projects:
- On the relevant Console page, click on the scope dropdown and select a project or project folder as a scope.

View Projects
By default, the Projects page displays projects and project folders in the root folder.
To view projects:
- In the AI Exposure Console, navigate to Settings > Accounts > Projects.
-
Do one of the following:
- Click Flat View to see projects created in all children folders. Use the Path column to identify the location of each project.
- Click a specific project folder to see projects (and subfolders) created in that folder.
-
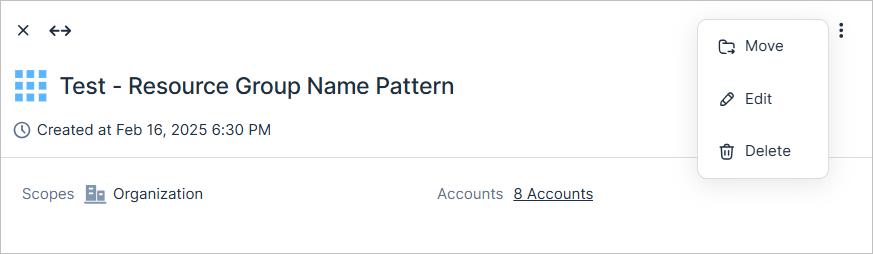
Click on a specific project to see project details. For example, you can:
- See when the project was created.
- See which scopes and accounts are in the project.
- Move the project.
- Edit the project.
- Delete the project.
Export Project Data
Export project data in CSV format. The data is exported according to the current filters applied to the table.
- In the AI Exposure Console, navigate to Settings > Accounts > Projects.
- Apply any relevant filters. Click Flat View to see projects created in all children folders.
- Click Export.