Connect an OCI Tenancy
Connect your entire Oracle Cloud tenancy in Tenable One Cloud Exposure to get full visibility into cloud identities and resources associated with the tenancy. Tenable collects inventory and configuration data from Oracle Cloud API.
Connecting your entire tenancy lets you expedite and automate the integration process in cloud environments with many accounts. Doing so allows you to:
- Simultaneously connect all compartments to Tenable at once.
- Automatically connect new compartments added in Oracle Cloud at a later stage.
- Ensure visibility into the full range of platform features.
After you complete integration, Tenable displays a status for each tenancy/compartment, indicating, for example, whether Tenable can connect to the tenancy, and helping you troubleshoot potential issues.
- See Supported Resources for a searchable list of supported OCI resources.
- See Billable Resources for a list of OCI resources which are billable for licensing purposes.
Prerequisites
Before you begin:
- Confirm root privileges. The OCI tenancy is onboarded in the root compartment.
- Grant sufficient permissions to the identity that will create groups, users, API keys, and policies in the root compartment.
- Ensure you have administrator access to the relevant Oracle Cloud tenancy with permissions to create users, groups, and policies.
-
Terraform-specific:
- Ensure you have Terraform CLI v0.13+ installed.
-
Ensure terraform init can download and install the following providers without conflicting with your existing configurations:
- OCI provider v6.0+
- TLS provider v4.0+
- Local provider v2.2+
- Ensure Terraform is run where the private key PEM file can be handled securely.
Connect a Tenancy
To connect an OCI tenancy:
- In the Cloud Exposure Console, navigate to Settings > Integrations and click + Add Integration.
- In the Integrations Library, click OCI Tenancy. The OCI Tenancy wizard opens.
-
In the Configuration step (step 1 of 2):
- Enter a name for the integration.
- For Tenancy OCID, enter the ID of the tenancy.
-
Under Capabilities, select the capabilities to enable. Your selection determines the required permissions.
- Monitoring (read-only) — Selected by default. Gain full visibility for all cloud assets, including information about permissions, compartment usage, data and security configurations.
- Compute Instance Scanning (Workload Protection) — Scan compute instances for vulnerabilities and misconfigurations. For the required permissions, see OCI Required Permissions.
-
Under Deployment, choose one of the following deployment options:
- Terraform. Module-based deployment. See Prerequisites before deploying.
- Copy the module invocation displayed in the Cloud Exposure wizard, add it to your Terraform configuration, and then run terraform apply. The module creates the identity and grants Tenable the permissions to connect and scan the environment.
- Manual. Manually, via the OCI Console. See Manually Deploy an OCI Tenancy for step-by-step instructions.
- Terraform. Module-based deployment. See Prerequisites before deploying.
-
Under Post deployment, enter the following values.
- Tenable User OCID (user): The OCID of the user you created for Tenable.
- Fingerprint (fingerprint): The fingerprint for the public key added to the user.
- Private Key — Upload the private key PEM file from the path provided in the Terraform output or from Oracle Cloud when you manually created user credentials.
- Home Region (region): The Oracle Cloud Infrastructure region.
- Click Next.
-
In the Scopes step (step 2 of 2):
- (Optional) Select Automatically update compartments structure to mirror your compartment's structure as folders within Tenable, preserving the hierarchy and keeping the view synchronized. For more information, see Account Hierarchy and Folders.
Under Scopes, choose which compartments to onboard:
- Sync all current and future compartments (recommended)
- Exclude specific compartments
Note: If you exclude an entire compartment, all current and future accounts within it are excluded. If you exclude specific accounts in a compartment, only the selected accounts are excluded.
- Click Finish.
Manually Deploy an OCI Tenancy
As an alternative to Terraform deployment, you can manually deploy your OCI tenancy via the OCI Console. These procedures are relevant if you selected Manual for the deployment type when connecting your tenancy.
Create a Group
Create a group for Cloud Exposure in OCI.
- Log in to the OCI Console and navigate to Identity & Security > Identity > Domains.
-
On the left-hand menu, under List scope > Compartment, select the root compartment.
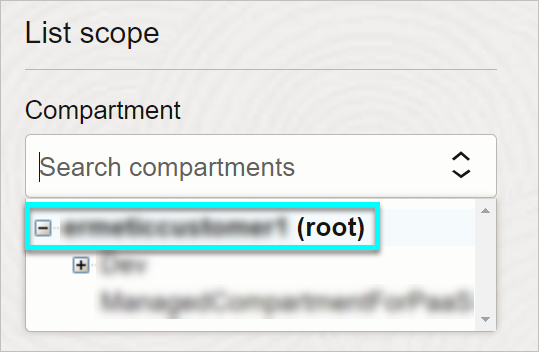
- In the list of domains, click on the Default domain name.
- Click Groups and then click Create group.
- For the Name, enter TenableCS, and then click Create.
Create and Assign a Policy to the Group
Grant the group you created for Cloud Exposure required permissions to read resources in OCI.
- Navigate to Identity & Security > Identity > Policies.
-
Click Create Policy and enter the following details:
- Name: Enter a meaningful name.
- Description: Enter a meaningful description.
- Compartment: Select the root compartment.
-
In the Policy Builder, click Show manual editor and add the Monitoring statement listed in OCI Required Permissions.
Note: If you did not use TenableCS as the Group name when you created a group, replace TenableCS with the name that you used.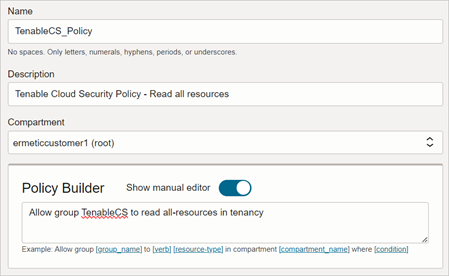
- Click Create.
Create a User
Create a user for which you will then create user credentials to grant Cloud Exposure API access to OCI.
- Navigate to Identity & Security > Identity > Domains.
- In the list of domains, click on the Default domain name.
- On the left-hand menu, click Users.
-
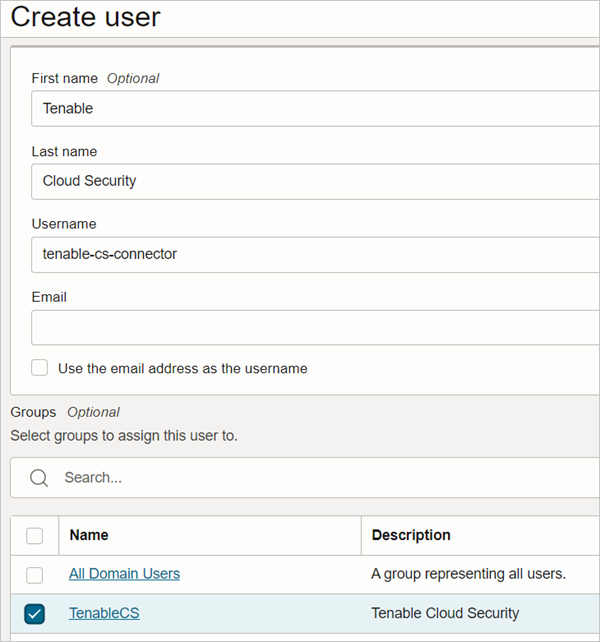
Click Create user, and enter the following details:
-
First name / Last name / Username / Email
Note: If an Email address is required, you can either enter it here, or disable the enforcement by navigating to Settings > Domain Settings and clearing the Primary email address required checkbox. - For Groups, select the group that you created.
-
- Click Create.
Create User Credentials
Create user credentials to grant Cloud Exposure API access to OCI.
- From the list of users (Identity > Domains > Default domain > Users), click on the user you created.
- On the left-hand menu, under Resources, click API keys.
- Click Add API key.
-
Click Download private key and then click Add.
Note: This file is necessary for Cloud Exposure to authenticate against OCI servers. You will need this key to complete Oracle Cloud integration.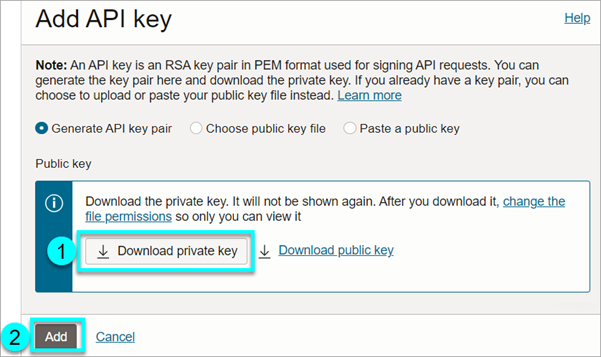
-
Click Copy to copy the configuration file content.
Note: To complete the authentication, Tenable needs basic authentication information contained in the configuration file. You will need to enter this information in the Cloud Exposure Console.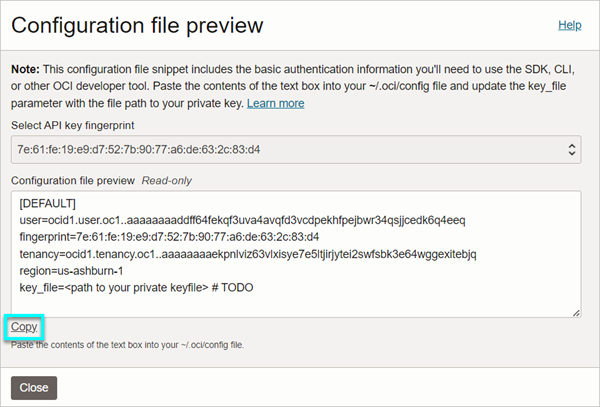
- Paste the content that you copied into a file (for example, oci_config.txt) and then save the file.