Top Attack Techniques
Required User Role: Basic User, Scan Operator, Standard User, Scan Manager, Administrator, or Custom Role
As part of a typical attack, adversaries leverage different tools and techniques to accomplish their objectives. This event is known as Attack Path. An attack path contains one or more Attack Techniques, allowing the hacker to accomplish their objective. To see a full list of supported attack paths within Tenable Exposure Management, view the Tenable Attack Path Techniques list.
Every attack path contains one or more attack techniques. Every network includes multiple attack paths. Tenable helps you to focus on the most important paths by highlighting:
-
Attack paths that lead to critical assets.
-
Assets with an ACR greater than 7.
-
Other Tenable defined static identifiers, such as Domain Admins.
An attack technique is a technique that exists in one or more attack paths that lead to one or more critical assets. The Top Attack Paths tab on the Attack Path page takes your data and pairs it with advanced graph analytics and the MITRE ATT&CK® Framework to create top attack techniques, which allow you to understand and act on the unknowns that enable and amplify threat impact on your assets and information.
Before you begin:
For Attack Path data ingestion to function as expected, ensure you have the following:
- A Tenable One Vulnerability Management Basic Network Scan with credentials.
-
One of the following:
-
A Tenable One Vulnerability Management basic scan using the Active Directory Identity scan template. This scan type requires fewer permissions, and provides a basic overview of your active directory entities.
Note: You can run this scan type on its own, or as part of a Basic Network Scan. In a Basic scan, you must ensure the Collect Identity Data from Active Directory option is enabled in the Discovery section. -
Tenable One Identity Exposure SaaS deployed.
Note: Because the plugin only supports up to 7,000 identities, the Active Directory Identity scan template is not designed for large environments, but is instead intended to help small customers kick start their use of Tenable Exposure Management. Tenable recommends that larger customers deploy Tenable One Identity Exposure. -
Additionally, for best performance, Tenable recommends the following:
-
Have at least 40% of assets scanned via an authenticated scan.
-
Select maximum verbosity in the Basic Network Scan.
-
A default Tenable One Web App Scanning scan, including injection plugins. At least 40% of the web applications should be scanned.
-
An AWS connection with a Tenable One Cloud Exposure scan policy including all vulnerabilities and available AWS resources.
-
When using Tenable One Identity Exposure, enable privileged analysis. This option highlights key attack vectors used by hackers and gives you a better understanding of your attack surface, including credential auditing and password analysis.
-
A scan frequency of at least once a week.
-
Configure all of your platform products, including:
-
Configure Tenable One OT Exposure to view OT/IoT data.
-
Configure Tenable One Attack Surface Management and configure the application for use with Tenable One Vulnerability Management. This ensures that usable data gets pulled into Tenable Exposure Management.
-
Configure Tenable One AI Exposure to gain visibility into your AI attack surface. Tenable One AI Exposure ingests data from ChatGPT Enterprise and Microsoft Copilot Studio and maps it to specific assets and findings in Tenable Exposure Management.
-
For cloud-heavy environments, Tenable One Cloud Exposure serves as the primary telemetry source for APA. However, you must enable specific modules to use the full potential of the analysis. For more information, see Integrate Tenable Cloud Security with Attack Path Analysis.
-
-
At least one attack technique found within Tenable Exposure Management.
-
At least one attack path generated within Tenable Exposure Management.
-
Attack paths that use the previously mentioned attack technique and lead to at least one critical asset.
To access the Top Attack Techniques tab:
-
Do one of the following:
-
In the left navigation menu, click Attack Path > Attack Techniques.
-
At the top of the Attack Path page, click the Attack Techniques tab.
The Top Attack Techniques tab appears.
-
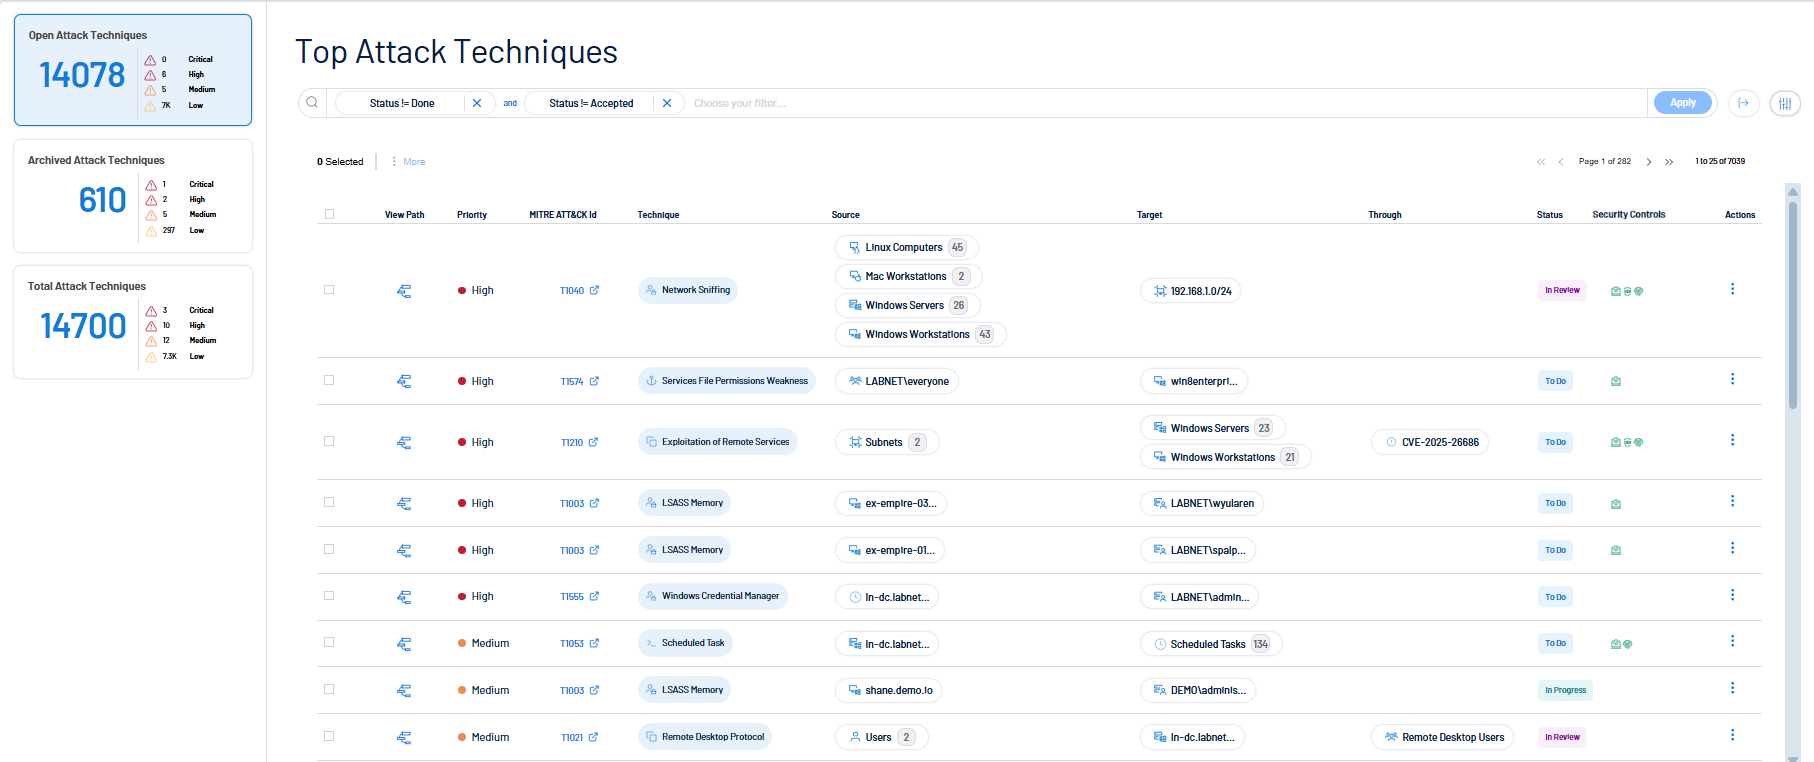
The Top Attack Techniques tab includes the following sections:
Attack Technique Tiles
On the left side of the page, you can view Attack Techniques tiles that include the following information:
-
Open Attack Techniques — View the total number of open attack techniques within Tenable Exposure Management. Also, view the number of open techniques in each priority level.
-
Archived Attack Techniques —View the total number of archived attack techniques within Tenable Exposure Management. Also, view the number of archived techniques in each priority level.
-
Total Attack Techniques — View the total number of attack techniques within Tenable Exposure Management. Also, view the number of total attack techniques in each priority level.
-
Click on a tile to filter the Top Attack Techniques list by that type of technique.

- When a attack technique is not seen as part of any attack path, Tenable Exposure Management changes the attack technique State to Archived.
- When a attack technique cannot be found within the Attack Path Graph on the Top Attack Paths tab, Tenable Exposure Management changes the attack technique State to Archived and the Status to Done.
If at any point the attack technique is again seen as part of an attack path, Tenable Exposure Management automatically reactivates the attack technique State to Open.
Top Attack Techniques List
View the Top Attack Techniques list, where you can:
-
Export an attack technique.
-
Change the status of an attack technique.
Tip: See View the Log History for an Attack Technique for more information about attack technique statuses. -
Archive an attack technique.
-
Click on a technique to view additional attack technique details.
-
View the following attack technique information:
-
View Path — Click the
 button in the row of any attack technique to navigate to the Top Attack Paths tab, where you can view a graphical representation of the attack path and interact with more attack path data.
 -
Priority — The priority, or criticality, of the attack technique, for example, Critical.
Note: By default, the Top Attack Techniques list sorts attack techniques by highest priority first.
Note: When calculating the priority, Tenable Exposure Management considers the following:- The number of attack paths where the attack technique is present compared to the total number of attack paths.
- The number of critical assets to which these attack paths lead compared to the total number of critical assets.
- The tactic used, for example, lateral movement or privilege escalation.
-
MITRE ATT&CK Id — The MITRE ATT&CK identification number for the attack technique. Click an identification number to navigate directly to the MITRE ATT&CK listing for the attack technique.
-
Technique — The MITRE ATT&CK technique associated with the attack technique.
-
Source — The starting point of the malicious activity. This represents the entity or location from which the attack is launched.
-
Target — The final object or system that the attacker intends to influence, access, or destroy.
-
Through — The path through which the attacker might access the target.
-
Status — The status to indicate the action taken on the attack technique, for example, To do or In Progress.
Tip: For more information, see Attack Path and Technique Statuses. -
Security Controls — Indicates whether there are any security controls in place on assets along the attack technique.
Tip: A security control on an asset is a security control or countermeasure that can potentially interrupt or block an attacker's ability to chain together vulnerabilities and reach a critical asset. Examples include EPP, VPN, and AV — each raising the cost and complexity for an attacker to succeed. For more information, see Security Controls on the attack technique details page.
You can manage the list in the following ways:
Filter the List
To filter the list of top attack techniques:
-
At the top of the Top Attack Techniques list, click inside the search box.
The Choose your filter drop-down box appears where you can filter the list. Options include, but are not limited to:
Filter Description Priority Filters by priority: critical, high, medium, or low. Note: When calculating the priority, Tenable Exposure Management considers the following:- The number of attack paths where the attack technique is present compared to the total number of attack paths.
- The number of critical assets to which these attack paths lead compared to the total number of critical assets.
- The tactic used, for example, lateral movement or privilege escalation.
Status Filters by status: To Do, In Progress, In Review, and Done. Source Filters by the attack path source. Target Filters by the attack path target. CVE Filters by specific CVEs. Mitigations Filters by mitigations for the attack techniques. Tactic Filters attack techniques with similar tactics. Technique Filters by attack techniques. For more information about attack techniques, view the Tenable Attack Path Techniques list. -
Select the filter you want to use to filter the Top Attack Techniques list.
The Choose operator drop-down box appears.
-
Select the operator you want to use to filter the Top Attack Techniques list.
The Choose value drop-down box appears.
-
Select the value you want to use to filter the Top Attack Techniques list.
-
Click Apply.
Tenable Exposure Management filters the Top Attack Techniques list based on your criteria.
-
Show/Hide Columns in the List
To show/hide columns in the top attack techniques list:
-
In the upper-right corner of the Top Attack Techniques list, click the
 button.
A drop-down menu appears.
-
Select or deselect the check box next to the column you want to show or hide in the list.
The Top Attack Techniques list updates based on your selection.
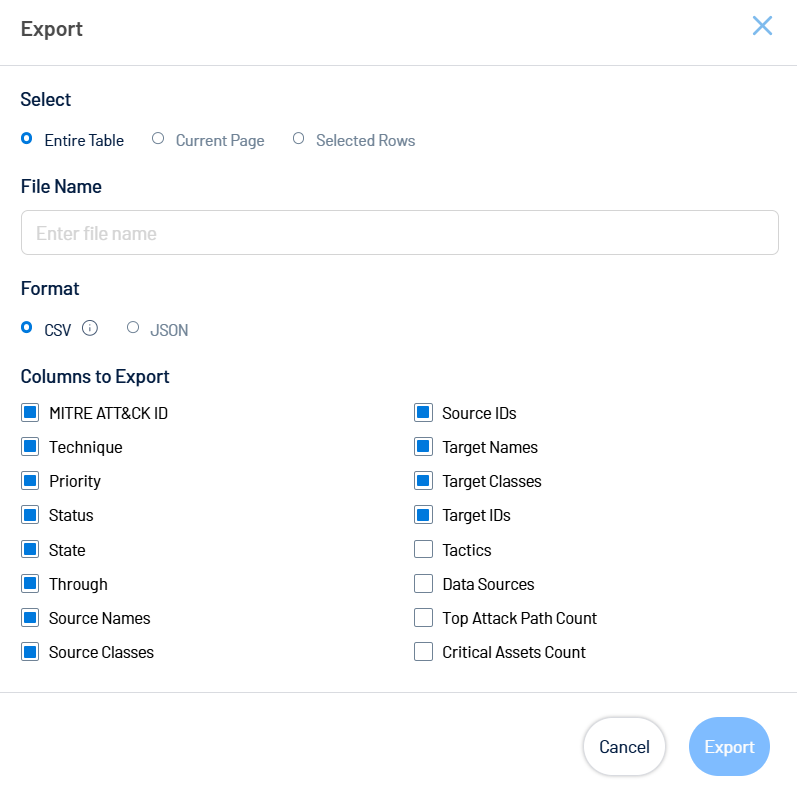
Export One or More Attack Techniques
Required User Role: Basic User, Scan Operator, Standard User, Scan Manager, Administrator, or Custom Role
To export one or more attack techniques from the list:
-
(Optional) To export only specific table rows, in the table, select the check box next to the rows you want to export.
-
In the upper-right corner of the page, click the
 button.
The Export window appears.
-
Do one of the following:
-
To export the entire table, select the Entire Table radio button.
-
To export the current page, select the Current Page radio button.
-
To export the selected rows, select the Selected Rows radio button.
Note: This option is only available if you select individual rows in the list before clicking the button.
-
-
In the File Name text box, type a file name to give the exported file.
-
In the Formats section, select the format in which you want to export the data.
-
In the Columns to Export section, select the check box for each column you want to include in the export file.
-
Click Export.
Tenable Exposure Management downloads the export file to your computer. Depending on your browser settings, your browser may notify you that the download is complete.