Identity 360 Essentials
Identity 360 offers robust tools for managing and analyzing your organization's identity data to allow you to make informed security decisions.
Search
Identity 360 offers three powerful search options to help you find the exact information you need:
-
Global Search Query Builder
-
Enables complex, precise searches using specific properties and relational queries
-
Ideal for power users and detailed analysis
-
Example: Find all accounts that are members of the "identities that have accounts belonging to a specific group" or "identities with high-risk entitlements accessed in the last 30 days."
-
Benefits: Allows you to construct precise, multi-layered searches to pinpoint exactly the data you need.
For complete information on how to use this query builder, see the Global Search Quick Reference Guide.
-
-
Natural Language Processing (NLP) Search
-
Simply type your request in plain English
-
The system intelligently interprets your intent and converts it into a structured query
-
Example: "Show me all inactive user accounts in the Marketing department"
-
Benefits: User-friendly, requires no query syntax knowledge, great for quick ad-hoc searches
-
-
Simple Search
-
Fast, straightforward text-based search for immediate results
-
Perfect for finding specific identities or simple lookups
-
Example: Typing a name like "John Smith" or an employee ID
-
Benefits: Instantaneous, ideal for day-to-day operations and quick checks
-
Each search type caters to different user needs and scenarios, from complex data analysis to quick identity lookups. You can choose the most appropriate search method based on your current task, technical expertise, and the complexity of the information you seek.
Filter
A filter function in Identity 360 allows you to narrow down or refine displayed data by applying specific criteria.
To apply a filter:
-
In the header of the Identities page, click
 .
.The Add Filter button appears.
-
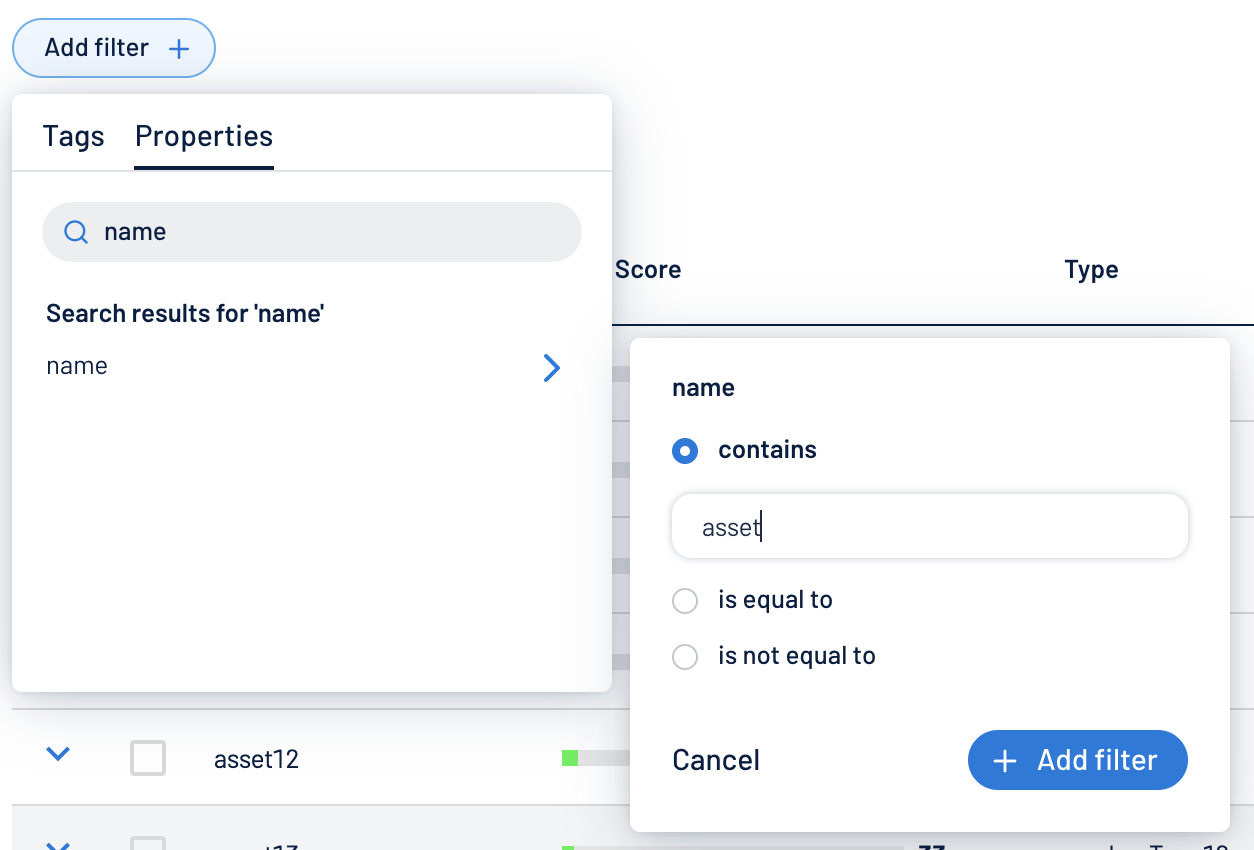
Click Add Filter +.
A menu appears.
-
Do one of the following:
-
To search the asset list by tag, click Tags (applicable only with Tenable One license and managed in Tenable Inventory.)
-
To search the asset list by asset property, click Properties.
-
-
In the search box, type the criteria by which you want to search the asset list.
Tenable Inventory populates a list of options based on your criteria.
-
Click the tag or property by which you want to filter the asset list.
A menu appears.
-
Select how to apply the filter. For example, if you want to search for an asset whose name is Asset14, then select the contains radio button and in the text box, type Asset14.
-
Click Add filter .
The filter appears above the asset list.
-
Repeat these steps for each additional filter you want to apply.
-
Click Apply filters.
The page filters the identity list by the designated criteria.
Export
You can export the data displayed in the table to an Excel file.
Note: Each tab within the detailed Identity view offers its own export option, allowing you to extract more targeted data sets.
To export data:
-
In the header of the Identities page, click the
 icon.
icon. -
In the Export Table window, select the columns to export. You have the option to export the current page or selected rows.

-
Click Export.
Customize Columns
You can add, remove, or reorder columns to tailor your view to your preferences. If you want to revert any changes, you can always reset to the default settings.
To customize column displays:
-
In the header of the Identities page, click
 .
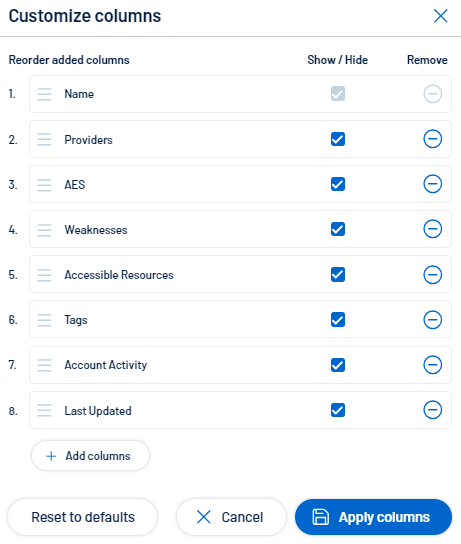
.The Customize columns window appears.
-
Optional:
-
In the Reorder added columns section, click and drag any column name to reorder the columns.
-
In the Show/Hide section, select/delesect the check boxes to show or hide columns in the table.
-
In the Remove section, click the button to permanently remove a column from the table.
-
To add columns to the table, click Add Columns.
The Add columns to table window appears.
-
(Optional) Use the search bar to search for a column property.
The list of column properties updates based on your search query.
-
Select the check box next to any column or columns you want to add to the table.
-
Click Add.
The column appears in the Customize columns window.
-
-
-
Click Apply Columns.
Tenable saves your changes to the columns in the table.
Default Columns
The default layout of columns ensures that key data is easily accessible while offering flexibility for customization.
-
Name – A mandatory field that cannot be hidden or removed, as it serves as the primary identifier for each item.
-
Providers – Displays the associated service or platform linked to the item.
-
AES – Shows the Asset Exposure Score.
-
Weaknesses – Highlights any vulnerabilities or issues detected for the listed items.
-
Accessible Resources – Shows resources that are accessible by the account or entity.
-
Tags – Labels or metadata associated with each item to help with categorization.
-
Account Activity – Logs or metrics related to the activity of accounts.
-
Last Updated – Displays the most recent date when the item was updated.
To reset to default columns:
-
Click Reset to Defaults to reset all columns to their defaults.