Flex Control settings include the functions listed in the table below. These options provide added flexibility when managing your patching environment.
|
Blocklisting |
Provides an extra level of protection for customer devices and patching processes. Prevents the download and installation of potentially damaging content to customer devices. Refer to Blocklisting. |
|
Cycle Operations |
Includes access to Patching, Deployment, and Rollout Cycle details. Details include a graphical representation of any cycles in progress and a table that lists details for each cycle in progress. Also includes a graphical representation of previously completed cycles and a table that lists a each completed cycle. Select each completed cycle to review details. Refer to Cycle Operations. |
|
Exceptions |
Allows administrators to exclude Business Units from specific updates on certain products or to use settings to maintain all endpoints at a specific version of a product. Refer to Patching Exceptions. |
|
Global Pause |
Use Global Pause to pause or resume all patching activities for specified software products and patches. Affects all clients contained in one or more specified Business Units. Refer to Global Pause. |
|
Rollbacks |
Create a Rollback object to rollback a patch to a previous version. Refer to Rollbacks. |
Tenable Patch Management includes an extra level of protection for customer devices and patching processes called Blocklisting. The Tenable Patch Management metadata team, as always, reviews all metadata that vendors provide for their new products and patches to verify relevance and integrity.
When a vendor releases products and patches, the Tenable Patch Management metadata team reviews the content and determines whether the patch has any issues that might cause unexpected behavior. The metadata team block lists patches and products that have issues and automatically creates an exclusion for the patch on all clients. Blocklisting prevents the download and installation of potentially damaging content to customer devices.
The Blocklist Settings workspace provides configuration options for Notifications and Communication Providers. The Notification Chains and Communication Providers configured from this workspace identify the process and delivery of communications related to blocklisted patches. Refer to Managing Blocklist Notification Settings.

Set categories of notification by selecting a Notification Chain to use when Tenable Patch Management blocklists a patch/release. Select the same or different Notification Chain to notify administrators when you blocklist a patch or a release. You can also select specific communication providers for either category of notification.
Blocklist Settings include notification details for blocklisted patches including Notification Chains and Communication Providers. You can use the Tenable Patch Management provided details (Tenable Patch Management Curated) or create your own (Customer). Update these settings as needed for your notification preferences.

-
Navigate to Blocklist Settings .
-
Select Browse next to either Tenable Patch Management Curated Chain or the Customer Chain to list the available Notification Chains.If you need to create a new Notification Chain for these purposes, refer to Create a Notification Chain .
-
Select the Name of the Notification Chain you want to use for whichever field you are editing – the Tenable Patch Management Curated Chain or the Customer Chain.
-
Select Add Notification Chain on the bottom left of the dialog.
-
Navigate to Blocklist Settings.
-
Select + Add Communication Providers for either Tenable Patch Management Curated Communication Providers or Customer Communication Providers from the Blocklist Settings.
-
Select one or more Names from the Communications Provider table, and then click Add Communication Providers at the bottom left of the dialog.
If you need to add providers to the table, refer to Create a New Communication Provider .
Includes access to Patching, Deployment, and Rollout Cycle details. Details include a graphical representation of any cycles in progress and a table that lists details for each cycle in progress. Also includes a graphical representation of previously completed cycles and a table that lists a each completed cycle. Select each completed cycle to review details.
Details available for each cycle type include the following:
-
Cycle Information: Provides general information about the Patch Process such as the Current State, the creation date and time, and the Patch Process schedule. This section also contains controls to manually start, stop, or delay a Patch Process.
-
Overall Metrics: This section contains information about the scope of the running process. This screen shows the number of business units and devices affected by this Patch Process, along with Urgency information.
-
Cycle History: This section gives a historical perspective of the results of past runs. This view shows the number of devices that previously were successful, failed, aborted, timed out, or errored.
-
Patch Approvals: One of the key functions of a Patch Process is to execute Approval Chains as defined in the Patching Strategy or Business Unit. This section displays pending Approvals. You cannot grant approvals from this view.
-
Cycle Logs: Display events relating to the Patch Process. For instance, the Cycle Operation Logs can show the administrator who manually started a Patch Cycle and at what time.
This dashboard shows information about the active Patch Processes in the environment. Patch Processes represent the workflow that models and performs the defined patching routine. As part of the overall Patching Strategy, Patch Deployment Bots use configured criteria to identify patches that apply to endpoints. Once approved, the Bot submits those patches to the Patch Process, which creates a Patch Cycle. The Patch Cycle executes at either a scheduled time or you can start it manually.
-
Mouse over or click Flex Controls on the Home menu, and then select Cycle Operations > Patching Cycles.
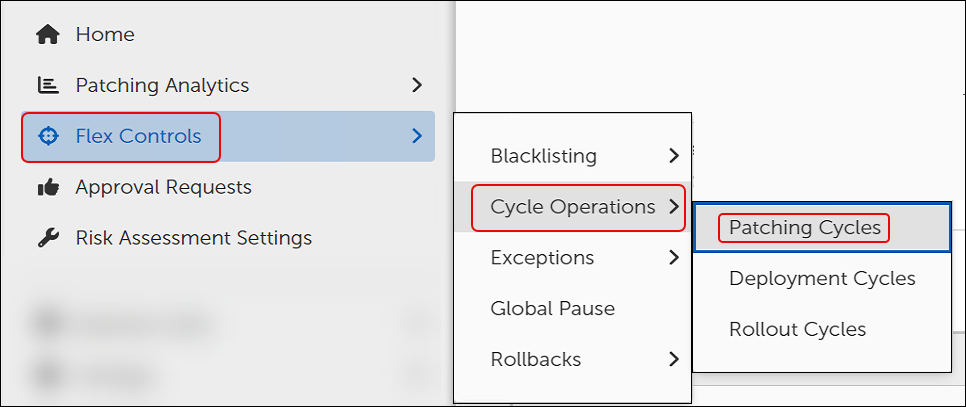
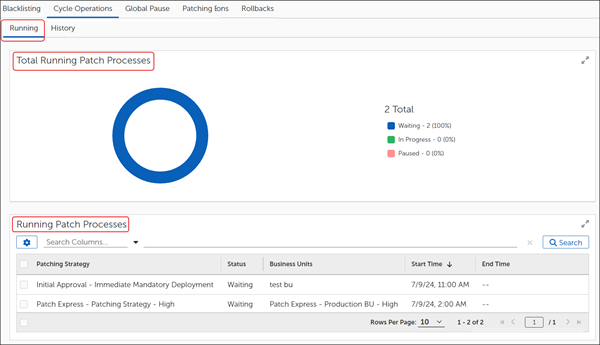
This opens to the Running tab of the Patching Cycles workspace:
-
The Total Running Patch Processes widget shows an aggregate summary of all patch processes and their corresponding states (Waiting, In Progress, or Paused).
-
The Running Patch Processes table lists the running Patching Strategies by name.
-
-
Enter a Patching Strategy name on the search bar above the Running Patch Processes table, and then click Search.

-
Select the Patching Strategy name in the Running Patch Processes table to get specific details about that process.
-
Mouse over or click Flex Controls in the Home menu, and then select Cycle Operations > Patching Cycles.

-
Select History on the upper left to change to the History tab:
-
The Total Finished Patch Processes widget on top shows an aggregate summary of all completed patch processes and their corresponding states (In Progress, Succeeded, Failed, Aborted, Timed Out, Error Occurred).
-
The Running Patch Processes table lists the completed patch processes by Patching Strategy name.
-
-
Enter a Patching Strategy name on the search bar above the Running Patch Processes table, and then click Search.

-
Select the Patching Strategy name in the Running Patch Processes table to get specific details about that process.
This dashboard shows information about currently running Patch Deployment Channel Processes and the history of completed patch processes. These details show the status of all active Deployment Processes.
-
Mouse over or click Flex Controls in the Home menu, and then select Cycle Operations > Deployment Cycles.
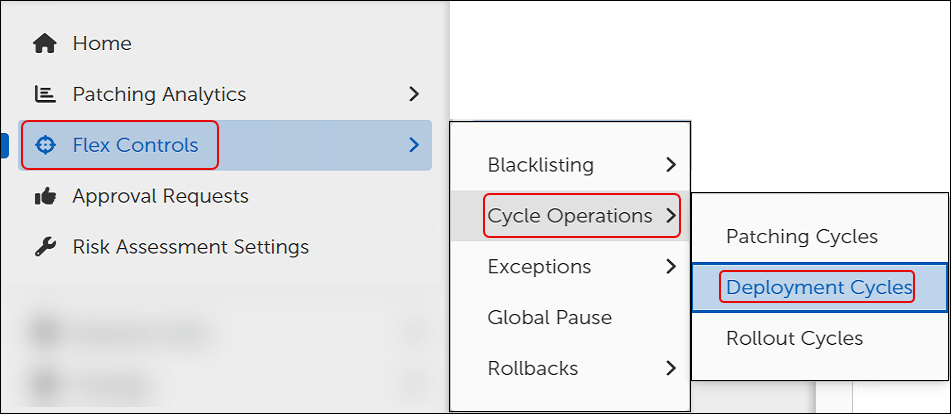
This opens to the Running tab of the Deployment Cycles workspace:
-
The Total Running Deployments widget shows an aggregate summary of all patch processes and their corresponding states (Waiting, In Progress, or Paused).
-
The Running Deployments widget table lists the running Deployment Strategies by name.
-
-
Enter a Deployment Strategy name on the search bar above the Running Patch Processes table, and then click Search.
-
Select the Deployment Strategy name in the Running Patch Processes table to get specific details about that process.
-
Mouse over or click Flex Controls in the Home menu, and then select Cycle Operations > Deployment Cycles.
-
Select History on the upper left to change to the History tab:
-
The Total Running Deployments widget shows an aggregate summary of all deployment processes and their corresponding states (Waiting, In Progress, or Paused).
-
The Running Deployments widget table lists the completed Deployment Strategies by name.
-
-
Enter a Deployment Strategy name on the search bar above the Running Patch Processes table, and then click Search.
-
Select the Deployment Cycle name in the Finished Deployments table to get specific details about that process.
Rollout Processes represent the installation of Patches per Business Unit. Each Business Unit involved in the Patch Deployment includes a Rollout Cycle.
-
Mouse over or click Flex Controls on the Home menu, and then select Cycle Operations > Rollout Cycles.

This opens to the Running tab of the Rollout Cycles workspace:
-
The Total Running Rollout Cycles widget on top shows an aggregate summary of all running Rollout processes and their corresponding states (Waiting, In Progress, Paused).
-
The Running Rollout Cycles table lists the completed patch processes by Rollout name.
-
-
Enter a Rollout Cycle name on the search bar above the Running Rollout Processes table, and then click Search.
-
Select the Rollout Cycle name in the Running Rollout Processes table to get specific details about that process.
-
Mouse over or click Flex Controls on the Home menu, and then select Cycle Operations > Rollout Cycles.
-
Select History on the upper left to change to the History tab:
-
The Total Running Deployments widget shows an aggregate summary of all deployment processes and their corresponding states (Waiting, In Progress, or Paused).
-
The Running Deployments widget table lists the completed Deployment Strategies by name.
-
-
Enter a Rollout Cycle name on the search bar above the Running Rollout Cycles table, and then click Search.
-
Select the Rollout Cycle name in the Finished Cycles table to get specific details about that process.
When Business Units require exemption from specific updates on certain products, or the entire enterprise must remain at a specific version of a product, Patching Exceptions provide a mechanism for creating and implementing the rules. Patching Exceptions provide version level patch support to give administrators granular control over patch deployment. For example, use Patching Exceptions to target and completely remove a product from an environment when the product is no longer required.
Patching Exceptions allow teams to define exceptions for specific business units or environments, create multiple exceptions under a single policy and more. This means you can manage exceptions for several patches or products simultaneously.
Tenable Patch Management includes two Patching Exception options: Desired State Override and Last Allowed Version. You may choose one option only per Patching Exception. For example, create one exception to use one or more Desired State Overrides, then create another to specify Last Allowed Versions. In either case, you may choose specific Business Units as the targets of the exception.
Desired State Override Options
Last Allowed Version
Specifies a product level to consider current and ignores all later releases. When specified, the Last Allowed Version sets the state for all products so that a later version than the one specified does not install.
-
Select Flex Controls from the menu, and then select Exceptions > Patches.
-
Select + New on the upper-right corner to open a Patching Exception template.
-
Name and describe the exception:
-
Enter a descriptive Name for this exception in the Name field.
-
Enter a detailed Description of the purpose for this exception.
-
-
Select Save on the upper left to save your new template:
-
Choose an Override Strategy:
-
If you choose Override Desired States, refer to Set Override Details for Patch Exception.
-
If you choose Select Last Allowed Versions, refer to Set Last Allowed Patch Versions.
-
Note: Choose only one software version per override exception.
-
Select Override Desired States (default) as your Override Strategy in an open workspace or dialog.

-
Select the + next to your choice for Desired State Overrides. The example uses Mandatory Install.
-
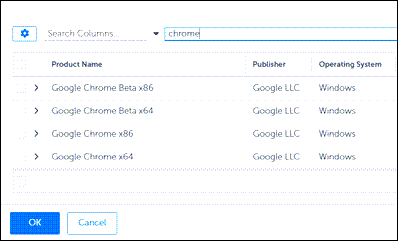
Select +Browse to open the table of available software:
-
Enter a product name on the search line, and then click Search. This example uses Google Chrome.
-
Select the product from the list, and then click OK.
-
-
Select Save on the upper-left corner of the dialog to save your changes:
-
Continue to Add Target Business Units.

With Select Last Allowed Versions as your Override Strategy in under Patching Exceptions you may select one or more Business Units to which the patching exception applies. With no Business Units specified, the Patching Exception applies to all endpoints where the specified Patches apply.
-
Select + Browse next to Target Business Units in an open Patching Exception template.
-
Select one or more Business Units to include in the Patching Exception.

-
Select OK on the lower left corner of the dialog.
-
Select Save on the upper left corner of the Patching Exceptions dialog to save your progress:
Global Pause settings take effect immediately on the clients you identify either globally or within the selected Business Units. Patch cycles continue to run as configured on the Tenable Patch Management side, and the Tenable Patch Management pauses the deployment of patches identified in the pause settings.
The Global Pause menu item provides access to both a button and access to configuration details for pausing patch activity for specific products, patches, cycles, or Business Units.
When activated, immediately stops all patch deployments across all licensed clients. When deactivated () Tenable Patch Management revokes the Global Pause request and restores normal patching activity to all licensed clients.
In addition, you may create pause configurations for each of the following:
: Pause patch deployments for specified products either globally or for specific Business Units.
: Pause patch deployments for specified patches either globally or for specific Business Units.
: Pause Patching, Deployment, or Rollout Cycles either for specified Business Units or for the Business Units already targeted by the Cycle.
: Pause all patches for specified Business Units.
To stop all patching activity on all licensed clients in the estate, use the following steps to activate .
-
Select Flex Controls on the menu, and then select Global Pause.

This opens the Global Pause dialog:
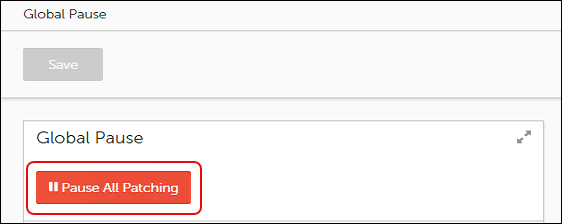
-
Select Pause All Patching.
-
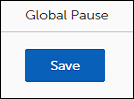
Select Save to activate Global Pause. This immediately stops all patch deployments across all licensed clients:
-
All patch deployments in progress that have not reached an irreversible state are paused immediately.
-
All newly initiated patch deployments are paused automatically.
-
To resume all paused patching activity on all licensed clients, use the following steps to revoke a .
-
Select Flex Controls on the menu, and then select Global Pause.
This opens the Global Pause dialog:

-
Select Resume Patching.
-
Select Save to revoke the Global Pause. This immediately revokes the Global Pause and allows patching activity to occur as configured.
To stop patching activity for specific objects, such as Products, Patches, Cycles, and Business units, use the following steps to access the menu items:
-
Select Flex Controls on the menu, and then select Global Pause.
This opens the menu:
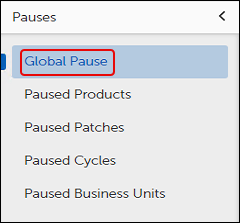
-
Select the pause you want to configure. You can configure multiple types of pauses, but you must configure them separately.
-
Global Pause: Pause all patching activity immediately (Stop All Patching Activity Immediately).
-
Paused Products: Pause patch deployments for one or more products (Pause Deployment of a Specific Software Product).
-
Pause Patches: Pause deployment of a software patch or release for one or more products (Paused Patches).
-
Paused Cycles: Specify a Patching, Deployment, or Rollout cycle to pause for one or more products.
-
Pause Business Units: Pause patch deployments for one or more Business Units.
-
To stop patching activity for specific software products or patches, complete the following steps:
-
Navigate to the menu (refer to Pause Patching for Specific Objects), and then select Paused Products.
This opens the dialog:

-
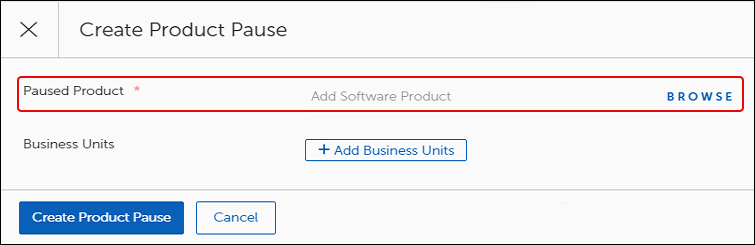
Select +Create Product Pause to open the Create Product Pause dialog:
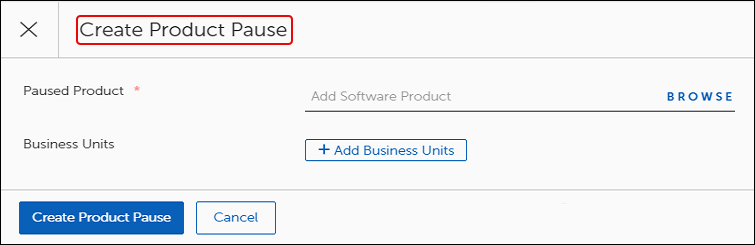
-
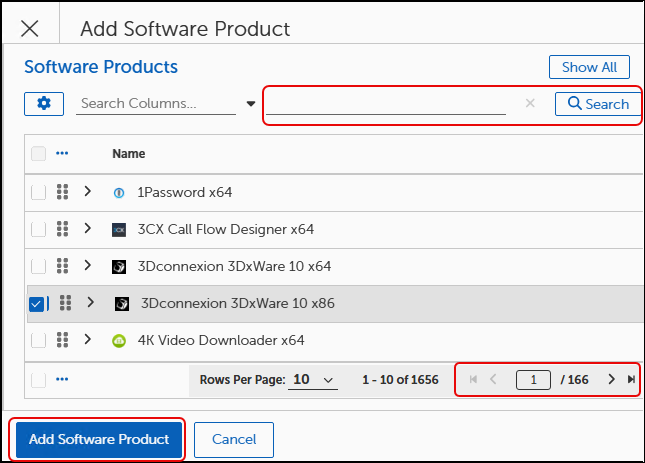
Select Browse to find the software product to pause.
-
Select the software product you want to pause using either of the following methods:
-
Use the navigation tools on the bottom right to scroll through the pages and select one or more Software Products from the table.
-
Enter a product name on the search line, and then click Search to find a specific product
-
-
-
Select Add Software Product to return to the Create Product Pause dialog, and then choose one of the following methods to proceed:
-
To create a Global Pause for the selected products, click Create Product Pause. This pauses the deployment of the selected software product on all devices in the estate.
-
To specify a pause for specific devices, continue with the next step to Add Business Units.
-
-
Add or remove Business Units:
-
Select Create Product Pause and then click Save to create a global pause for the selected products.
To stop patching activity for a specific patch, complete the following steps:
-
Navigate to the menu (refer to Pause Patching for Specific Objects), and then select Paused Patches.
This opens the dialog:

-
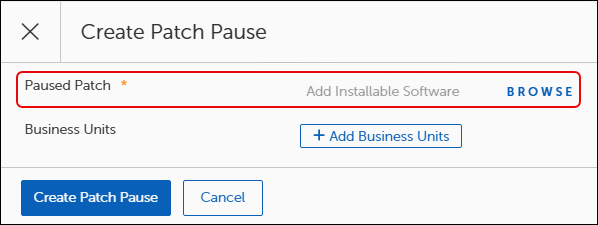
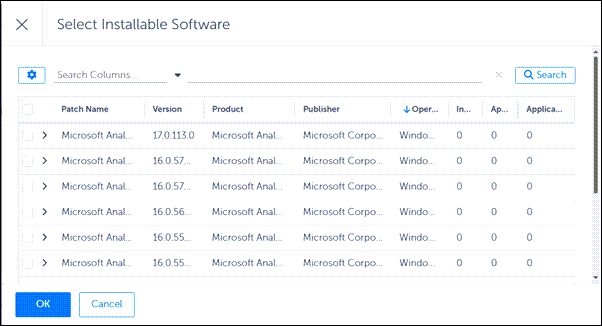
Select +Create Patch Pause to open the Create Product Pause dialog, and then select Browse to find the Software patch you want to pause:

-
Select Browse to find the Software Patch to pause:
-
Select the patch you want to pause:
-
-
Select Add Installable Software Product to return to the Create Patch Pause dialog, and then choose one of the following methods to proceed:
-
To create a Global Pause for the selected products, click Create Patch Pause. This pauses the deployment of the selected software patch on all devices in the estate.
-
To specify a pause for specific devices, continue with the next step to Add Business Units.
-
-
Add or remove Business Units:
-
Select Create Patch Pause and then click Save to create a global pause for the selected patch.
Tenable Patch Management allows you to create Patching Cycles, Deployment Cycles, and Rollout Cycles to customize patching in your estate. Global Pause provides a way to pause these cycles when necessary. You may create a pause for one cycle at a time.
-
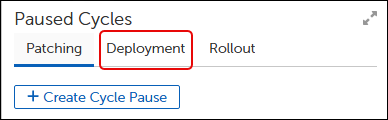
Paused Cycles - Patching
-
Paused Cycles - Deployment
-
Paused Cycles - Rollout
Note: Pausing a cycle that is currently in a WAITING state (has not run yet), prevents that cycle from running until you remove the pause. This is the only server-side behavior related to pausing.
To stop patching activity for a specific patching cycle, complete the following steps:
-
Navigate to the menu (refer to Pause Patching for Specific Objects), and then select Paused Cycles.
This opens the Paused Cycles dialog to the Patching tab:

-
Select +Create Cycle Pause to open the Create Cycle Pause dialog, and then click Browse.

-
Search for and select the patching cycle you want to pause using one of the methods described below:
Note: Cycles do not appear unless you have created them previously. If you do not have a cycle to stop, do not complete this section.
-
Use the navigation tools on the bottom right to scroll through the pages to find and select a Patching Cycle from the table.
-
Enter a cycle name on the search line, and then click Search to find and select a specific cycle.
-
-
Select OK, and then choose one of the following options to proceed:
-
To create a Global Pause for the selected cycle, skip to Step 6. This pauses the deployment of the selected cycle on all devices in the estate.
-
To specify a pause for specific devices, continue with the next step to Add Business Units.
-
-
Add or remove Business Units:
-
Select Create Cycle Pause and then click Save to create a pause for the selected cycle.
To stop all patching activity for a specific deployment cycle, complete the following steps:
-
Navigate to the menu (refer to Pause Patching for Specific Objects), and then select Paused Cycles.
This opens the Paused Cycles dialog to the Deployment tab:
-
Select +Create Cycle Pause. This opens the Create Cycle Pause dialog:
-
Select Browse to open the Select a Deployment Cycle dialog, and then use one of the methods below to find and select a cycle.
Note: Cycles do not appear unless you have created them previously. If you do not have a cycle to pause, choose a different pause method.

-
Use the navigation tools on the bottom right to scroll through the pages to find and select a cycle from the table.
-
Enter a cycle name on the search line, and then click Search to find and select a specific cycle
-
-
Select OK to save your entry, and then choose one of the following options to proceed:
-
To create a Global Pause for the selected cycle, skip to Step 6. This pauses the deployment of the selected software product on all devices in the estate.
-
To specify a pause for specific devices, continue with the next step to Add Business Units.
-
-
Add or remove Business Units:
-
Select Create Cycle Pause and then click Save to create a pause for the selected cycle.
To stop all patching activity for a specific rollout cycle, complete the following steps:
-
Navigate to the menu (refer to Pause Patching for Specific Objects), and then select Paused Cycles.
This opens the Paused Cycles dialog to the Rollout tab:

-
Select +Create Cycle Pause. This opens the Create Cycle Pause dialog:
-
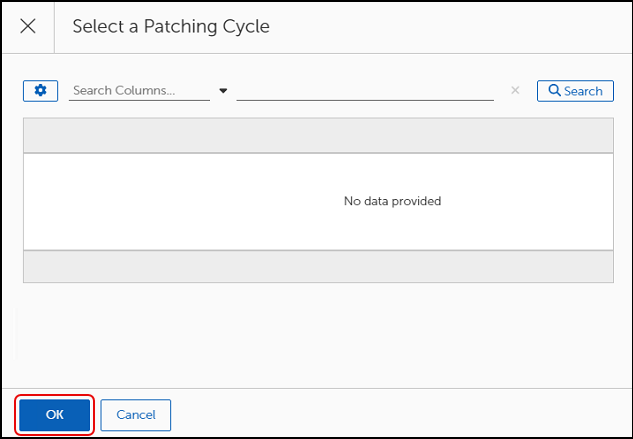
Select Browse to select the rollout cycle you want to pause. This opens the Select a Rollout Cycle dialog.
Note: Cycles do not appear unless you have created them previously. If you do not have a cycle to stop, do not complete this section.
-
Use the navigation tools on the bottom right to scroll through the pages to find and select a Rollout Cycle from the table.
-
Enter a cycle name on the search line, and then click Search to find and select a specific cycle.
-
-
Select OK , and then choose one of the following options to proceed:
-
To create a Global Pause for the selected cycle, skip to Step 6. This pauses the deployment of the selected software product on all devices in the estate.
-
To specify a pause for specific devices, continue with the next step to Add Business Units.
-
-
Add or remove Business Units:
-
Select Create Cycle Pause and then click Save to create a pause for the selected rollout cycle.
To stop patching deployment for specific business units, complete the following steps:
-
Navigate to the menu (refer to Pause Patching for Specific Objects), and then select Paused Business Units.
This opens the dialog:

-
Add or remove Business Units:
-
Select Save to create a global pause for the selected business unit or business units.
The Rollbacks feature of Tenable Patch Management allows you to rollback one or more patches or releases to a previous version (Rollback), or you may rollback one or more patches or releases to an earlier, non-sequential version (Rollback to Version).
In either case, you may configure Rollback activities across your entire estate or limit a rollback to one or more Business Units.
Use the Rollback template to rollback a patch or release to the previous version. To rollback to a specific, earlier version, refer to Rollback to Version.
Use the Rollback template to configure a patch or release rollback to the previous version:
-
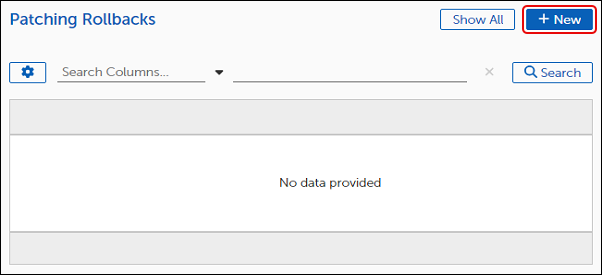
Select Flex Controls on the left navigation menu of the Patch Dashboard, and then select Rollbacks > Rollback.

This opens the Patching Rollbacks table. Until you create a rollback, the table is empty.
-
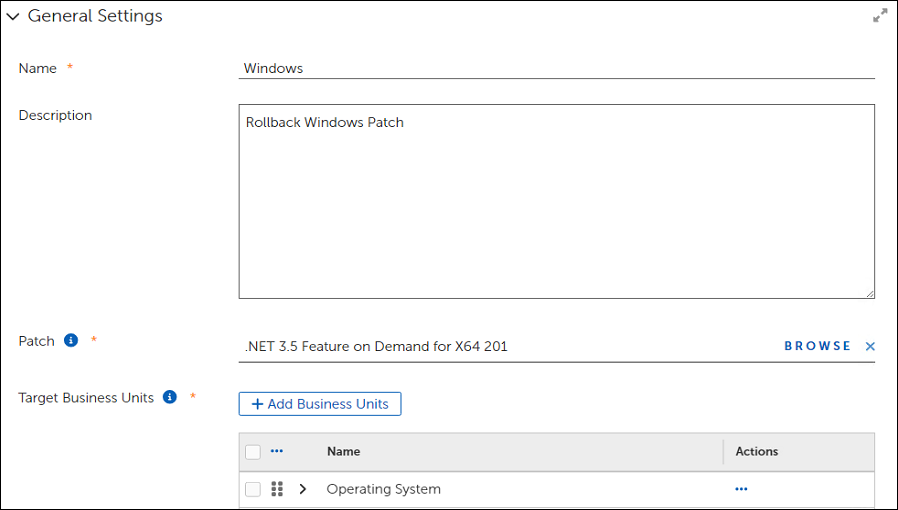
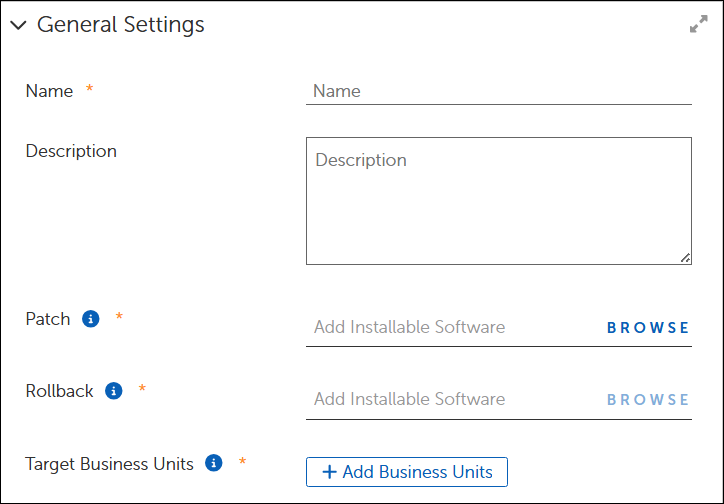
Select +New to open the Rollback template, and then enter a Name and a detailed Description of the rollback.
Note: A red asterisk next to a field name indicates a required field.

-
Locate the patch or release you want to roll back:

-
Select a Software patch or release :
-
Add one or more Business Units to specify the devices to rollback.
-
Select Save to save the Rollback configuration. This returns you to the Patching Rollbacks table, which lists your new rollback.
-
Select a Rollback template from the Patching Rollbacks table of an open Patching Rollbacks template.
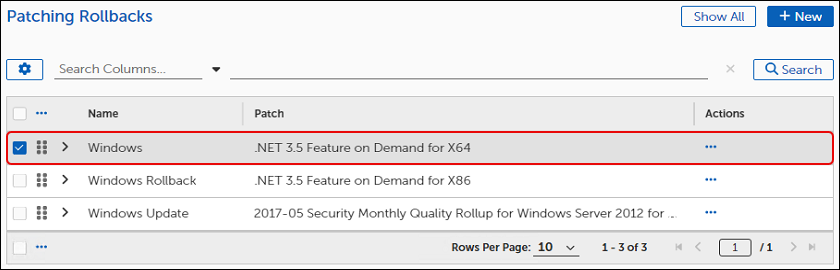
This opens the template.
Note: A red asterisk next to a field name indicates a required field.
-
Modify the Rollback settings:
-
Select Browse to choose a different patch or release to roll back.
-
Select +Add Business Units to add or remove target devices.
-
-
Select Save on the upper-left corner of the template to save the new settings.
-
Select a Rollback template from the Patching Rollbacks table of an open Patching Rollbacks template.
This opens the template.
Note: A red asterisk next to a field name indicates a required field.
-
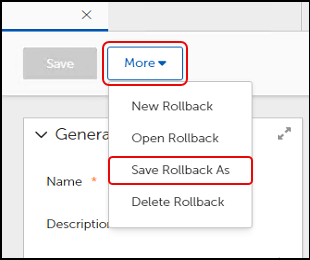
Select More, and then select Save Rollback As.
-
Enter a new Name for the template, and then click Save as.

-
Revise the Description to reflect any changes needed for the copy, and then click Save.
-
Select Back to Rollbacks on the upper-left corner of the template to return to the Rollbacks table and view your changes.
-
Open the Patching Rollbacks table ().
-
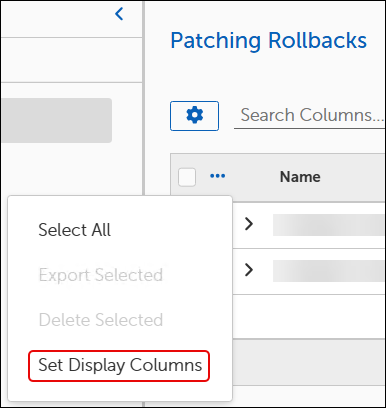
Select the ellipsis (...) next to Name in the Patching Rollbacks table, and then click Set Display Columns.
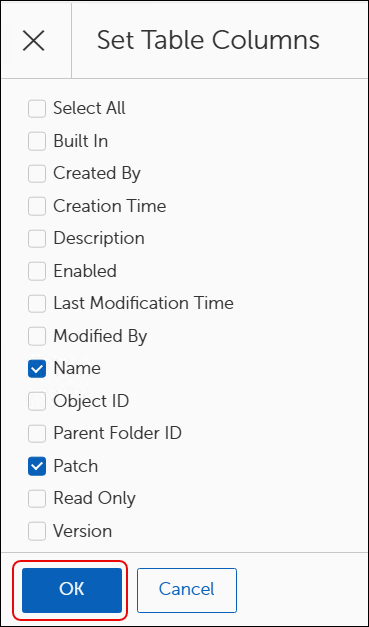
This opens the Set Table Columns dialog.
-
Select the column names you want the Patching Rollbacks table to display, and then click OK.
-
Select a Rollback template from the Patching Rollbacks table of an open Patching Rollbacks template.
-
Select the Ellipsis (...) next to Name, and then select Delete Selected.
-
Review the Are you sure? dialog:

-
Select Export Logs on the top-right corner of the Are you sure? dialog to export trace logs. The trace logs download to your device as a file with a
.logextension. -
Select OK to delete the Rollback.
-
-
Select Back to Rollbacks on the upper-left corner of the template to return to the Rollbacks table and view your changes.
-
Open the Patching Rollbacks table ().
-
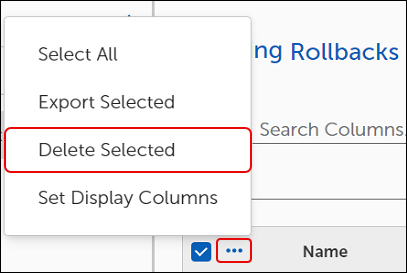
Select the ellipsis (...) next to Name, and then click Select All.

-
Select the ellipsis (...) again, and then choose what you want to do with the selected Rollbacks:
-
To export the selected Rollbacks, refer to Select All Rollback to Version Objects.
-
To delete the Selected templates, refer to Bulk Delete Rollbacks.
-
To customize the display columns of the Patching Rollbacks table, refer to Customize Patching Rollback Table Settings.
-
-
Open the Patching Rollbacks table (Flex Controls > Rollbacks > Rollback).
-
Select the ellipsis (...) next to Name, and then click Select All.
-
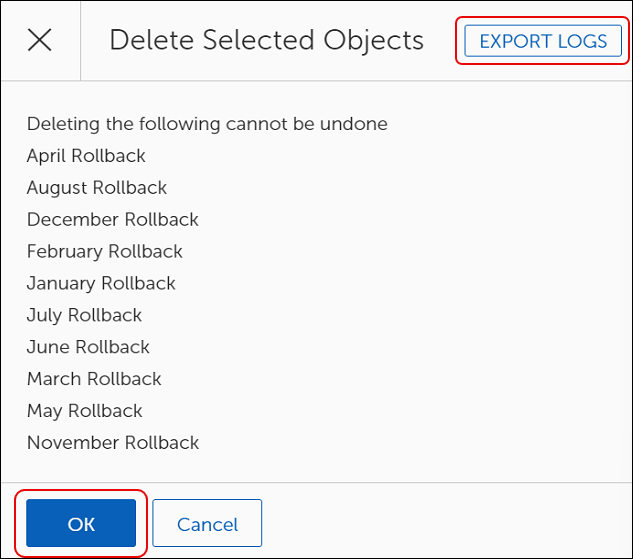
Select the ellipsis (...) next to Name, and then select Delete Selected.

This opens the Delete Selected Objects dialog:
-
(Optional) Select Export Logs on the top-right corner of the Delete Selected Objects dialog to export trace logs. The trace logs download to your device as a file with a
.logextension. -
Select OK to delete the Rollbacks. This returns you to the Patching Rollbacks to table where the deleted Rollbacks no longer appear.
-
Open the Patching Rollbacks table ().
-
Select a single Patching Rollback from the table, or click the ellipsis (...) next to Name, and then click Select All to export all Rollbacks
-
Select the ellipsis (...) next to Name again, and then click Export Selected.

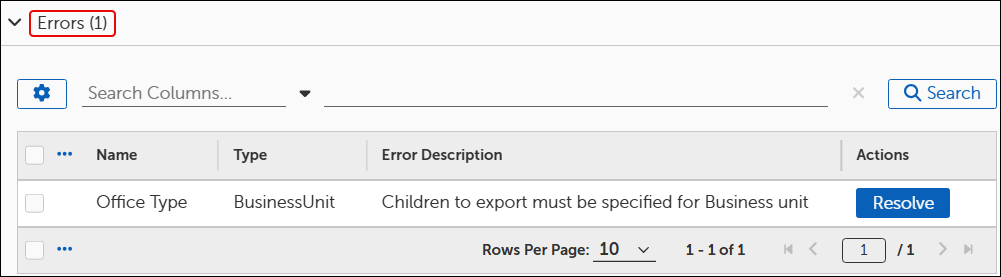
This opens the Object Export Settings:

If Object Export Settings command returns an error similar to the following, refer to Resolve Export Errors errors:
-
Continue to Configure the Object Export Settings.
-
Complete the steps in Export Rollback to open the Object Export Settings template.
-
Enter an Exporting Organization Name and a Description of the settings you intend to create.
-
Toggle the Export as JSON switch to enable or disable (default) whether to export the settings as a JSON file.
-
Toggle the Automatically Import ... switch to enable or disable whether to select a specific folder to save the import.
-
Select Export on the bottom left corner of the Object Export Settings to export the selected objects.
Note: Tenable Patch Management no longer supports the Export to Linked Servers functionality. Do not make any changes to the default settings.
To view the folder location of a Rollback to Version template, complete the following steps:
-
Open the Patching Rollbacks table ().
-
Select the ellipses (...) in the Actions column of the Patching Rollbacks table, and then select Show References.

This opens the [Rollback Name] Object References dialog.

-
Select the caret next to a Folder icon to expand the folder and view the contents, if needed.
-
Select OK to return to the Patching Rollbacks table.
Use the Rollback to Version template to rollback a patch or release to a specific release or version. To rollback to the previous version, refer to Rollback.
To rollback a patch to a previous patch or release version, complete the following steps:
-
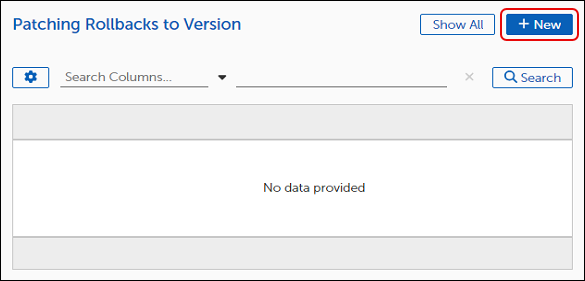
Select Flex Controls on the left navigation menu of the Patch Dashboard, and then select Rollbacks > Rollback to Version.

This opens the Patching Rollbacks to Version table. Until you create a rollback, the table is empty..
-
Select +New to open the Rollback template, and then enter a Name and a detailed Description of the rollback.
Note: A red asterisk next to a field name indicates a required field.
-
Enter a Name and a detailed Description of your Rollback to Version.
-
Add the patch or release to roll back from.
-
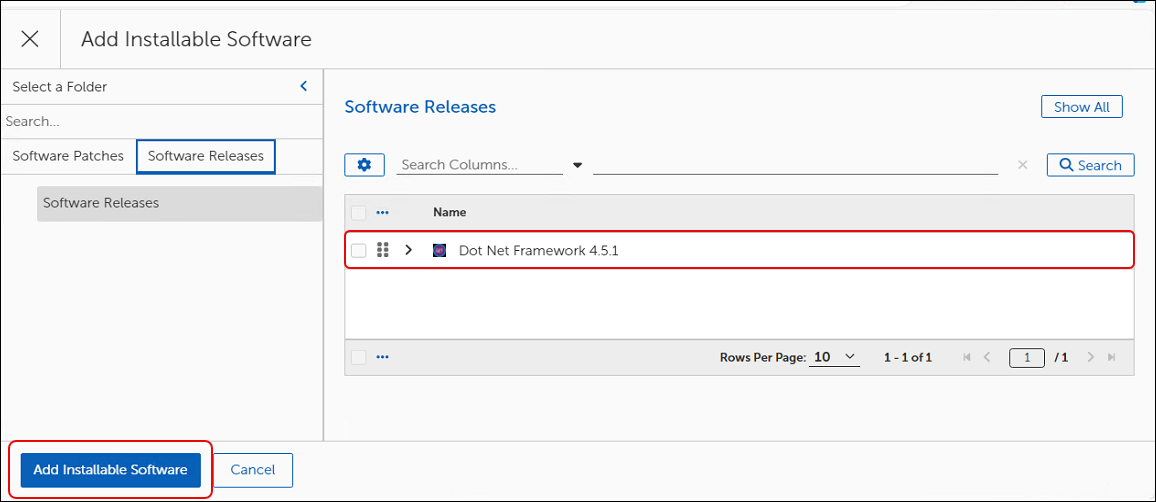
Select Browse next to Add Installable Software in an open Rollback to Version template.

-
Choose the Software Patch or Software Release from the Add Installable Software table to roll back from. You can select only one Patch or Release to roll back from.

-
Select Add Installable Software to return to the Rollback to Version template.
-
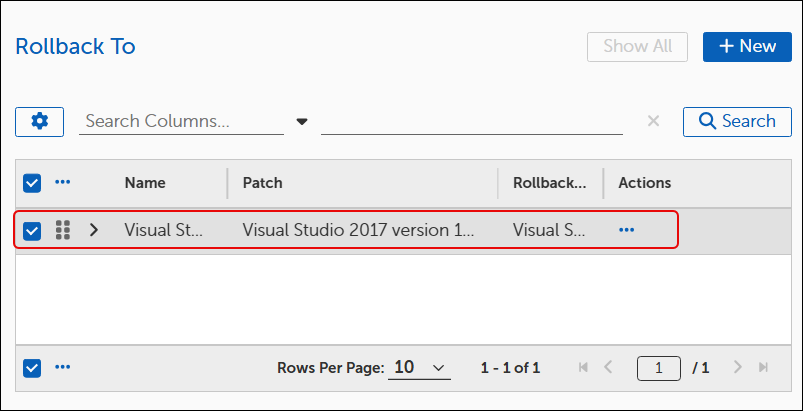
Choose the software patch or release version to roll back to.
-
Select Browse next to Rollback in an open Rollback to Version template.

-
Select a Patch or Release version from the Add Installable Software table to roll back to. The only visible versions are those that match the item you selected for Patch. You can select only one Patch or Release to roll back to.
-
Select Add Installable Software.
-
Add target Business Units for the Rollback to Version.
-
Select a Rollback to Version template from the Patching Rollbacks to Version table of an open Patching Rollbacks template.

This opens the template.
-
Modify the Rollback settings:
-
Select Browse for Patch to choose a patch or release to roll back from.
-
Select Browse for Rollback to choose the version of the patch or release to roll back to.
-
Select +Add Business Units to add or remove target devices.
-
-
Select Save top-left corner of template to save the changes.
-
Select a Rollback template from the Patching Rollbacks to Version table of an open Patching Rollbacks template.
This opens the template.

-
Select More, and then select Save Rollback As.
-
Enter a new Name for the template, and then click Save as.
-
Revise the Description to reflect any changes needed for the copy, and then click Save.
-
Select Back to Rollbacks on the upper-left corner of the template to return to the Rollbacks table and view your changes.
-
Open the Patching Rollbacks table ().
-
Select the ellipsis (...) next to Name in the Patching Rollbacks table, and then click Set Display Columns.
This opens the Set Table Columns dialog.
-
Select the column names you want the Patching Rollbacks table to display, and then click OK.
-
Select a Rollback to Version template from the Patching Rollbacks to Version table of an open Patching Rollbacks template.
-
Select the Ellipsis (...) next to Name, and then select Delete Selected.
-
Review the Are you sure? dialog:
-
Select Export Logs on the top-right corner of the Are you sure? dialog to export trace logs. The trace logs download to your device as a file with a
.logextension. -
Select OK to delete the Rollback.
-
-
Select Back to Rollbacks on the upper-left corner of the template to return to the Rollbacks table and view your changes.
-
Open the Patching Rollbacks table ().
-
Select the ellipsis (...) next to Name, and then click Select All.

-
Select the ellipsis (...) again, and then choose what you want to do with the selected Rollbacks:
-
To export the selected Rollbacks, refer to Select All Rollback to Version Objects.
-
To delete the Selected templates, refer to Bulk Delete Rollbacks.
-
To customize the display columns of the Patching Rollbacks table, refer to Customize Patching Rollback Table Settings.
-
Use the following task to delete all Rollback to Version templates.
-
Open the Patching Rollbacks table (Flex Controls > Rollbacks > Rollback to Version).
-
Select the ellipsis (...) next to Name, and then click Select All.
-
Select the ellipsis (...) next to Name, and then select Delete Selected.
This opens the Delete Selected Objects dialog:
-
(Optional) Select Export Logs on the top-right corner of the Delete Selected Objects dialog to export trace logs. The trace logs download to your device as a file with a
.logextension. -
Select OK to delete the Rollbacks. This returns you to the Patching Rollbacks to Version table where the deleted Rollbacks no longer appear.
-
Open the Patching Rollbacks table ().
-
Select a single Patching Rollback from the table, or click the ellipsis (...) next to Name, and then click Select All to export all Rollbacks
-
Select the ellipsis (...) next to Name again, and then click Export Selected.
This opens the Object Export Settings:
If Object Export Settings command returns an error similar to the following, refer to Resolve Export Errors errors:
-
Continue to Configure the Object Export Settings.
-
Complete the steps in Export Rollback to Version to open the Object Export Settings template.
-
Enter an Exporting Organization Name and a Description of the settings you intend to create.
-
Toggle the Export as JSON switch to enable or disable (default) whether to export the settings as a JSON file.
-
Toggle the Automatically Import ... switch to enable or disable whether to select a specific folder to save the import.
-
Select Export on the bottom left corner of the Object Export Settings to export the selected objects.
Note: Tenable Patch Management no longer supports the Export to Linked Servers functionality. Do not make any changes to the default settings.
To view the folder location of a Rollback to Version template, complete the following steps:
-
Open the Patching Rollbacks table ().
-
Select the ellipses (...) in the Actions column in the Patching Rollbacks to Version table, and then select Show References.
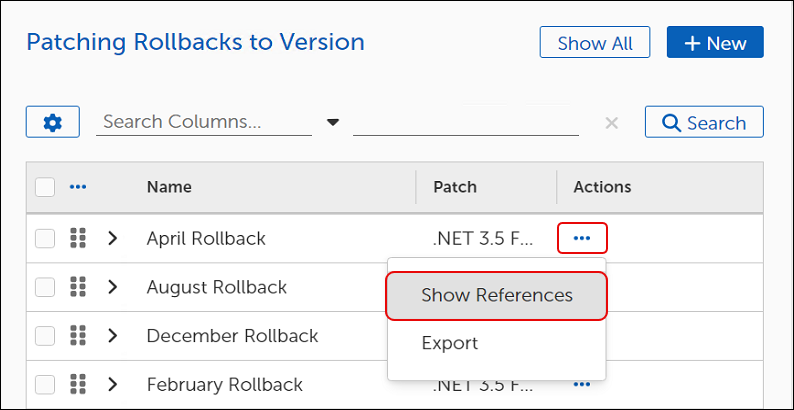
This opens the [Rollback Name] Object References dialog.
-
Select the caret next to the Folder icon to expand the folder and view the contents, if needed.
-
Select OK to return to the Patching Rollbacks to Version table.