Tenable Identity Exposure: Microsoft Entra ID IdP
One of the most common IdPs used to configure SAML with Tenable Identity Exposure is Microsoft Entra ID. The following steps guide you through the configuration process from start to finish.
Manual configuration requires the following:
-
URL of the SAML server: A value that corresponds to the Login URL within Microsoft Entra ID.
-
Assert endpoint of the Tenable.ad service provider: A value that corresponds to the Reply URL within Microsoft Entra ID.
-
Trusted Certificate Authorities: The SAML server certificate in PEM-encoded format, beginning with -----BEGIN CERTIFICATE ----- and ending with -----END CERTIFICATE -----, provided by Microsoft Entra ID in the Certificate (Base 64) section.
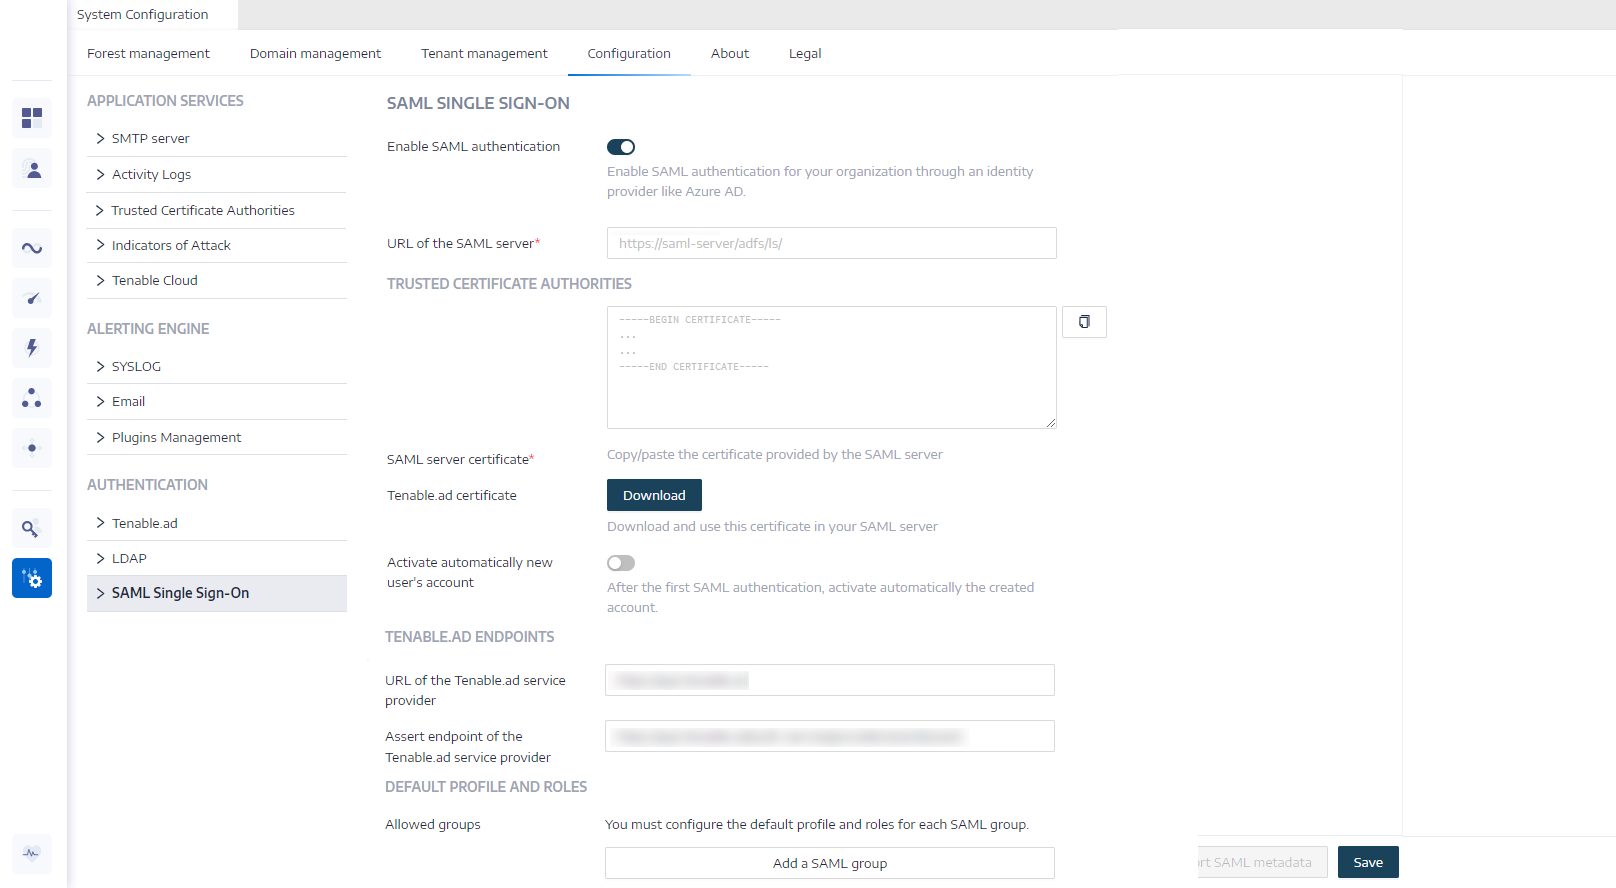
Enable Tenable Identity Exposure SAML
The first step in configuring SAML for use with Tenable Identity Exposure is to enable the configuration in the Tenable Identity Exposure application. Then, you can download your certificate file to use in your IdP.
To enable the Tenable Identity Exposure SAML configuration:
- In your browser, navigate to Tenable Identity Exposure.
-
Navigate to Systems > Configuration.
The configuration pane appears.
-
Under the Authentication section, click SAML Single Sign-on.
-
Click the Enable SAML authentication toggle.
A SAML information form appears.
-
In the Tenable.ad Certificate section, click Download.
Your browser downloads the certificate needed to connect with your IdP.
-
In the Tenable.ad Endpoints section, copy the following values for use within your IdP:
-
URL of the Tenable.ad service provider
-
Assert endpoint of the Tenable.ad service provider
-
You can now use the downloaded certificate and copied values to set up the connection with your IdP.
Microsoft Entra ID: Create Application and Upload Certificate
Now that you have enabled the Tenable Identity Exposure SAML configuration, you can create a Tenable application in Microsoft Entra ID.
-
In your browser, navigate to the Azure Admin portal.
-
In the navigation menu, navigate to All services > Enterprise Applications.
The application gallery appears.

-
Click Create your own application.
The Create your own application window appears.

-
In the What's the name of your app? text box, type a name for your application.
-
In the What are you looking to do with your application section, select the Integrate any other application you don't find in the gallery radio button.
-
Click Create.
Microsoft Entra ID redirects you to the application overview page.
-
In the Getting Started section, click the Set up single sign on tile.
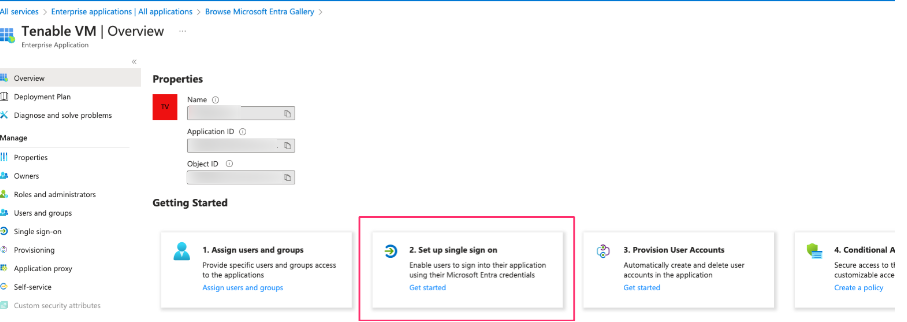
The Single Sign-on options appear.

-
Click the SAML tile.
The SAML-based Sign-on page appears.
-
On the Basic SAML Configuration tile, click the
 button.
Action items appear.
-
Click Edit.
The Basic SAML Configuration page appears.

-
In the Identifier (Entity ID) text box, paste the URL of the Tenable.ad service provider value you copied from Tenable Identity Exposure.
-
In the Reply URL text box, paste the Assert endpoint of the Tenable.ad service provider value you copied from Tenable Identity Exposure.
-
On the User Attributes & Claims tile, click the
button.Action options appear.
-
Click Edit.
The User Attributes & Claims page appears.
-
Click Add a group claim.
The Group Claim preview appears.

-
Select the Groups assigned to the application radio button.
-
In the Source Attribute drop-down, select Group ID.
-
Select the Customize the name of the group claim checkbox.
-
In the Name text box, type groups.
-
Click Save.
You return to the SAML-based Sign-on page.
-
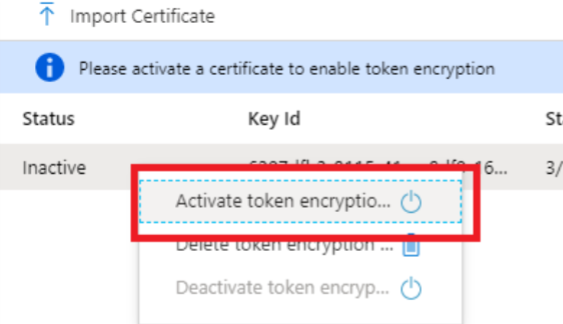
In the left navigation menu, click Token Encryption.
Encryption options appear.
-
Click Import Certificate.

-
In your file manager, select the certificate you downloaded from Tenable Identity Exposure.
-
Click Add.
-
Right-click the newly uploaded certificate and click Activate Token Encryption.
Create Microsoft Entra ID Groups and Assign Users
To create groups and assign users:
-
In Microsoft Entra ID, in the left navigation menu, click Users and Groups.
The Users and Groups page appears.
-
Click Add User.
The Add Assignment page appears.
-
Click the Users and Groups section.
-
In the selection plane, select the users and/or groups you want to assign to the group for use with Tenable Identity Exposure.

-
For each user or group you add, click the name and copy the Object ID for later use within Tenable Identity Exposure.
 Tip: You'll later paste this as the SAML group name within Tenable Identity Exposure.
 -
Navigate back to the SAML-based Sign-on page.
-
On the SAML Certificates tile, in the Certificate (Base 64) section, click Download.

Your browser downloads the certificate.
Tip: You'll later paste the contents of this certificate in the Trusted Certificate Authorities section of Tenable Identity Exposure. -
In the Set up App section, copy the Login URL for later use within Tenable Identity Exposure.
Tip: You'll later paste this as the URL of the SAML server within Tenable Identity Exposure.
You can now finish your SAML configuration within the Tenable Identity Exposure application.
Finalize the Tenable Identity Exposure SAML Configuration
Once you've set up your application within your IdP, you can finalize your SAML configuration via the Tenable Identity Exposure interface.
To finalize the Tenable Identity Exposure SAML configuration:
- In your browser, navigate to Tenable Identity Exposure.
-
Navigate to Systems > Configuration.
The configuration pane appears.
-
Under the Authentication section, click SAML Single Sign-on.
-
Click the Enable SAML authentication toggle.
A SAML information form appears.
-
In the URL of the SAML server box, paste the value you copied from your IdP. This value identifies the SAML server where Tenable Identity Exposure must connect.
-
In the Trusted Certificate Authorities box, paste certificate values that you copied from your IdP, beginning with -----BEGIN CERTIFICATE ----- and ending with -----END CERTIFICATE -----.
-
Enable the Activate automatically new user's account toggle.
-
In the Default Profiles and Roles section, configure at least one Allowed Group. This group name should match the name and description of the group you created in your IdP.
-
 A group for your administrators that matches the group you created in your IdP:
-
In the SAML group name text box, type the name of the group you created in your IdP.
-
In the Default profile text box, select the default profile you want to use for the group.
-
In the Default roles box, select the default role you want to use for the group. For example, if the group is for Administrator use only, select Global Administrator.
-
-
-
Click Save.
Tenable Identity Exposure saves your changes, and your SAML configuration is ready for use.
Additional Resources
For more information on Microsoft Entra ID IdP configuration, see the following resources: