Create a Scan
To create a scan:
-
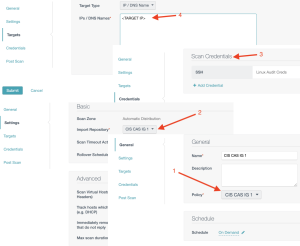
After creating an active scan, ensure the correct Policy is selected.
-
Ensure the correct Import Repository is selected.
-
Select the Scan Credentials that were created earlier.
- Enter the target IP in IPs / DNS Names.
Once the scan is created and run, the user can navigate to scan results and drill into the scan. Drilling into the scan result will bring the user to the Vulnerability Analysis page. Each CIS Control plugin name directly relates to all the previous questions that were answered in the audit file. High severities indicate a failed compliance check, and info severities indicate a passed compliance check. If the auditing user input a "Yes" as a compliance check answer the check will have an info severity.
