Tenable Nessus Certificate Configuration for Unix
The following topic describes the commands and relevant files involved in the Nessus SSL process on a Red Hat Linux system. This process creates the following files:
|
File Name Created |
Purpose |
Where to Copy to |
|---|---|---|
|
/opt/nessus/com/nessus/CA/cacert.pem |
This is the certificate for the Certificate Authority. If using an existing PKI, this will be provided to you by the PKI and must be copied to this location. |
/opt/nessus/com/nessus/CA on the initial Nessus server and any additional Nessus servers that need to authenticate using SSL. |
|
/opt/nessus/com/nessus/CA/servercert.pem |
This is the public certificate for the Nessus server that is sent in response to a CSR. |
/opt/nessus/com/nessus/CA on any additional Nessus servers that need to authenticate using SSL. |
|
/opt/nessus/var/nessus/CA/cakey.pem |
This is the private key of the Certificate Authority. It may or may not be provided by the Certificate Authority, depending on if they allow the creation of sub users. |
/opt/nessus/var/nessus/CA on any additional Nessus servers that need to authenticate using SSL. |
|
/opt/nessus/var/nessus/CA/serverkey.pem |
This is the private key of the Nessus server. |
/opt/nessus/var/nessus/CA on any additional Nessus servers that need to authenticate using SSL. |
Create Nessus Client Keys
The Nessus user, in this case the user ID that Tenable Security Center uses to communicate with the Nessus server, is created by the following command:
# /opt/nessus/sbin/nessuscli mkcert-client
This command creates the keys for the Nessus clients and optionally registers them appropriately with the Nessus server by associating a distinguished name (dname) with the user ID. It is important to respond y (yes) when prompted to register the user with the Nessus server for this to take effect. The user name may vary and is referred to here as user.
The certificate filename is a concatenation of cert_, the user name you entered and .pem. Additionally, the key filename is a concatenation of key_, the user name you entered and .pem.
If the user was previously added via the /opt/nessus/sbin/nessuscli adduser command, you will still need to run this program to register the user. If you have not previously created the user, it is not necessary to also run the nessuscli adduser command; the user is created if it does not already exist. The following files are created by this command:
|
File Name Created |
Purpose |
|---|---|
|
/tmp/nessus-xxxxxxxx/cert_{user}.pem |
This is the public certificate for the specified user. |
|
/tmp/nessus-xxxxxxxx/key_{user}.pem |
This is the private key for the specified user. |
|
/opt/nessus/var/nessus/users/{user}/auth/dname |
This is the distinguished name to be associated with this user. The distinguished name consists of a number of options separated by commas in the following format: /C={country}/ST={state}/L={location}/OU={organizational unit}/O={organization/CN={common name} |
Create and Deploy SSL Authentication for Nessus
An example SSL Certificate configuration for Nessus to Tenable Security Center authentication is included below:
In the example described here, Tenable Security Center and the Nessus scanner are defined as follows. Your configuration varies:
Tenable Security Center:
IP: 192.0.2.50
OS: Red Hat ES 5
Nessus Scanner:
IP: 192.0.2.202
OS: Red Hat ES 5
Create Keys and User on Nessus Server
Log in to the Nessus scanner and use the su command to become the root user. Create the Certificate Authority and Nessus server certificate as follows:
# /opt/nessus/sbin/nessuscli mkcert
--------------------------------------------------------------------------
Creation of the Nessus SSL Certificate
--------------------------------------------------------------------------
This script will now ask you the relevant information to create the SSL
certificate of Nessus. Note that this information will *NOT* be sent to
anybody (everything stays local), but anyone with the ability to connect to your Nessus daemon will be able to retrieve this information.
CA certificate life time in days [1460]:
Server certificate life time in days [365]:
Your country (two letter code) [US]:
Your state or province name [NY]:
Your location (e.g. town) [New York]:
Your organization [Nessus Users United]: Tenable Network Security
This host name [Nessus4_2]:
Congratulations. Your server certificate was properly created.
The following files were created :
. Certification authority :
Certificate = /opt/nessus//com/nessus/CA/cacert.pem
Private key = /opt/nessus//var/nessus/CA/cakey.pem
. Nessus Server :
Certificate = /opt/nessus//com/nessus/CA/servercert.pem
Private key = /opt/nessus//var/nessus/CA/serverkey.pem
Next, create the user ID for the Nessus client, which is Tenable Security Center in this case, to log in to the Nessus server with, key and certificate. This is done with the command /opt/nessus/sbin/nessuscli mkcert-client. If the user does not exist in the Nessus user database, it is created. If it does exist, it is registered to the Nessus server and have a distinguished name (dname) associated with it. It is important to respond y (yes) when prompted to register the user with the Nessus server for this to take effect. The user must be a Nessus admin, so answer y when asked. The following example shows the prompts and typical answers:
# /opt/nessus/sbin/nessuscli mkcert-client
Do you want to register the users in the Nessus server
as soon as you create their certificates ? [n]: y
--------------------------------------------------------------------------
Creation Nessus SSL client Certificate
--------------------------------------------------------------------------
This script will now ask you the relevant information to create the SSL
client certificates for Nessus.
Client certificate life time in days [365]:
Your country (two letter code) [FR]: US
Your state or province name []: MD
Your location (e.g. town) [Paris]: Columbia
Your organization []: Tenable Network Security
Your organizational unit []:
**********
We are going to ask you some question for each client certificate
If some question have a default answer, you can force an empty answer by
entering a single dot '.'
*********
User #1 name (e.g. Nessus username) []: paul
User paul already exists
Do you want to go on and overwrite the credentials? [y]: y
Should this user be administrator? [n]: y
Country (two letter code) [US]:
State or province name [MD]:
Location (e.g. town) [Columbia]:
Organization [Tenable Network Security]:
Organizational unit []:
e-mail []:
User rules
----------
nessusd has a rules system which allows you to restrict the hosts
that $login has the right to test. For instance, you may want
him to be able to scan his own host only.
Please see the nessus-adduser(8) man page for the rules syntax
Type the rules for this user, and enter a BLANK LINE once you are done:
(the user can have an empty rules set)
User added to Nessus.
Another client certificate? [n]: n
Your client certificates are in /tmp/nessus-043c22b5
You will have to copy them by hand
#
The certificates created contain the username entered previously, in this case paul, and are located in the directory as listed in the example above (e.g., /tmp/nessus-043c22b5).
Create the nessuscert.pem Key
In the above specified tmp directory, the certificate and key files in this example are named cert_paul.pem and key_paul.pem. These files must be concatenated to create nessuscert.pem as follows:
# cd /tmp/nessus-043c22b5
# cat cert_paul.pem key_paul.pem > nessuscert.pem
Note: The nessuscert.pem file is used when configuring the Nessus scanner on Tenable Security Center. This file needs to be copied to somewhere accessible for selection from your web browser during the Nessus configuration.
Configure Nessus Daemons
To enable certificate authentication on the Nessus server, the force_pubkey_auth setting must be enabled. Once enabled, log in to the Nessus server may only be completed by SSL certificates. Username and password login are disabled. As the root (or equivalent) user on the Nessus server, run the following command:
# /opt/nessus/sbin/nessuscli fix --set force_pubkey_auth=yes
Restart the Nessus daemons with the appropriate command for your system. The example here is for Red Hat:
# /sbin/service nessusd restart
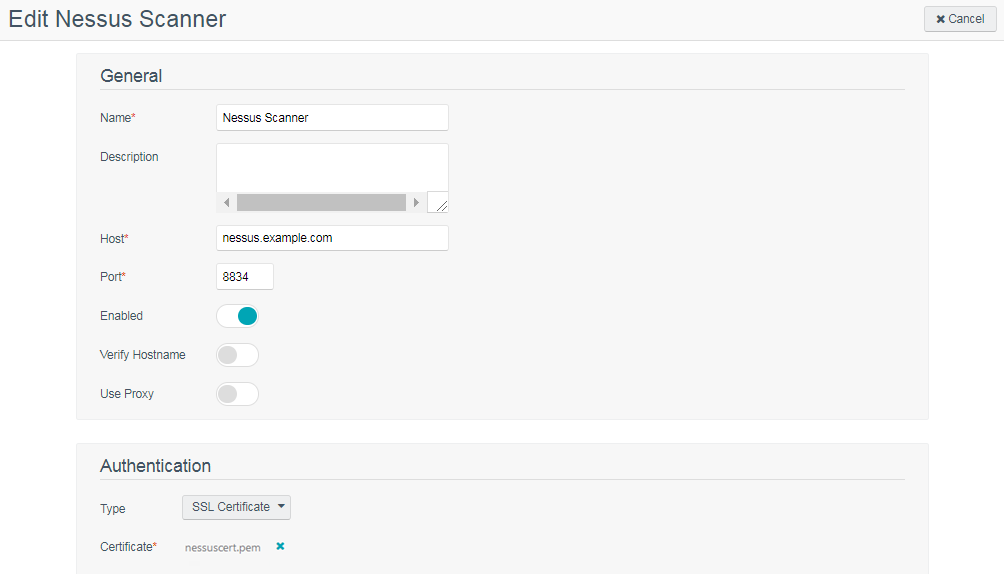
Change the Nessus Mode of Authentication
In Tenable Security Center, update your Tenable Nessus scanner configuration to use SSL certificate-based authentication. For more information, see Add a Tenable Nessus Scanner.
Considerations for Custom Certificates
During an upgrade, Tenable Security Center will check for the presence of custom SSL certificates. If certificates are found and the owner is not Tenable, any newly generated certificates will be named with a .new extension and placed in the /opt/sc/support/conf directory to avoid overwriting existing files.
Deploy to Other Nessus Scanners
After you configure authentication on one Tenable Nessus scanner, you can use the same SSL certificates and user names to authenticate other Tenable Nessus scanners.
Before you begin:
-
Set up and configure all of your Tenable Nessus scanners.
-
Add your Tenable Nessus scanners to Tenable Security Center, as described in Add a Tenable Nessus Scanner.
To duplicate the same authentication configuration on other Tenable Nessus scanners:
-
In the command line interface (CLI) on another Tenable Nessus server, run the following command to copy the certificate files onto your other Tenable Nessus server:
# cd /opt/nessus/var/nessus/CA
# scp cakey.pem serverkey.pem root@nessusIP:/opt/nessus/var/nessus/CA
# cd /opt/nessus/com/nessus/CA
# scp cacert.pem servercert.pem root@nessusIP:/opt/nessus/com/nessus/CA
-
Run the following command to create a user directory on your second Tenable Nessus server, using the same name as the user you created on the first Tenable Nessus server. Replace admin with the user's name:
/opt/nessus/sbin/nessuscli adduser admin
A confirmation prompt appears.
-
Press y to confirm you want the user to have system administrator privileges.
Tenable Nessus creates the user.
-
Run the following command to copy the the user you created on the first Tenable Nessus server to the directory you created in step 2. Replace admin with the user’s name:
# cd /opt/nessus/var/nessus/users
# tar –zcvf – admin | ssh –C root@nessusIP "tar –zxvf - -C /opt/nessus/var/nessus/users"
-
Run the following command to force Tenable Nessus to authenticate via certificate:
/opt/nessus/sbin/nessuscli fix --set force_pubkey_auth=yes
-
Restart the Nessus service on all the Nessus servers with the appropriate command for your system. This example is for Red Hat:
# /sbin/service nessusd restart
-
In Tenable Security Center, update all of your Tenable Nessus scanner configurations to use SSL certificate-based authentication. For more information, see Add a Tenable Nessus Scanner.