Saved Views

The Explore section in Tenable Vulnerability Management allows you to build custom queries or use Tenable Queries with the query builder and save them to reuse or share.

Explore allows you to save the complete state of your findings and asset tables as a saved view. This feature preserves your query filters along with all table customizations, such as which columns are visible, column order and width, applied sorting, and data grouping. Use saved views to quickly load a fully configured workspace.

A saved view consists of the following:

  • A saved query.

  • The state of the table that lists findings or assets and includes the following:

    • The shown columns.

    • The column sorting.

    • The column widths.

    • The ordering of the columns.

  • The state of the tree view showing Vulnerabilities, Host Audits, and Web Application Findings.

  • The Group By selection, in Findings.

    Note: Assets in Explore do not have a Group By selection option.
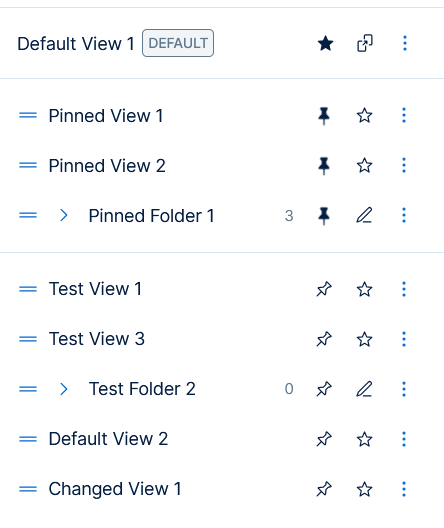
Access Saved Views

You can access the Saved Views drop-down to the left of the query builder within the Explore page.

The Saved Views drop-down consists of the following sections:

  • A default section shows the current default view.

  • A pinned section shows a list of pinned views and folders.

  • An unpinned section shows unpinned views and folders.

Manage Saved Views

You can manage your saved views in the following ways:

Search for Saved Views

To search for a saved view:

  1. To the left of the query builder, click Saved Views.

    A drop-down appears.

  2. In the Search box, type any token.

    The search results populate the list based on this token.

    Note: The search matches any saved view or folder name. If the query matches the folder name, Tenable Vulnerability Management shows all underlying saved views.

Manage the Default View

Set the Default View

You can set any saved view to be your default view.

To set a default view:

  1. To the left of the query builder, click Saved Views.

    A drop-down appears.

  2. To the right of the view, click the button.

    A confirmation message appears.

    Your view is now the default view.

    Note: Each time you log into Explore, the default view for both Assets and Findings appears in the top section of the Saved Views drop-down.

Change the Default View

To change the default view:

  1. To the left of the query builder, click Saved Views.

    A drop-down appears.

  2. To the right of the view, click the button.

    A confirmation message appears.

    Your view is now the default view.

  3. Note: Setting a saved view as the default replaces any existing default view.

Remove the Default View

To remove the default view:

  1. To the left of the query builder, click Saved Views.

    A drop-down appears.

  2. To the right of the current default view, click the button.

    A confirmation message appears.

Create a Saved View

To create a saved view:

  1. Use the query builder to build a query.

  2. To the left of the query builder, click Saved Views.

    A drop-down appears.

  3. Click Save As New View.

  4. In the New View Name box, type a name for the saved view.

    The name must be between 3 and 50 characters.

    The name must only contain alphanumeric characters or the following special characters: 

    , . @ - _ & *

  5. Click the button to save.

    A confirmation message appears.

Edit a Saved View

To edit a saved view:

  1. To the left of the query builder, click Saved Views.

    A drop-down appears.

  2. In the drop-down, click a view to edit.

  3. Make a change to one of the following:

    • The query.

    • The tree view.

    • The data grouping (Group By).

    • Any of the following states of the table:

      • The shown column names.

      • Column ordering.

      • Column sorting.

      • Column width.

    The drop-down shows that the view was edited.

  4. Click on the drop-down.

    A menu appears.

  5. Do one of the following:

    • Save As New View to create new view based on the edits.

      1. Click  Save As New View.

      2. In the New View Name box, type a name for the view.

        The name must be between 3 and 50 characters.

        The name must only contain alphanumeric characters or the following special characters:

         , . @ - _ & *

      3. Click the button to save.

        A confirmation message appears.

    • Save Changes to confirm the changes made to the existing saved view.

      1. Click Save Changes

        A confirmation message appears.

Move a Saved View

You can move saved views to new positions within the pinned or unpinned sections. You can also move saved views to or from existing folders within those sections.

Note: You cannot move saved views between the pinned and unpinned sections.

To move a saved view:

  1. To the left of the query builder, click Saved Views.

    A drop-down appears.

  2. Use the button to drag and drop the saved view to a new position in the section or move a saved view to or from an existing folder in the section by using the button.

  3. Note: When you move a saved view to a folder, the folder shows an updated number of views within the folder.

Share a Saved View

To share a saved view:

  1. To the left of the query builder, click Saved Views.

    A drop-down appears.

  2. To the right of the view to share, click the button.

    A menu appears.

  3. Click Copy Link.

Note: Saved views are stored on a user-only basis. If you click the copied link, the saved view appears with an updated query, datagrid, tree selection, and data grouping. If a different user clicks the link, the user sees the same filters but not the original saved grid state or tree view.
Note: Any Tenable Vulnerability Management user can run a shared query, but the assets they can view are based on permissions. To learn more, see Access Control.

Pin a Saved View

To pin a saved view:

  1. To the left of the query builder, click Saved Views.

    A drop-down appears.

  2. To the right of the view, click the button.

    Pinned views appear in one of the following positions:

    • At the top of the view list, if there is no default view set.

    • Below the default view, if one is set.

    • At the top of the list within a folder.

Delete a Saved View

To delete a saved view:

  1. To the left of the query builder, click Saved Views.

    A drop-down appears.

  2. To the right of the view to delete, click the button.

    A menu appears.

  3. Click the Delete button.

    A pop-up appears.

  4. Click Delete.

    A confirmation message appears.

Manage Saved View Folders

You can manage your saved view folders in the following ways:

Create a Saved View Folder

To create a saved view folder:

  1. To the left of the query builder, click Saved Views.

    A drop-down appears.

  2. Click Add a New Folder.

  3. In the New View Name box, type a name for the view.

    The name must be between 3 and 50 characters.

    The name must only contain alphanumeric characters or the following special characters:

     , . @ - _ & *

    A confirmation message appears.

Note: Folders show the number of views within them.

Pin a Saved View Folder

To pin a saved view folder:

  1. To the left of the query builder, click Saved Views.

    A drop-down appears.

  2. To the right of the saved folder, click the button.

    Pinned folders appear in one of the following positions:

    • At the top of the view list, if there is no default view set.

    • Below the default view, if one is set.

Move a Saved View Folder

You can move saved view folders to new positions within the pinned or unpinned sections.

Note: You cannot move saved view folders between the pinned and unpinned sections.

To move a saved view folder:

  1. To the left of the query builder, click Saved Views.

    A drop-down appears.

  2. Use the button to drag and drop the folder to a new position in the section by using the button.

Delete a Saved View Folder

To delete a folder:

  1. To the left of the query builder, click Saved Views.

    A drop-down appears.

  2. To the right of the folder to delete, click the button.

    A menu appears.

  3. Click the Delete button.

    A pop-up appears.

  4. Do one of the following:

    • Select the option to move saved views out of the folder, before deleting the folder.

    • Select the option to delete the folder and all of the views within the folder.

  5. Click Delete.

    A confirmation message appears.