General Settings
Required User Role: Administrator
On the General page, you can configure general settings for your Tenable One Vulnerability Management instance.
To access general settings:
-
In the left navigation, click
 Settings.
The Settings page appears.
-
Click the General tile.
The General page appears. By default, the Severity tab is active.
Here, you can configure the following options:
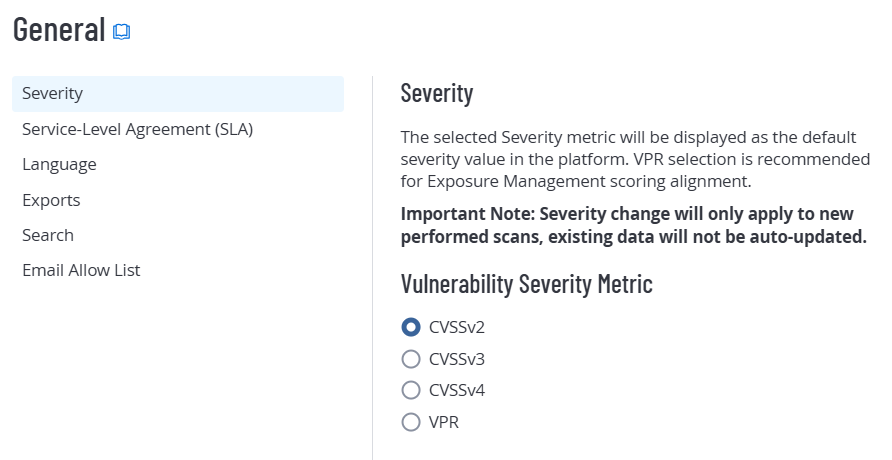
Severity
By default, Tenable One Vulnerability Management uses VPR to calculate severity for individual vulnerability instances. You can configure your severity metric setting if you want Tenable One Vulnerability Management to calculate the severity of vulnerabilities using CVSS or Vulnerability Priority Rating scores.
Tip: A vulnerability instance is a single instance of a vulnerability appearing on an asset, identified uniquely by plugin ID, port, and protocol.
For information about severity, VPR, and the ranges for CVSSv2, CVSSv3, and CVSSv4, see CVSS vs. VPR.
- Tenable Web App Scanning vulnerabilities.
- Tenable Container Security vulnerabilities.
- The calculations displayed in the SLA Progress: Vulnerability Age widget. To modify your SLA severity, navigate to the Service-Level Agreement (SLA) tab on the General page.
Caution: When changing your severity metric, only newly-observed findings reflect the new setting. This includes brand-new findings AND existing findings re-detected by a subsequent scan. Findings that have not been re-detected since the metric change retain their previous severity (unless otherwise recasted). For more information on recast rules, see Recast/Accept Rules.
To configure your severity setting:
-
On the Severity tab, select the metric that you want Tenable One Vulnerability Management to use for severity calculations.
-
CVSSv2 — Use CVSSv2 scores for all severity calculations.
-
CVSSv3 — Use CVSSv3 scores, when available, for all severity calculations. Use CVSSv2 only if a CVSSv3 score is not available.
-
CVSSv4 — Use CVSSv4 scores, when available, for all severity calculations. Use CVSSv3 only if a CVSSv4 score is not available. Use CVSSv2 only if neither CVSSv3 nor CVSSv4 scores are available.
-
VPR — Use VPR for all severity calculations.
-
- Click Save.
-
The system saves your change and begins calculating severity based on your selection.
All vulnerabilities seen before the change retain their severity. After the change, all vulnerabilities seen during scans receive severities based on your new selection. Because of this, you could see two findings of the same vulnerability each with two different severity values.
Tip: A vulnerability instance is a single instance of a vulnerability appearing on an asset, identified uniquely by plugin ID, port, and protocol.
Service-Level Agreement (SLA)
You can configure Service Level Agreement (SLA) settings to modify how Tenable calculates your SLA data.
You can view this data in the SLA Progress: Vulnerability Age widget on the Vulnerability Management Overview dashboard. For more information, see Vulnerability Management Dashboard.
To configure your SLA settings:
-
Click the Service-Level Agreement (SLA) tab.
The SLA options appear.
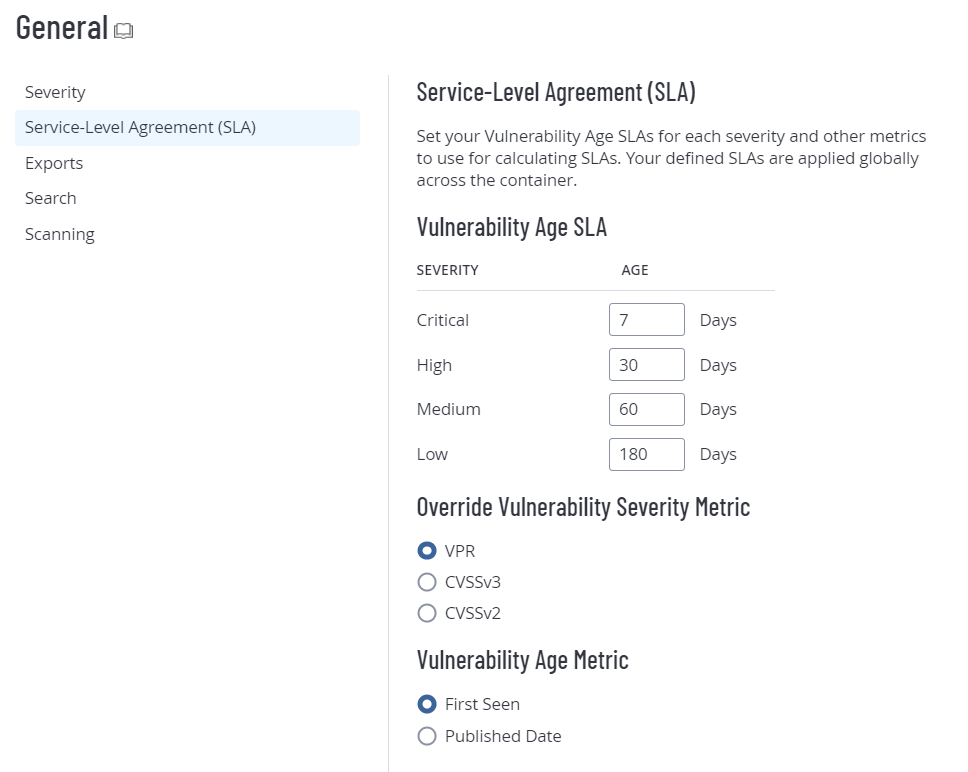
-
Configure the following options:
Option Default
Description/Actions Vulnerability Age SLA -
Critical 7 days
-
High 30 days
-
Medium 60 days
-
Low 180 days
To modify the number of days included for each severity, type an integer in the box next to Critical, High, Medium, or Low.
Override Vulnerability Severity Metric
VPR Specifies whether Tenable uses VPR severity, CVSSv4 severity, CVSSv3 severity, or CVSSv2 severity to calculate SLA data.
For more information about these metrics, see CVSS vs. VPR.
Note: This option affects only the calculations displayed in the SLA Progress: Vulnerability Age widget. To modify the severity metric for all other areas of the product, navigate to the Severity tab on the General page.
Vulnerability Age Metric First Seen Specifies whether Tenable uses First Seen, Vuln SLA Date, or Published Date to calculate SLA data.
For more information about these options, see Findings Filters.
-
-
Click Save.
Tenable One Vulnerability Management saves your SLA settings.
Language
On the General page, you can change the plugin language in your Tenable One Vulnerability Management container to English, Japanese, Simplified Chinese, or Traditional Chinese. This setting affects all users in the container.
To change the plugin language:
-
In the upper-left corner, click the
 button.
The left navigation plane appears.
-
In the left navigation plane, click Settings.
The Settings page appears.
-
Click the General tile.
The General tile appears. By default, the Severity tab is active.
-
Click the Language tab.
The Language tab appears.
-
Under Language, select a new language.
Tenable One Vulnerability Management updates the plugin language for your container.
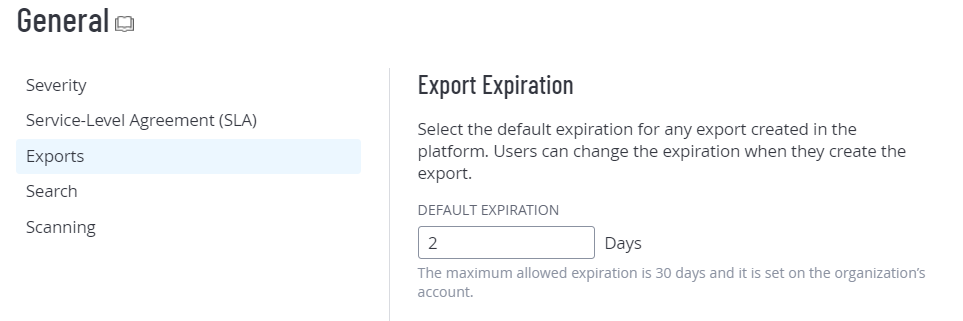
Configure Export Expiration
When creating an export, you can specify an expiration delay of up to 30 calendar days. This is the maximum retention period permitted by Tenable One Vulnerability Management before export files expire. To configure the number of days for your default export expiration from the General tile, do the following:
-
Click the Exports tab.
The Export Expiration options appear.
-
In the Default Expiration box, type the number of days you want Tenable One Vulnerability Management to allow before your exports expire.
Note: Tenable One Vulnerability Management allows you to set a maximum of 30 calendar days for export expiration.
Note: You must type the number of days as an integer between 1 and 30.
-
Click Save.
Tenable One Vulnerability Management saves your settings and updates the number of allowable days before your exports expire.
Search
Turn on Enable Plugin Output Search to store plugin output data each time you launch a scan. You can then filter vulnerability findings by plugin output and view that output on dashboards such as the AI/LLM Dashboard. Once you have enabled this setting, you must launch a scan to start storing the data.
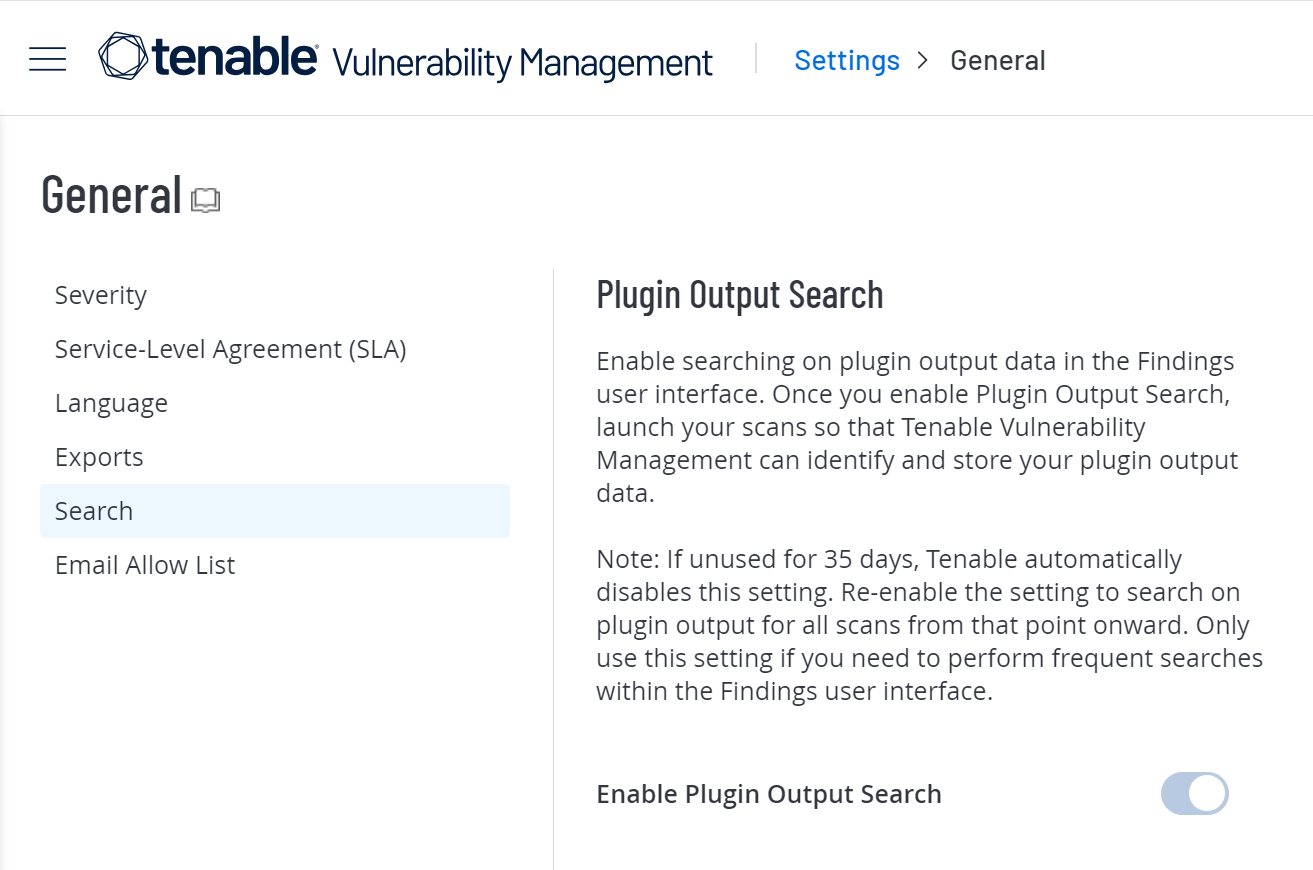
Caution: You cannot turn off Enable Plugin Output Search once you have turned it on, but the system automatically turns it off when it goes unused for 35 days.
Caution: Due to technical constraints in how the underlying system processes large data in JSON format, only the first 20,000,000 characters of raw plugin data are available when searching plugin output.
Email Allow List
In this section, type comma-separated email domains where the system can send export files, for example, mycompany.com. Once you add domains, users can only send exports to those domains. An error appears when users try to email exports to unapproved domains.
Turn on the Include Subdomains toggle to include email subdomains: for example, sales.mycompany.com.
To learn more about the export types in Tenable One Vulnerability Management, see Exports.