Configure ServiceNow
Required User Role: Administrator
Before you create ServiceNow incidents within Tenable Vulnerability Management, you must configure your ServiceNow account.
Prerequisites
Before you create ServiceNow incidents via Tenable products, you must:
-
Have a ServiceNow administrator user with the following roles:
ServiceNow Permission
Custom Context ServiceNow Documentation canvas_user Primarily associated with accessing and viewing Configurable Workspaces and pages built with UI Builder.
This role provides the necessary permissions to render and interact with the visual structure (the "canvas") of the ServiceNow user interfaces.
Document Intelligence Roles cmdb_inst_admin Grants administrative rights specifically for configuring and managing CMDB data integration processes. Exploring SGC Central connection_admin A specialized administrative role focused on managing the security and configuration of external system connections. Create a Connection Administrator -
Perform the following steps to support ServiceNow tags:
-
In ServiceNow, in the upper-right corner, access the user menu.
-
Select Elevate role.
The Elevate role window appears.
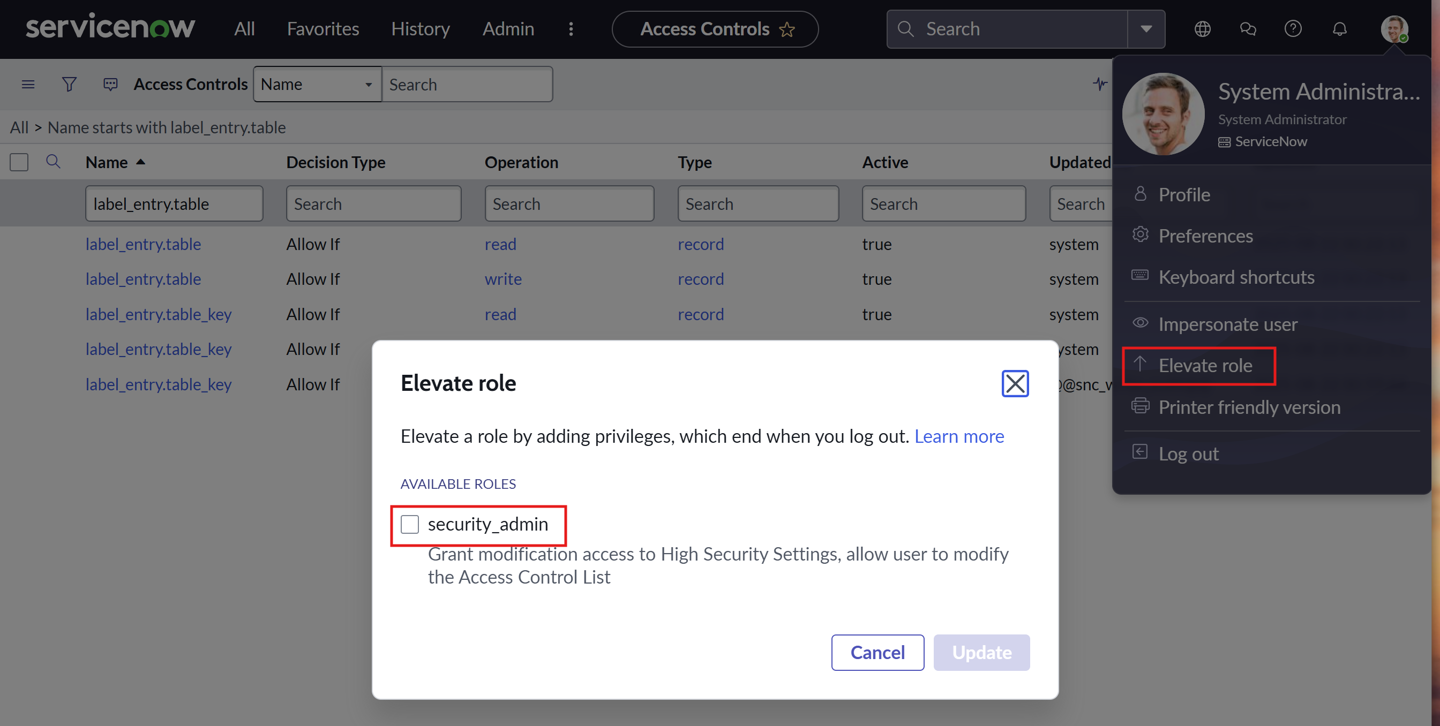
-
Select the security_admin check box.
-
Click Update.
-
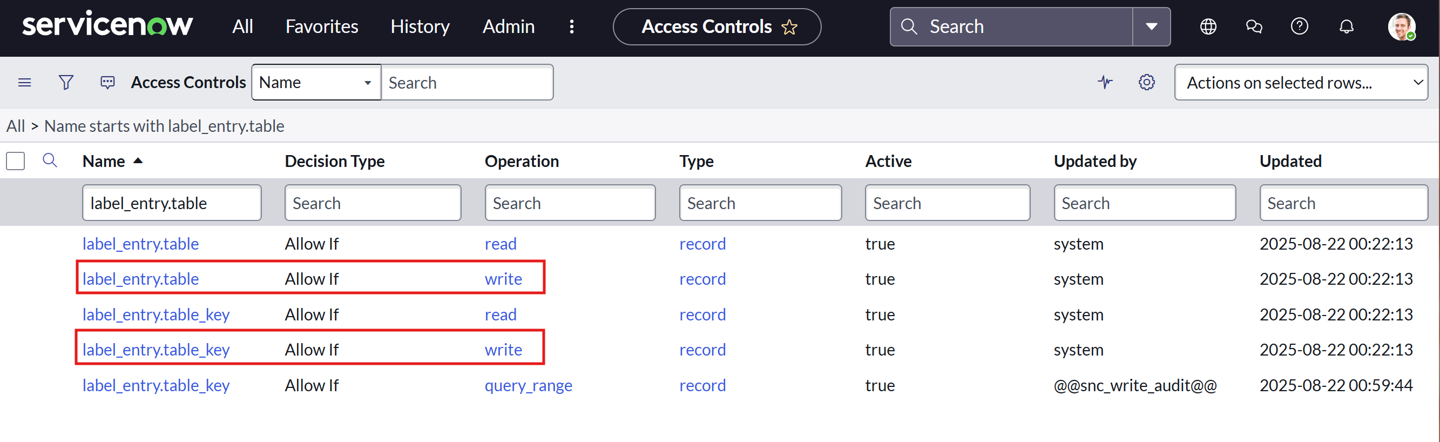
Add the admin & maint roles to both the label_entry.table and label_entry.table_key write operation ACL records.
-
-
Perform the steps to configure ServiceNow for use with the Tenable One Platform.
Configure the Integration
Before you create an initiative, you must first configure a connection between ServiceNow and Tenable Vulnerability Management.
To configure ServiceNow to support ServiceNow incident creation in Tenable Vulnerability Management:
-
In the left navigation, click
 Settings.
The Settings page appears.
- Click the
 ServiceNow tile.

The ServiceNow connector page appears.
- Configure your ServiceNow credentials:
- To test the connection, click Connect.

Once Tenable validates the integration connectivity, a Connection was Successful notification appears.
Important! You must successfully connect the integration before you can proceed.
- Configure the following default values for synchronizing ServiceNow Incident Priorities and Incident States: Important! When creating custom fields in ServiceNow, sync your values to the Task table rather than the Incident table. Fields added to the Task table are globally accessible across related records (such as Problem and Change), whereas Incident custom fields remain private to that specific table and do not propagate data across your environment.
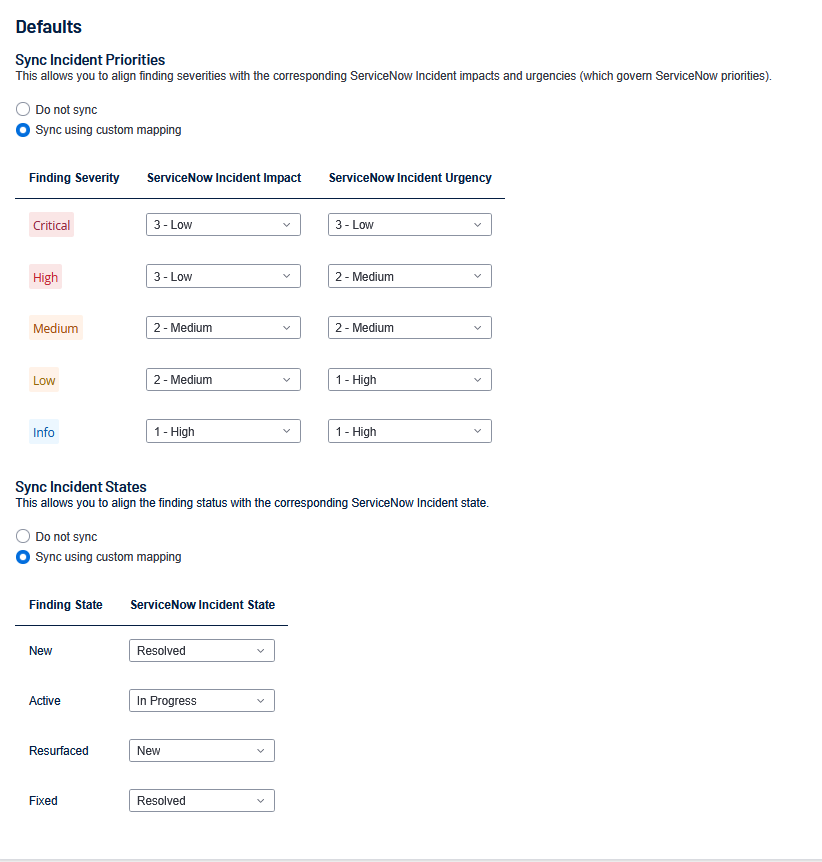
Sync Incident Priorities
Select one of the following:
Do Not Sync
Sync Using Custom Mapping — If you use a custom mapping, use the following guidelines:
Finding Severity ServiceNow Incident Impact ServiceNow Incident Urgency Resulting ServiceNow Priority Customer Context Critical
High High P1 (Critical) Immediate, business-impacting risk. Typically requires emergency patching or immediate action. High High Medium P2 (High) Confirmed vulnerability with high CVSS/VPR; requires aggressive patching as per SLA. Medium Medium Medium P3 (Moderate) Standard vulnerability management queue. Addresses moderate risk findings. Low Low Low P4 (Low) Non-critical finding, typically addressed during regular maintenance cycles. Info Low Low P5 (Informational) Excluded from most standard patching SLAs. For situational awareness or future planning.
Sync Incident State
Select one of the following:
Do Not Sync
Sync Using Custom Mapping — If you use a custom mapping, use the following guidelines:
Tenable Vulnerability Management Finding State ServiceNow Incident State New, Active, Resurfaced New, In Progress Fixed Resolved, Closed
- Click Save.
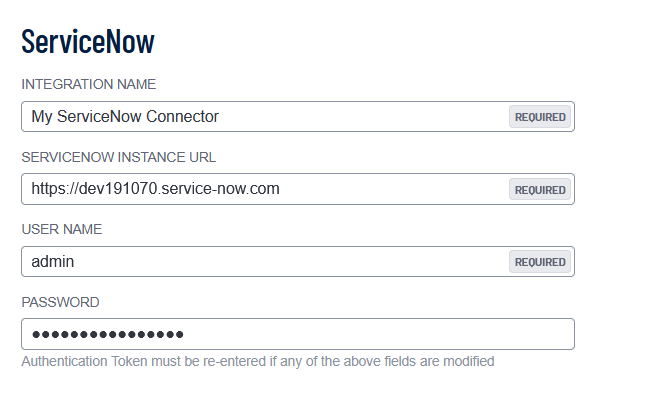
| Option | Description |
|---|---|
| Integration Name | Choose your own ServiceNow integration name. |
| ServiceNow Instance URL | The unique web address for your organization's instance of ServiceNow, typically formatted as https://[your-company-name].service-now.com. |
| User Name |
Your ServiceNow User ID. |
| Password |
Your ServiceNow password associated with the User ID. |