Get Started with Tenable Web App Scanning
There are significant differences between scanning for vulnerabilities in web applications and scanning for traditional vulnerabilities with Tenable Nessus, Tenable Agents or Tenable Network Monitor. As a result, Tenable Web App Scanning requires a different approach to vulnerability assessment and management.
Tenable Web App Scanning offers significant improvements over the legacy Tenable Nessus-based web application scanning policy:
-
The legacy scanning template for Tenable Nessus is incompatible with modern web application frameworks such as Javascript, HTML 5, AJAX, or single page applications (SPA), among others, which can potentially leave you with an incomplete understanding of your web application security posture.
-
Tenable Web App Scanning provides comprehensive vulnerability scanning for modern web applications. Its accurate vulnerability coverage minimizes false positives and false negatives to ensure that security teams understand the true security risks in their web applications. It offers safe external scanning so that production web applications do not experience disruptions or delays.
-
Tenable Web App Scanning uses region-specific cloud scanners. There is no need for more scanners if your web application analysis scope includes only publicly available assets. If your web applications are not public, your installation plan depends on where your web applications run and your organization's data storage needs.
Tenable Web App Scanning Best Practices
Use the following sequence to configure and manage your Tenable Web App Scanning deployment:
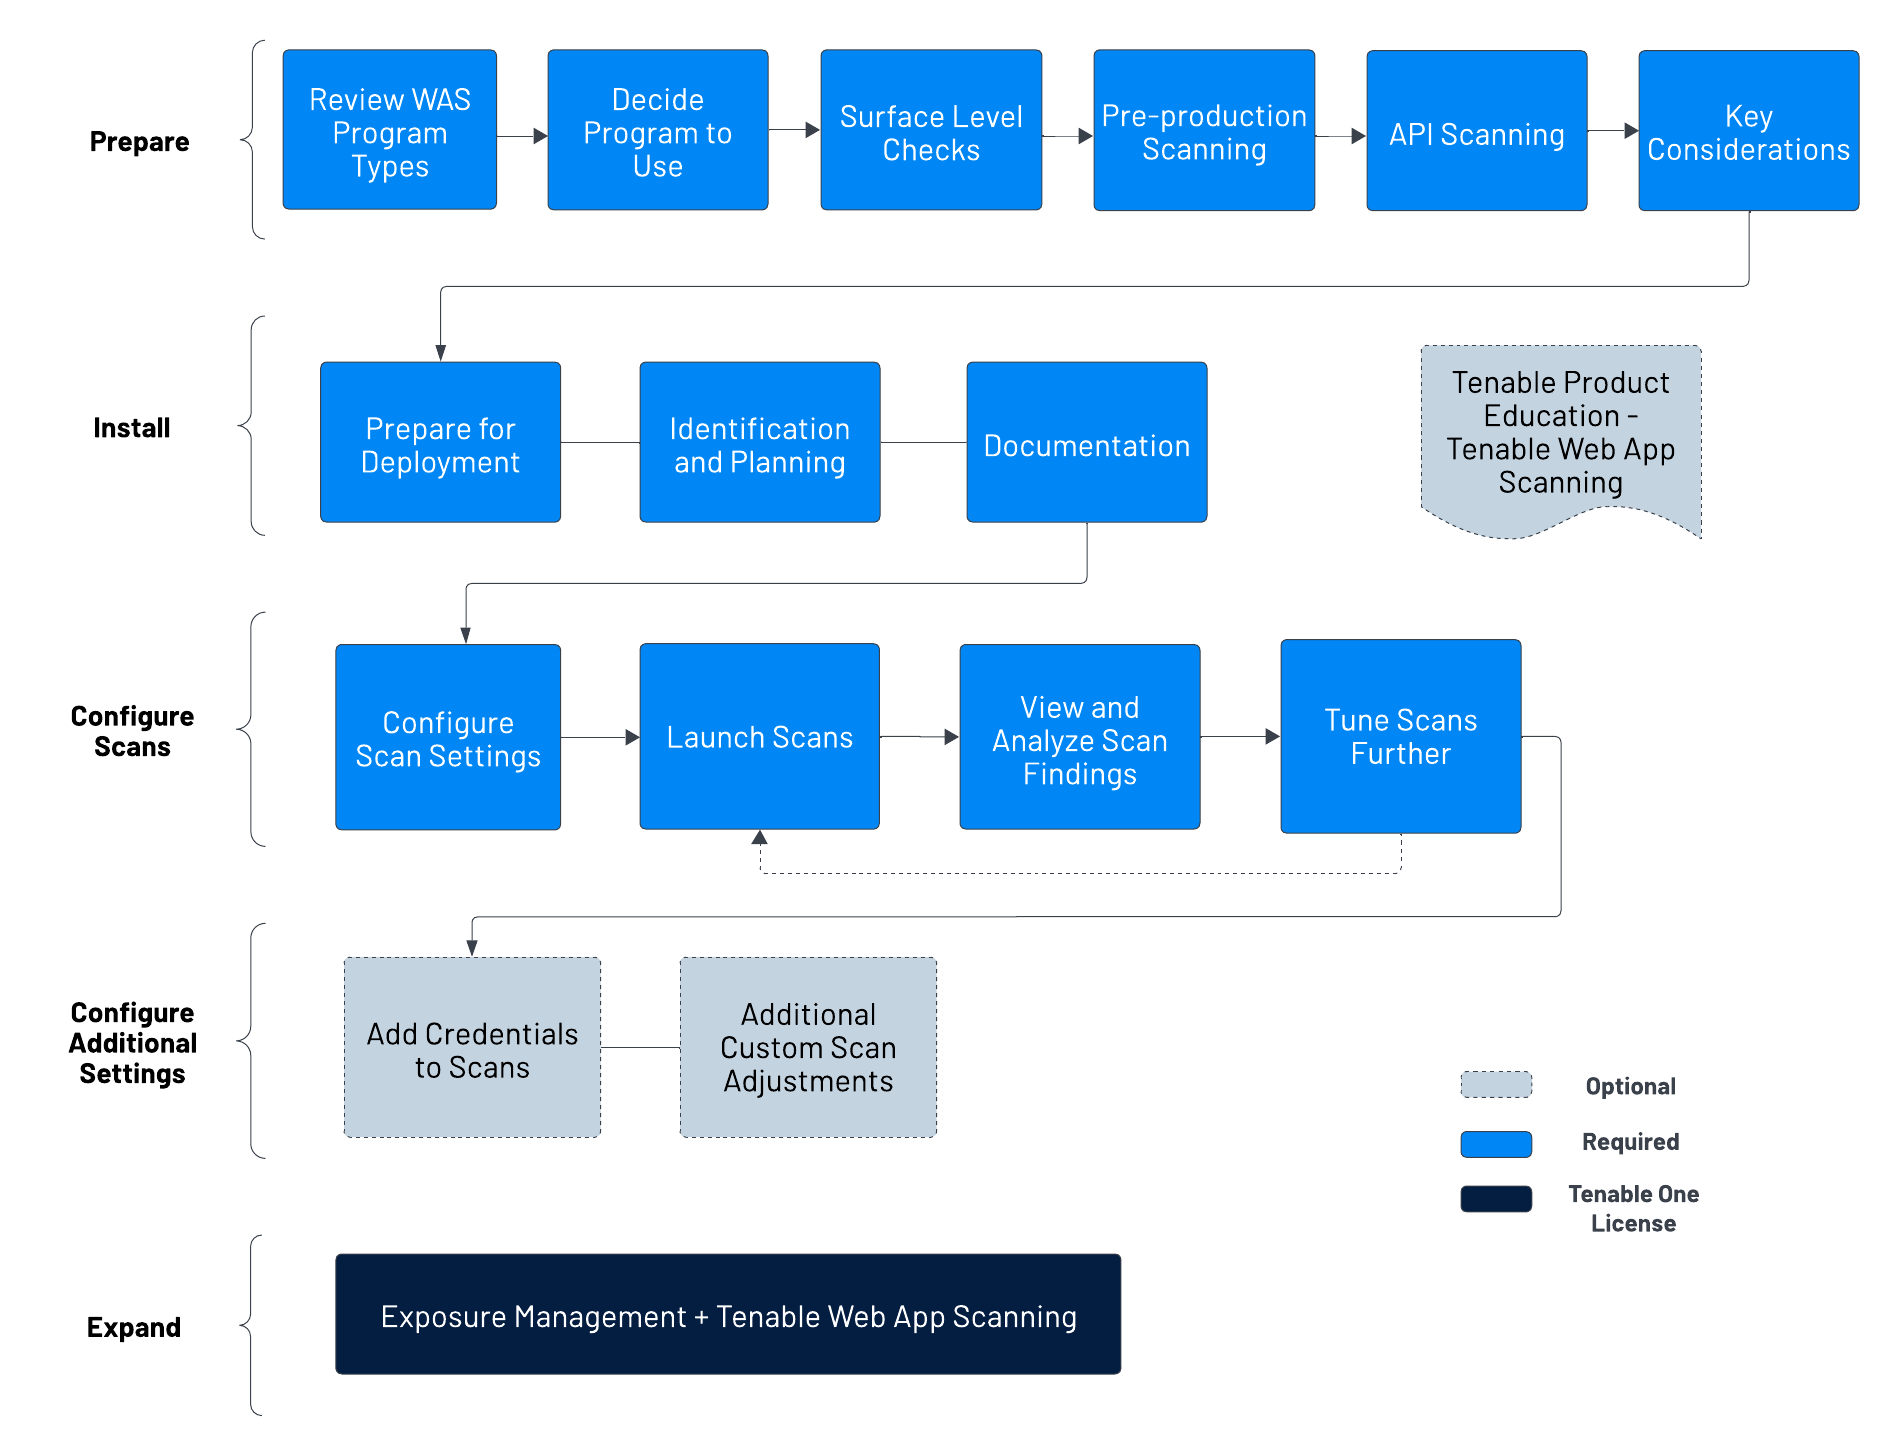
The following steps can get you started into Tenable Web App Scanning quickly and with Tenable-recommended practices. You can familiarize yourself with the full process first or click through each step as you configure your scans in the Tenable user interface,
Prepare
Before you begin, familiarize yourself with Tenable Web App Scanning basics to establish a deployment plan and an analysis workflow for your implementation and configurations:
Types of Tenable Web App Scanning Programs
There are several viable ways to operate a web application scanning program based on dynamic application security testing (DAST) technology. Most programs use some combination of each approach to meet different needs for each site. The following list gives Tenable supported scan templates:
-
Scan: The complete set of available checks which includes all other pre-built templates, except for the API scan.
- Overview: A simplified version of the “Scan” template without several active tests to lower its impact and speed up the scan.
- PCI: A special template used as part of the attestation offering that Tenable provides for the payment card industry (PCI) security standard. Only submissions to attestation consume PCI licenses; otherwise, this template is a simplified version of the "Scan" template.
-
SSL/TLS: A health check scan focused on the current state of the web server encryption settings and certificate state (for example, the remaining time on the certificate).
-
Config Audit: A compliance audit that detects externally viewable web server settings that external audit providers commonly review to evaluate the health of a security program.
- API Scan: A special template requiring more configuration to describe the application programming interface (API), so that the scanner can successfully detect relevant vulnerabilities This includes some similar tests in the “Scan” template but adds others unique to API endpoints.
Quick Surface-level Checks
You typically use the “SSL_TLS” or “Config Audit” scan templates to run a rapid test — often lasting only minutes — on a more regular basis than in-depth scans to give you an overview of surface-level checks such as any certificate-type and encryption-type issues with a given site or commonly exposed configuration parameters that are not best practice.
-
Untuned Detailed Scans: Without requiring tuning or refinement, this approach uses the “Scan” template to optimize detection of most vulnerabilities, and simulates drive-by style attacks that sites commonly experience. These scans deploy quickly and return valuable incremental visibility from the scan target while using basic validation to avoid obvious scan errors. However, this approach may run into timeouts (such as the eight-hour default in Tenable Vulnerability Management), or miss more complex sections of a site that requires authentication or fine-tuning for correct scans. These drawbacks are common with sites that have forums, blogs, large product volume, multiple languages, or a high number of pages.
-
Authenticated Detailed Scans: While similar to the Untuned Detailed scan, this approach uses authentication. You can do this in the scan configuration page or in the Chrome extension from Tenable. In addition to the benefits of an untuned scan, authenticated scans log on as a user to test for potential issues. Tenable recommends that you never log on as an admin user, especially in production (see the "Key Considerations" section). Authentication requires you to create and maintain the test user account and to update any unique site configurations.
-
Tuned Detailed Scans: In addition to authentication, you can use other methods to optimize scans for speed or complexity (see “Key Considerations”). These refinements involve an initial time investment before deployment and may require semi-regular adjustments depending on the frequency of the site updates.
Pre-production Scanning
To limit scanner impact on a production site and maintain 100 percent uptime, you can consider integrating scans using the Tenable Vulnerability Management API to trigger a scan based on a weekly or monthly build, or a pre-production location on a regular schedule. This protects the more exposed production site which may differ from internal builds. This scanning approach works to varying degrees with most mature organizations and often depends on-site criticality and resource availability.
API Scanning
Organizations are increasingly adopting APIs to power web applications, B2B transactions, mobile applications, and automation scenarios. You can assess these potential exposures by using the API scanning template within Tenable Web App Scanning to provide critical visibility into more cyber risks. In general, high risk and exposure are drivers for mature programs or organizations to scan APIs more frequently. Ultimately, as the security program develops, many organizations proactively identify all vulnerable locations to ensure full coverage. This type of scan can require more input from development staff and rely on an OpenAPI file to provide the endpoint definitions for the scanner to communicate to the API itself.
Decide Which Tenable Web App Scanning Program to Use
Most programs start with a few scans based on the “SSL_TLS” or “Config Audit” templates to familiarize vulnerability managers with how to establish scans and review results. Then, they progress into running an untuned scan using the Tenable Web App Scanning scan template.
Timeouts are common when you first build out your program. The default scan completion timeout in Tenable Vulnerability Management is eight hours, and extending this may not “complete” the scan; this may only be achievable via tuning for greater speed.
It is viable to run a program based on untuned scans while accepting the timeout. As many web application vulnerabilities span multiple pages containing the same vulnerability, it is likely that a scan automatically detects a significant proportion of vulnerabilities within the first several hours. Tenable's own monitoring can confirm this. Tuned scans typically improve scan efficiency and accuracy by only a small degree and cost more time to refine the scan configuration.
Most mature organizations tune scans on their most critical sites, which involve 10-20 minutes of effort per site and improves with operator experience. An organization’s level of knowledge and resource availability can determine the percentage of sites that undergo detailed tuning. It is rare to see all sites tuned, especially in organizations with many websites. This is due partly to the dynamic nature of websites; they often expand or change significantly every few years, and this requires a review of scan settings to adapt to the development pace of the test site.
-
Focus on the process first: Start with the Tenable Web App Scanning “Scan” (a complete set of checks) or an “Overview” scan (fewer checks but lower impact) templates. Familiarize yourself with the scanner output and work with your team to incorporate the findings into your workflows. Develop your mitigation and resolution programs.
-
Dig deeper into critical areas: Once you have established some of the baseline procedures and identified the right owners within your organization for the output from the scanner, start investing time in more advanced-tuned scans to gain better visibility into your most important sites.
-
Take action: The scans return a significant amount of data to drive organizational action. Consider the potential consumers of the data. Developers want details to identify necessary fixes and improve over time. Management must know which sites contribute the greatest risk to the business, and therefore allocate resources. Security leadership needs general category information such as the OWASP vulnerability categories for all sites to focus on a specific classification of vulnerabilities.
Note: Tenable Professional Services offers a highly recommended quick-start program for new users of Tenable Web App Scanning scanning to help establish the mechanics of developing a new program. Also, the ProServe team runs a workshop to establish the internal processes and initial goals of developing a broader vulnerability management program. These services help organizations get a solid foundation and understanding of effective cybersecurity programs and familiarization with the product. Contact your Tenable sales representative at [email protected].
Key Considerations to Optimize Your Scan Results
-
Identify where the location of the web application:
-
Public Websites
You can scan external websites from Tenable Vulnerability Management using the internet-based Tenable Web App Scanning or an on-premises scanner.
-
Private Websites
You can scan internal or intranet web applications from Tenable Vulnerability Management using an on-premises Tenable Web App Scanning Scanner.
-
-
Ensure that the scanner has a network route to the target:
If the scanner cannot reach the web application, or cannot deliver an input and retrieve results, scanning fails. Network constraints such as latency can affect scanning or network controls (for example, host-based firewalls, network firewalls, network segregation, etc.). Always include internal web application scanners on your "allow" list.
-
Scanner location can impact latency or server response times
If there are too many timeouts during a scan, the session terminates. Choose a scanner located as close as possible to the targets. Review the sitemap plugin attachments to check for long page load times or timeouts. This can occur with too many concurrent tests on a slower server, a scanner that’s not close enough to the web application (such as scanning Australia from a US scanner), or the site setup that may lead to longer load times. Changing your scanner location can help to prevent readjustments for advanced settings that slow the scanner down. Counter-intuitively, slowing the scan speed settings can speed up results on a site that responds slowly, by lowering the rate of queries and adding less variability to the returned queries.
-
The scanner acts as a user:
The scanner can follow links, press buttons, and simulate the actions of a user based on what it can access. There can be undesired interaction on the site as a result of its site discovery phase. For example, if a user can send an email, the scanner can fill out forms and press the “send email” button potentially more than once. The scanner has no context for any specific button action, unless you teach it or exclude either the whole page or page element to prevent it from pressing a button unintentionally. (For more information, view our documentation on Scope Settings.) Keep in mind that excluding page elements to prevent such actions lowers the accuracy of the scan, so consider plans to scan sites like this in pre-production on a regular schedule.
-
The scanner acts as many users:
With its default settings, the scanner can operate as several users navigating the website at the same time. On servers with good capacity, there is typically minimal impact from this activity. However, if the state of the server is unknown, you can de-tune the speed of the scan — at least for the first test — to alert to any potential site impact from simultaneous sessions. For more details on configuring such a test, see Advanced Settings.
-
Customize tuning for each site; it requires effort, but it is optional.
Customized tuning generally applies to most websites because each web application is different. There are unique structures, sitemaps, third-party libraries, components, and custom code working together. Your investment in tuned scans depends on resource availability, criticality of the site, and impact to the business.
-
When tuning for authentication, never run a Tenable Web App Scanning scan as a web site administrator in production – only in test or pre-production environments.
Running a web application scan with administrator credentials could create or delete users, or perform other undesired administrative functions.
-
When tuning for speed, a rudimentary understanding of your sites can help accelerate DAST scans.
- Review the sitemap plugin and associated file attachment.
-
Configure your settings: Increase “Network Timeout,” or lower “Max Simultaneous Requests” and “Requests per Second,” if you experience significant page timeouts, or discover higher than five-second average page response times in the sitemap attachment.
-
Consider speeding up your scan settings if you obtain sub one-second responses and only minimal impact to the web server.
-
Deduplicate site content: The scanner does not test site text, image, and video content — only input fields and interactions. If you have redundant pages, such as a site that uses multiple languages but has the same underlying code, you only need to test one language version of the site.
-
Add more binary exclusions: Tenable Web App Scanning does not “test” text, images, or videos and decide which file extensions to exclude. The scan scope section provides a default set that you can adapt for a specific site.
-
Prioritize critical URLs: Identify the critical portions of the application, such as those ones forms that can return sensitive data. Add those URLs to the scope of your testing, either via “include” in the scan scope section, or through a manual crawl script. You can also consider whether these sites require testing in pre-production.
-
When tuning for complexity, use session recordings to train the scanner.
You can do this by using the Selenium IDE and adding within the scope section of a scan configuration. With this process, you can perform manual crawling to ensure that the scanner can test a highly complex location within a site. For example, a site can require a specific series of button presses and a specific set of correct input values to reach a page that isn’t available any other way. You can record the steps to enable the scanner to play it back.
Note: The Tenable-provided Selenium extension is no longer supported. The Edge and Firefox extensions provided by Selenium directly are supported. Selenium-provided packages running outside of browsers are also supported. -
Map out whether there is a web application firewall (WAF), web proxy, or load balancer between the scanner and the target:
Some network devices can interfere with the scanning or completely invalidate the results. You may think it’s sufficient to receive only the “remote” view of results filtered by the firewall; however, it’s possible the WAF’s built-in protections only prevent one or two methods of executing the flaw. Gaining a full picture of the true state of the site is imperative to make risk-based decisions. Configure your WAF to support bypass functionality to allow specific IPs or a combination of IP and agent header strings to prove and authorize the incoming scan. A list of Tenable scanner IP ranges is available here.
-
Some sites can require specific browser identities:
Check whether the application is compatible with the default user agent (configured as “WAS/%v” by default). If not, it may need a specific or commonly available header from a standard browser, such as Mozilla/5.0. Some server-side protections or a web application firewall can require a specific set of results. In this case, you can copy the user agent string from a known browser that can access the site successfully.
-
Target critical sites with greater care at the outset:
Is the target site production-facing, or in any other way critical? What is the business impact if the web application scanner causes a service disruption? Always perform the first scan of a site in a controlled manner, either with staff on-hand or within a pre-production environment. Once you understand the nature of the site, you can begin full automation.
For more information and guided product walk-throughs, visit our Tenable Product Education YouTube channel. These short, instructional videos explain how to make the best use of Tenable Web App Scanning, including the authentication and tuning procedures mentioned above to help you secure your vulnerable web applications.
Install
-
-
Confirm requisite access to the Tenable Vulnerability Management platform and Tenable Web App Scanning application. Create users with appropriate access to Tenable Web App Scanning for scanning and viewing of results. You can configure Role-Based Access Control (RBAC) to allow user access. You must have Administrative credentials for configuration.
-
Determine whether you need a local scanner. You can deploy local or cloud-based scanners and connect them to Tenable Vulnerability Management. You can use these scanners on internet-facing web applications and development or pre-production environments (if suitable firewall rules apply).
The Tenable Core + Tenable Web App Scanning scanner supports installation on VMware (.ova), Hyper-V (.zip), or a physical machine (.ISO). You can deploy it locally on-premises or within a cloud-based development environment to scan non-internet-facing web applications. For more information on VMware/vCenter, refer to the VMware integration documentation.
You can download the local scanner here. Check that you have the following:
- Outbound access to https://cloud.tenable.com via port 443 to communicate with Tenable Vulnerability Management.
- Inbound access via HTTPS on port 8000 for browser access to the management interface.
-
-
-
Define the security objectives. Why are we scanning, what do we hope to achieve, and what does success look like?
-
Determine scanning priorities. Identify which target web applications are within the scope of quick scanning and which require more detailed scanning.
-
Ensure full coverage. Determine whether there are any other (possibly unidentified) web servers, services, or applications that you need to scan, and how to find them.
-
-
- Track everything. Produce and manage documentation that captures full details of the deployment requirements, deployed scanner resources (if applicable), web applications identified for scanning, and the tuning you applied to the scans with an accompanying rationale.
-
Communicate your findings. Establish reporting requirements to identify: the recipients, the level of detail, and the frequency of the reports distribution. Developers may need PDFs, while ticketing systems require vulnerability details. Management often prefers a higher-level summary of overall exposure and risk reduction.
Configure Scans
After you prepare your analysis workflow and determine the scope of the web application assets, you can configure and run scans on those assets.
Tenable recommends that you first run high-level overview scans to help you determine the settings to configure for more in-depth scans.
-
-
To configure and run overview scans:
-
Do one of the following:
- To perform an overview scan to determine which web application targets Tenable Web App Scanning scans by default, create a scan using the Overviewscan template.
- To perform an overview scan to determine if your web application is compliant with common security industry standards, create a scan using the Config Auditscan template.
Note: The Tenable-provided scan templates for overview scans do not require authentication. However, the plugin results from these scans can help you identify the types of credentials your web applications require for more in-depth scans.
- Review the scan results, along with your scanning strategy, and determine which configuration settings you want to adjust when you run your standard web application scans.
-
-
To configure and run standard scans:
- Create a scan using the template that best matches your assessment needs:
- To perform a comprehensive vulnerability scan, select the Scan template.
- To perform a scan to determine if your web application appropriately implements SSL/TLS public key encryption, select the SSL TLS template.
-
(Optional) Configure your scan settings, including user permissions, and plugin settings.
Note: You can also configure your credentials options in standard scans. However, you need to add credentials only if your web application requires them for authentication.
- Monitor the scan status.
- Create a scan using the template that best matches your assessment needs:
-
- Launch the scan.
- View and analyze your scan results:
Analyze the findings.
Use the sitemap crawled as an input to detailed scanning, tuning and optimization, reviewing for page timeouts, length of time to access a page, errors, or opportunities to remove repetitive content.
Review the “Scan notes” for any higher priority concerns, which may provide suggestions for scan improvement.
- Further tune your scans based on your business needs:
Experiment with advanced settings. Perform scan tuning in a few locations based on the data gathered in the previous step. You can then update and deploy the scan for the targeted web applications. For more information, see
For a demonstration on scan tuning in Tenable Web App Scanning, see the following video:
Configure Additional Settings
Configure other features, if necessary, and refine your existing configurations:
- Add credentials to your scan:
- If the scan must authenticate to the web application using methods required by your server's HTTP protocol, add HTTP Server-Based authentication.
- If the scan must authenticate to the web application using methods required by the web application, add Web App authentication.
-
Consider further custom adjustments, such as scan settings, user permissions, and plugin settings.
Tip: Each application is unique. Running scans and analyzing the results reveal techniques that help you run scans most efficiently and ensure coverage of all areas of the application. Depending on the size or complexity of the web application, the scan may finish allowing you to analyze the results for further optimization. Tenable highly recommends that you review the “scan notes” after a scan completes and the attachment to the sitemap plugin regularly.
Expand into Tenable One
Integrate Tenable Web App Scanning with Tenable One and leverage the following features:
-
Access the Exposure View page, where you can gain critical business context by getting business-aligned cyber exposure score for critical business services, processes and functions, and track delivery against SLAs. Track overall web application risk to understand the risk contribution of web applications to your overall cyber exposure score.
-
View CES and CES trend data for the Global and Web Applications exposure cards.
-
View Remediation Service Level Agreement (SLA) data.
-
View Tag Performance data.
-
Access the Exposure Signals page, where you can generate exposure signals that use queries to search for asset violations. Simply put, if an asset is impacted by a weakness related to the query, then the asset is considered a violation. Using this, you can gain visibility into your most critical risk scenarios.
-
Find top active threats in your environment with up-to-date feeds from Tenable Research.
-
View, generate, and interact with the data from queries and their impacted asset violations.
-
Create custom exposure signals to view business-specific risks and weaknesses
-
-
Access the Inventory page, where you can enhance asset intelligence by accessing deeper asset insights, including related attack paths, tags, exposure cards, users, relationships, and more. Improve risk scoring by gaining a more complete view of asset exposure, with an asset exposure score that assesses total asset risk and asset criticality.
-
View and interact with the data on the Assets tab:
-
Review your Tenable Web App Scanning assets to understand the strategic nature of the interface. This should help set your expectations on what features to use within Tenable Exposure Management, and when.
-
Familiarize yourself with the Global Asset Search and its objects and properties. Bookmark custom queries for later use.
-
Find devices, user accounts, software, cloud assets, SaaS applications, networks, and their weaknesses.
- Drill down into the Asset Details page to view asset properties and all associated context views.
-
-
View and interact with the data on the Weaknesses tab:
-
View key context on vulnerability and misconfiguration weaknesses to make the most impactful remediation decisions.
-
-
View and interact with the data on the Software tab:
-
Gain full visibility of the software deployed across your business and better understand the associated risks.
-
Identify what software may be out of date, and which pieces of software may soon be End of Life (EoL).
-
-
View and interact with the data on the Findings tab:
-
View instances of weaknesses (vulnerabilities or misconfigurations) appearing on an asset, identified uniquely by plugin ID, port, and protocol.
-
Review insights into those findings, including descriptions, assets affected, criticality, and more to identify potential security risks, visibility on under-utilized resources, and support compliance efforts.
-
-
-
Access the Attack Path page, where you can optimize risk prioritization by exposing risky attack paths that traverse the attack surface, including web apps, IT, OT, IoT, identities, ASM, and prevent material impact. Streamline mitigation by identifying choke points to disrupt attack paths with mitigation guidance, and gain deep expertise with AI insights (Not supported in FedRAMP environments).
-
View the Dashboard tab for a high-level view of your vulnerable assets such as the number of attack paths leading to these critical assets, the number of open attack techniques and their severity, a matrix to view paths with different source node exposure score and ACR target value combinations, and a list of trending attack paths.
-
Review the Top Attack Path Matrix and click the Top Attack Paths tile to view more information about paths leading to your “Crown Jewels”, or assets with an ACR of 7 or above.
You can adjust these if needed to ensure you’re viewing the most critical attack path data.
-
-
On the Top Attack Techniques tab, view all attack techniques that exist in one or more attack paths that lead to one or more critical assets by pairing your data with advanced graph analytics and the MITRE ATT&CK® Framework to create attack techniques, which allow you to understand and act on the unknowns that enable and amplify threat impact on your assets and information.
-
On the Top Attack Paths tab, generate attack path queries to view your assets as part of potential attack paths:
Then, you can view and interact with the Attack Path Query and Asset Query data via the query result list and the interactive graph.
-
Interact with the MITRE ATT&CK Heatmap tab.
-
-
View and interact with the data in the Tags page:
-
Create and manage tags to highlight or combine different asset classes.
-
View the Tag Details page to gain further insight into the tags associated with your assets.
-