Scan Using Portable OT Agents
An OT agent in a portable state can discover assets in air-gapped, isolated, and complex OT environments, and then return results to OT Security for analysis.
The following interconnected capabilities allow agent scanning in complex air-gapped environments:
Network Areas to anchor assets to logical or physical sites. For more information, see Network Areas.
Agent in a disconnected portable state collects and packages discovery data and transfers it securely to the ICP without requiring a live connection.
A native interface for field technicians to load scan profiles, track progress, run scans offline, and download results. The interface is also for pairing, and system log.
Key Concepts
The following entities work together to deliver portable OT discovery.
Network Areas — A logical or physical container (for example, Building B) that anchors assets to a location. OT Security treats identical IP addresses in different network areas (duplicated networks) as separate, unique assets.
OT Discovery Scan (OTD Scan) — The technical instruction set that you create through the OT Discovery scan wizard. The instruction set defines the scan credentials, and schedules.
Subnet (Monitored Network) — A network range in CIDR notation (for example, 192.168.0.0/24) that defines the scope of discovery. OT Security does not create assets that fall outside the configured subnets.
Source — Any entity that reports asset data, such as sensors, agents, local ICP, CSV uploads, or Packet Capture (PCAP) Player.
Agent States
The last connection to OT Security determines the state of an agent:
Static — The agent has an active live connection to OT Security and receives scan configurations in real time.
Portable — The agent last connected via a result upload without establishing a live connection. The agent operates independently in air-gapped environments and performs OT discovery without a network path to OT Security.
Portable State Agent Scan Workflow
Prerequisites
Verify that you have Administrator permissions.
Define your network area and subnets on the Network Areas page.
Note: Both the network area and the subnet must exist in OT Security before the agent returns results. If a result upload references a network area or subnet that does not exist, OT Security notifies you and holds the results. OT Security releases the results after you link them to an existing network area or create a new one.
Step 1: Define the OT Discovery Scan
You must first create an OTD scan using the OTD configuration wizard.
Go to Data Collection > Active Queries.
The Active Queries Management page appears.
Click the OTD Scans tab.
The OTD Scans page appears.
Click Create OTD Scan.
The Create OTD Scan panel appears.
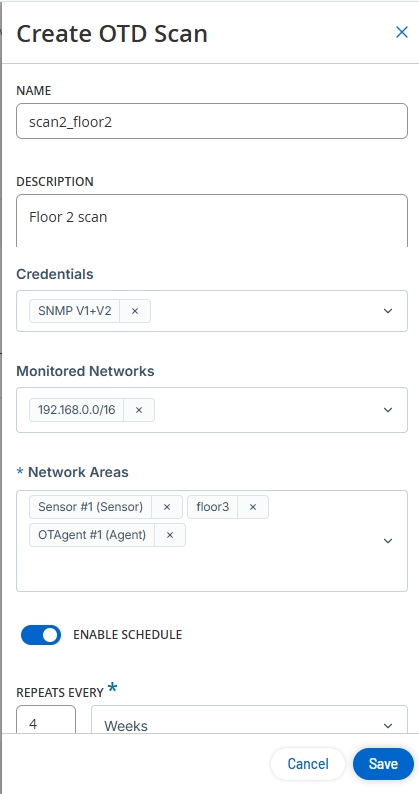
In the Name box, type a name for the scan.
In the Description box, type the context or details for the scan.
In the Credentials drop-down box, select the required credentials from the list.
Step 2 Link the Subnet and Network Area
Within the OTD scan wizard, you must link the subnet and network area.
In the Monitored Networks drop-down box, select one or more subnets for the scan or type a CIDR range.
Note: You can pre-populate subnets on the Monitored Networks page, or you can create them directly in this field by typing the CIDR range.In the Network Areas drop-down box, select one or more network areas.
Note:You can pre-populate network areas on the Network Areas page, or you can create them directly in this field by typing a new name.Define a schedule.
Click the Enable Schedule toggle.
The Repeats Every drop-down box becomes active.
(Optional) Specify the interval minutes, hours, days, or weeks as required.
In the On section, select the days you want to run the scan.
In the At drop-down box, select the time at which you want to run the scan.
Click Save.
OT Security saves the OTD Scan.
Step 3 Sync the Configuration to the Agent
Access your local OT Agent interface on Windows.
Note: The agent automatically syncs available scan configurations whenever it establishes a connection to OT Security.Select the upload file that you want to run or pair with the ICP (static or online).
Select the network area where you want to run the scan.
Step 4 Run the Scan
Run the scan from the local agent interface. In the portable state, the agent performs OT discovery on the selected network without a live connection to Tenable OT Security.
View the progress of the scan in the execution log and download the results.
Step 5 Upload Results
Upload results through Manual Uploads in OT Security.
Go to Data Collection > Data Sources.
The Data Sources page appears.
Click the Manual Uploads tab.
The Manual Uploads page appears.
Navigate to the OTD Scan Files section and click Upload.
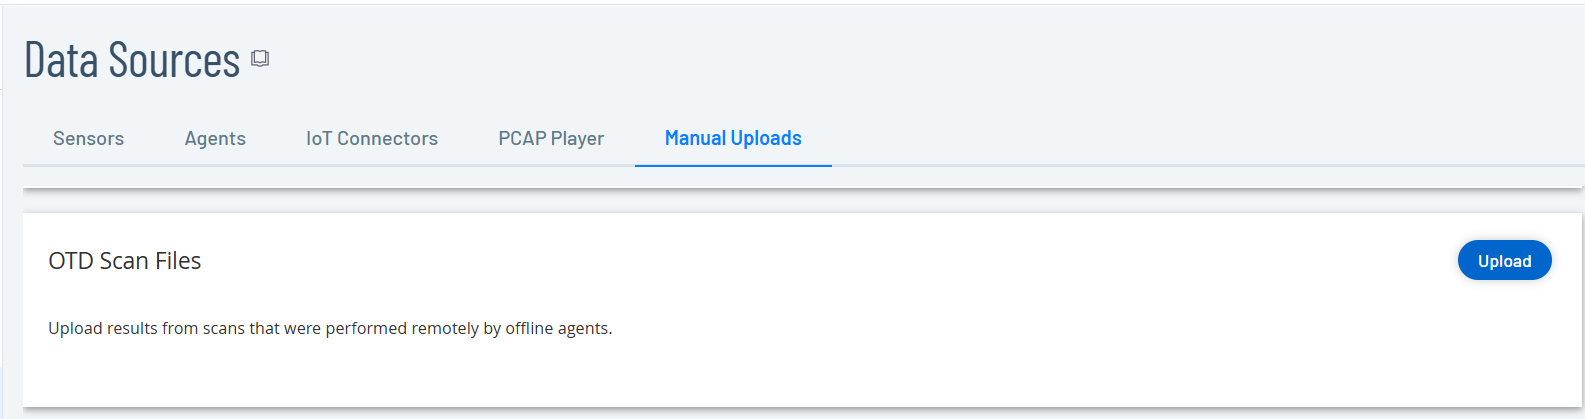
Browse to your local OTD scan results file and select it to upload.
Note: If you do not define the network area or subnet before this upload, OT Security notifies you. You must link the results to an existing network area or create a new one with a name that matches the same name as the results before the system populates your asset inventory.View the imported asset data results in the Inventory page.