Secure Relay for Tenable Identity Exposure
As of version 3.59, the Secure Relay component takes over designated tasks in the Tenable One Identity Exposure platform:
-
Allows you to configure domains from which it forwards the data to the Directory Listener (DL) component that collects AD objects.
-
Facilitates the setup and maintenance for large infrastructures through automatic updates and no longer needs multiple DLs that require simultaneous upgrades.
-
Acts as a bridge between the single DL and various endpoints such as domain controllers, SMTP and SYSLOG servers, or LDAP servers for in-product authentication.
-
Ties to one or several domains. The DL can manage an unlimited number of relays.
-
Requires configuration of naming and mapping (domain, SMTP, SYSLOG, LDAP authentication) in the Tenable One Identity Exposure console.
Before you begin:
Install or upgrade to Tenable One Identity Exposure 3.59 with Secure Relay:
-
Review the Secure Relay Requirements.
-
Network requirements:
-
In previous and current versions, the DL communicated to the SEN directly, using the AMQP(S) protocol.
-
In version 3.59, the relays that replace the multiple DLs communicate with the only remaining DL over HTTPS.
-
Envoy is the reverse proxy.
-
-
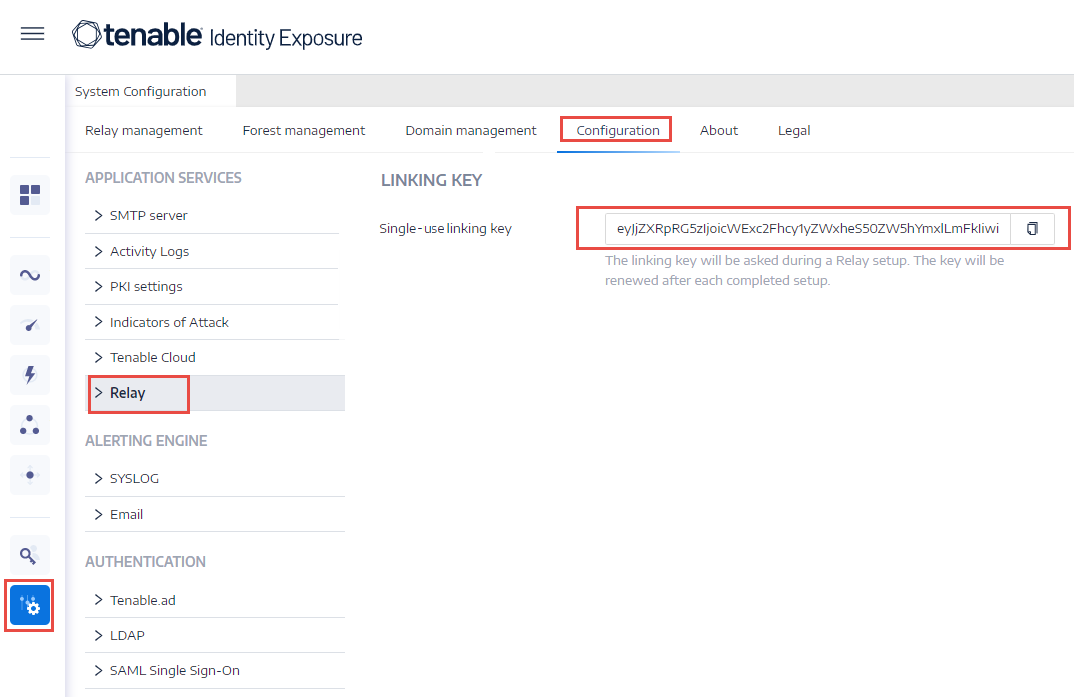
Linking key: The Secure Relay installation requires a single-use linking key that contains the address of your network and an authentication token. Tenable One Identity Exposure regenerates a new key after each successful Secure Relay installation.
To retrieve the linking key:
-
In the Tenable One Identity Exposure console, click System on the left menu bar and select the Configuration tab > Relay.
-
Click
 to copy the linking key.
-
-
Role Permissions: You must be a user with role-based permissions to configure the relay. The required permissions are the following:
-
Data entities: Entity Relay
-
Interface entities:
-
Management > System > Configuration > Application Services > Relay
-
Management > System > Relay management
-
-
Installation procedure
Required User Role: Administrator on the local machine
To install the Secure Relay:
-
Download the executable program for Secure Relay from Tenable’s Downloads site.
-
Double-click on the file tenable.ad_SecureRelay_v3.xx.x to start the installation wizard.
The Welcome screen appears.

-
Click Next.
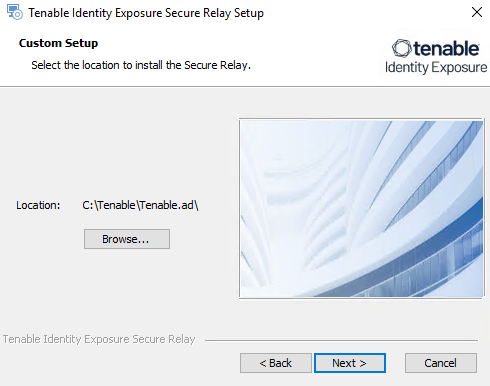
The Custom Setup window appears.
-
Click Browse to select the disk partition you reserved for Secure Relay (separate from the system partition).
-
Click Next.
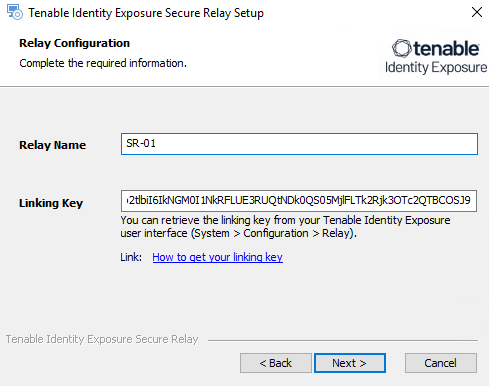
The Relay Configuration window appears.
-
Provide the following information:
-
In the Relay Name box, type a name for your Secure Relay.
-
In the Linking key box, paste the linking key that you retrieved from the Tenable One Identity Exposure portal.
-
If you choose to use a proxy server, select the option Use an HTTP Proxy for your relay calls and provide the proxy address and port number.
-
-
Click Next.
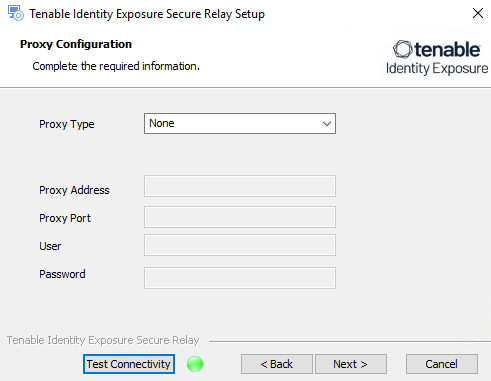
The Proxy Configuration window appears:
-
Select one of the following options:
-
None: Do not use a proxy server.
-
Unauthenticated: Type the address and port for the proxy server.
-
Basic authentication: Type the address, port, user, and password for the proxy server.
Caution: To configure a proxy using "Unauthenticated" or "Basic authentication", the relay only supports IPv4 addresses (such as 192.168.0.1) or a proxy URI without http:// or https:// (such as myproxy.mycompany.com.) The relay does not support IPv6 addresses (such as 2001:0db8:85a3:0000:0000:8a2e:0370:7334.) -
-
Click Test Connectivity. The following can occur:
-
Green light — The connection succeeded.
-
Invalid linking key — Retrieve the linking key from the Tenable One Identity Exposure portal.
-
Invalid Relay Name — This box cannot remain empty. Provide a name for the relay.
-
Connection failed — Check your internet access.
-
-
Click Next.
The Ready to Install window appears.
-
Click Install.
-
After the installation completes, click Finish.
Post-installation checks
After the Secure Relay installation completes, check for the following:
Installed relays in Tenable One Identity Exposure
To see the list of installed relays:
-
In Tenable One Identity Exposure, click Systems on the left menu bar and select the Relay Management tab.
The pane shows a list of secure relays and their linked domains.
Services
After a successful installation, the following services are running:
-
Tenable_Relay
-
tenable_envoy
Note: You can locate the Envoy license in Tenable One Identity Exposure at Systems > Legal > Envoy license.
Environment variables
The installation adds six new environment variables related to Secure Relay. These variable names begin with ALSID_CASSIOPEIA_. If you selected to use a proxy server, there are two additional variables related to the proxy IP and port.
Logs for troubleshooting
You can find logs in the following locations:
-
Installation logs: C:\Users\<your user>\AppData\Local\Temp
-
Relay logs: On the VM hosting Secure Relay in the folder specified at the time of installation.
Relay configuration
Automatic updates
After you install Secure Relay, Tenable One Identity Exposure checks regularly for new versions. This process is fully automated and requires HTTPS access to your domain (TCP/443). An icon in the network tray indicates when Tenable One Identity Exposure is updating Secure Relay. Once the process completes, Tenable One Identity Exposure services restart and data collection resumes.
Uninstallation
To uninstall a Secure Relay:
-
In Windows, go to Settings > Apps & Features > Tenable One Identity Exposure Secure Relay.
-
Click Uninstall.
When the uninstallation completes, Tenable One Identity Exposure Secure Relay services and environment variables no longer appear in your system.
-
In Tenable One Identity Exposure, click Systems on the left menu bar and select the Relay Management tab.
-
Select the relay you just uninstalled and click
 to remove it from the list of available relays.
For more information: