SSH Auto-Discovery
Required User Role: Standard, Scan Manager, or Administrator
Note: The Address field in the CyberArk Account Details for an account/host must contain a valid IP/FQDN and must be resolvable on your network. This value is vetted during the collection and discovery process. Address values that are null, or unresolvable, are not added to the scan.
Note: Privilege Escalation is available, but only using the SUDO method at this time. More research is needed to explore other escalation methods.
Note: SSH Key authentication is supported, but escalated privileges after SSH Key authentication is not available at this time.
To configure SSH auto-discovery:
-
Log in to Tenable Vulnerability Management.
-
In the left navigation plane, click
 Scans.
The Scans page appears.
-
Click + New Scan.
The Scan Templates page appears.
-
Select a Scan Template.
The scan configuration page appears.
- In the Name box, type a name for the scan.
- In the Targets box, type an IP address, hostname, or range of IP addresses.
-
(Optional) Add a description, folder location, scanner location, and specify target groups.
-
Click the Credentials tab.
The Credentials pane appears.
-
In the Select a Credential menu, select the Host drop-down..
-
Select SSH.
-
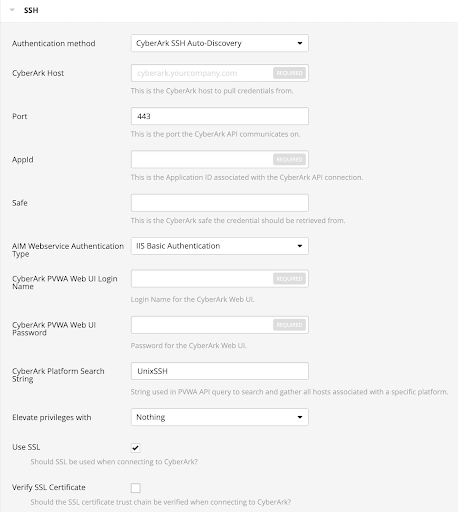
From the Authentication Method drop-down, select CyberArk SSH Auto-Discovery.
The CyberArk SSH Auto-Discovery field options appear:
-
Configure each field for the SSH authentication.
Option Description Required CyberArk Host
The IP address or FQDN name for the user’s CyberArk Instance.
Note: Customers hosting the PVWA and CCP on separate servers should only use this field for the PVWA host.
yes
Port
The port on which the CyberArk API communicates. By default, Tenable uses 443.
Note: Customers hosting the PVWA and CCP on separate servers should only use this field for the PVWA host.
yes
CCP Host
The IP address or FQDN name for the user’s CyberArk CCP component.
Note: Customers hosting the PVWA and CCP on separate servers should only use this field for the PVWA host.
no
CCP Port
The port on which the CyberArk CCP (AIM Web Service) API communicates. By default, Tenable uses 443.
Note: Customers hosting the PVWA and CCP on separate servers should only use this field for the PVWA host.
no
AppID
The Application ID associated with the CyberArk API connection.
yes
Safe Users may optionally specify a Safe to gather account information and request passwords.
no AIM Web Service Authentication Type There are two authentication methods established in the feature. IIS Basic Authentication and Certificate Authentication. Certificate Authentication can be either encrypted or unencrypted. yes
CyberArk PVWA Web UI Login Name Username to log in to CyberArk web console. This is used to authenticate to the PVWA REST API and gather bulk account information. yes
CyberArk PVWA Web UI Login Password Password for the username to log in to CyberArk web console. This is used to authenticate to the PVWA REST API and gather bulk account information. yes
CyberArk Platform Search String String used in the PVWA REST API query parameters to gather bulk account information. For example, the user can enter UnixSSH Admin TestSafe, to gather all UnixSSH platform accounts containing a username Admin in a Safe called TestSafe.
Note: This is a non-exact keyword search. A best practice would be to create a custom platform name in CyberArk and enter that value in this field to improve accuracy.
yes PVWA REST API Authentication Type
Choose whether to authenticate to the PVWA by entering username and password or to gather credentials from the Central Credential Provider (CCP). (Not available with Tenable Security Center.)
yes
PVWA REST API Credential ID
The unique identifier ("Account name") of the CyberArk account containing CCP credentials. (Not available with Tenable Security Center.)
Yes, if the PVWA REST API Authentication Type is set to Gather from CCP.
Elevate Privileges with
Users can only select Nothing or sudo at this time.
no
Use SSL
If enabled, the scanner uses SSL through IIS for secure communications. Enable this option if CyberArk is configured to support SSL through IIS.
yes
Verify SSL Certificate
If enabled, the scanner validates the SSL certificate. Enable this option if CyberArk is configured to support SSL through IIS and you want to validate the certificate.
no
Targets to Prioritize Credentials Specify IPs or CIDR blocks on which this credential is attempted before any other credential. To specify multiple IPs or CIDR blocks, use a comma or space-separated list.
Using this setting can decrease scan times by prioritizing a credential that you know works against your selected targets. For example, if your scan specifies 100 credentials, and the successful credential is the 59th credential out of 100, the first 58 credentials have to fail before the 59th credential succeeds. If you use Targets To Prioritize Credentials, you configure the scan to use the successful credential first, which allows the scan to access the target faster.
no Caution: Tenable strongly recommends encrypting communication between your on-site scanner and the CyberArk AIM gateway using HTTPS and/or client certificates. For information on securing the connection, refer to the Tenable Vulnerability Management User Guide and the Central Credential Provider Implementation Guide located at cyberark.com (login required).
- Click Save.