Get Started with Tenable Vulnerability Management
This topic explains how to plan a Tenable Vulnerability Management deployment. It includes high-level guidance to build a deployment plan, configure scanners and application settings, start analyzing vulnerability data, and—when ready—expand into Tenable One.
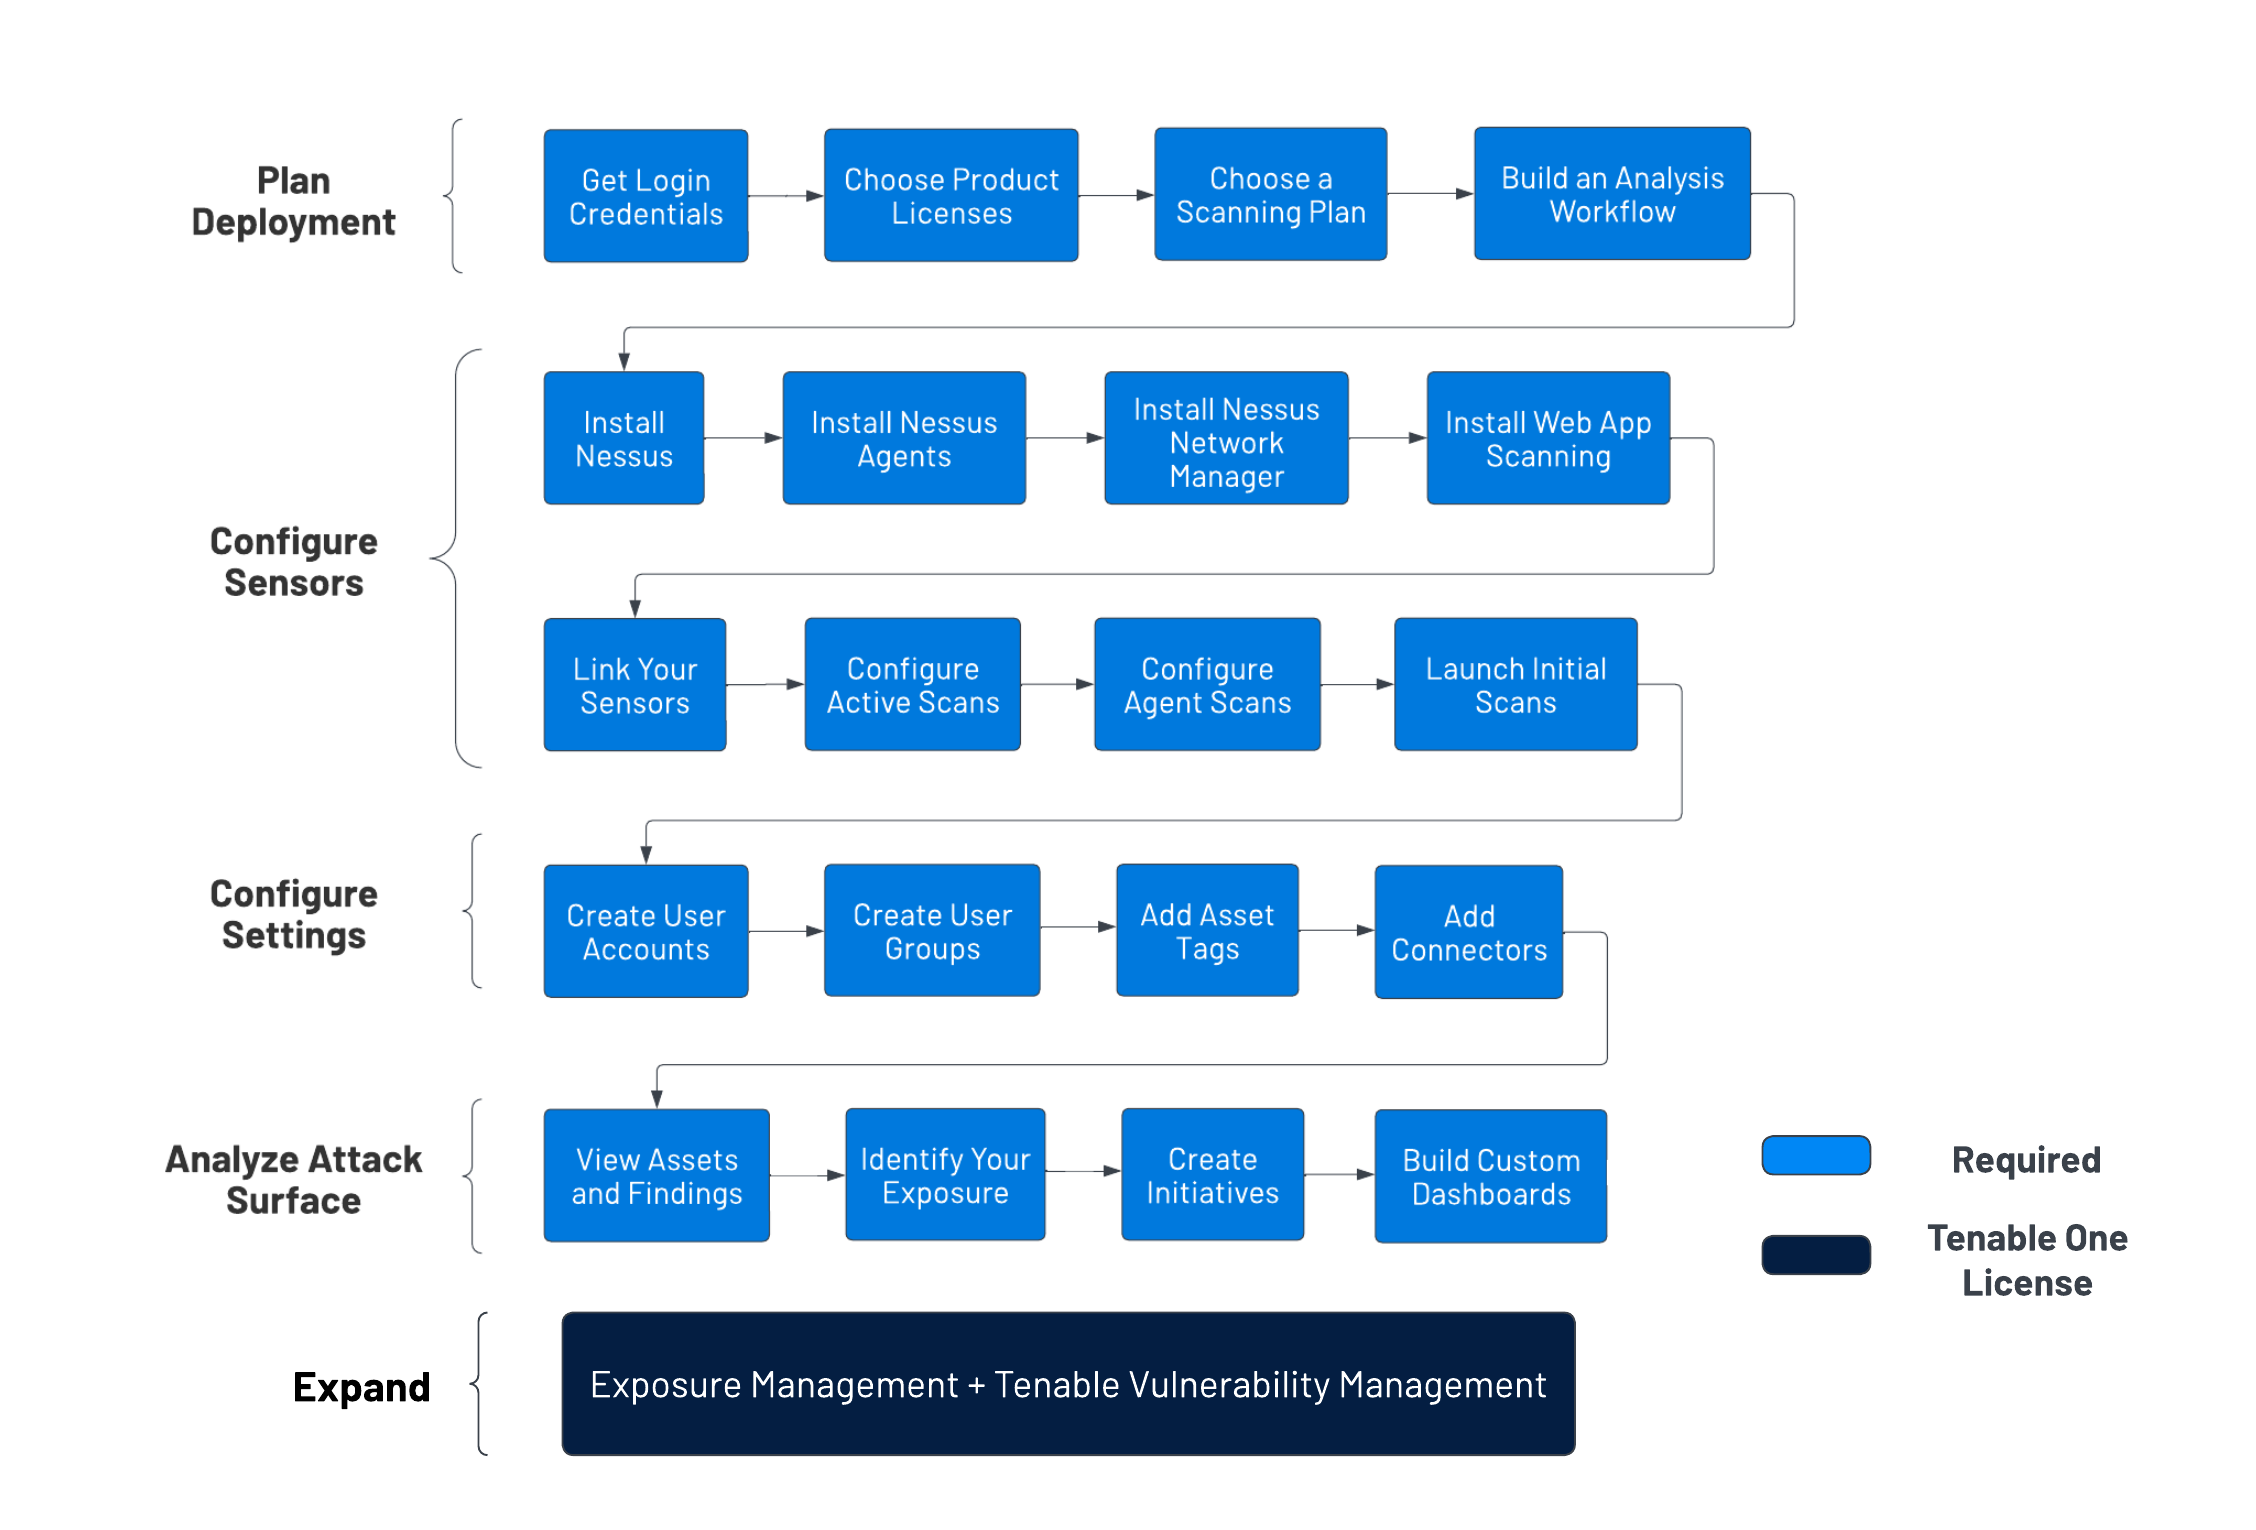
Plan Your Deployment
Establish a deployment plan:
- Contact your Tenable representative and get your product access information and account credentials.
-
Analyze your network topology, considering Tenable-recommended best practices, as described in the General Requirements Guide.
-
Choose additional Tenable product licenses based on your organizational needs:
-
If you want to assess your exposure, obtain a Tenable Lumin license.
-
If you want to scan web applications, obtain a Tenable Web App Scanning license.
-
If you want to evaluate risk on your containers, obtain a Tenable Container Security license.
-
-
Choose a scanning plan, including the scans to run. Consult the Scan Tuning Guide if needed.
-
Design an analysis workflow, identifying key stakeholders and considering what data you intend to share.
Install and Configure Sensors
To install and configure sensors:
-
Install the sensors chosen in your deployment plan:
-
Install Tenable Nessus as described in the Tenable Nessus User Guide.
-
Install Tenable Agents as described in the Tenable Agent Deployment and User Guide.
-
Install Tenable Network Monitor and then configure your installation as described in in the Tenable Agent Deployment and User Guide.
Note: FedRAMP compliance prohibits downloading binaries directly. Update your Tenable Network Monitor scanners periodically to ensure you have the latest fixes and enhancements. This requirement also applies to Tenable Agents and Tenable Nessus scanners.
-
Install Tenable Core and Tenable Web App Scanning as described in the Tenable Core User Guide.
-
-
Link sensors to Tenable Vulnerability Management, as described in Link a Sensor.
-
Configure your first active scan using the Basic Network Scan template:
- Create a scanner group, as described in Create a Scanner Group.
- Create a scan using the Basic Network Scan template, as described in Create a Scan.
-
Configure your first agent scan using the Basic Agent Scan template:
- Create an agent group, as described in Create an Agent Group.
- Create an agent scan using the Basic Agent Scan template, as described in Create a Scan.
- Launch your first Tenable Nessus scan and agent scan, as described in Launch a Scan.
-
Confirm that scans completed, accessing all targeted areas of your network. Review discovered assets.
Configure Application Settings
Configure other settings in Tenable Vulnerability Management:
- Create user accounts for the users in your organization.
- Create user groups to control user permissions for the resources in Tenable Vulnerability Management.
-
Add asset tags to organize and identify the assets to scan.
- Set up asset discovery with connectors, Professional Services integrations, or integrated products (as described in the Integration Guides section of the Tenable Vulnerability Management Documentation page).
-
Configure managed credentials, scan-specific credentials, or policy-specific credentials for a Tenable Nessus scan, as described in Credentials. For more information about configuring and troubleshooting credentialed scans, see Tenable Nessus Credentialed Checks.
-
Launch your credentialed Tenable Nessus scan and credentialed agent scan, as described in Launch a Scan.
- Confirm your credentialed scan completed, accessing all targeted areas of your network.
-
Analyze Your Attack Surface
Use the following features in Tenable Vulnerability Management to understand your vulnerabilities:
- View your scans and scan details.
- View scanned assets and vulnerabilities on the Findings and Assets tables.
- With Vulnerability Intelligence, view known vulnerabilities by category and compare them to your own exposure.
- With Exposure Response, create initiatives to track remediation projects.
-
With reports, share scan and vulnerability information with your organization.
- Use custom dashboards to get visual overviews of your attack surface.
Expand into Tenable Exposure Management
Integrate Tenable Vulnerability Management with Tenable Exposure Management and leverage the following features:
-
Access the Exposure View page, where you can gain critical business context by getting business-aligned cyber exposure score for critical business services, processes and functions, and track delivery against SLAs. Track overall VM risk to understand the risk contribution of assets to your overall Cyber Exposure Score, including by asset class, vendor, or by tags.
-
View CES and CES trend data for the Global and Vulnerability Management exposure cards.
-
View Remediation Service Level Agreement (SLA) data.
-
View Tag Performance data.
-
Access the Exposure Signals page, where you can generate exposure signals that use queries to search for asset violations. Simply put, if an asset is impacted by a weakness related to the query, then the asset is considered a violation. Using this, you can gain visibility into your most critical risk scenarios.
-
Find top active threats in your environment with up-to-date feeds from Tenable Research.
-
View, generate, and interact with the data from queries and their impacted asset violations.
-
Create custom exposure signals to view business-specific risks and weaknesses
-
-
Access the Inventory page, where you can enhance asset intelligence by accessing deeper asset insights, including related attack paths, tags, exposure cards, users, relationships, and more. Improve risk scoring by gaining a more complete view of asset exposure, with an asset exposure score that assesses total asset risk and asset criticality.
-
View and interact with the data on the Assets tab:
-
Review your AD assets to understand the strategic nature of the interface. This should help set your expectations on what features to use within Tenable Exposure Management, and when.
-
Familiarize yourself with the Global Asset Search and its objects and properties. Bookmark custom queries for later use.
-
Find devices, user accounts, software, cloud assets, SaaS applications, networks, and their weaknesses.
- Drill down into the Asset Details page to view asset properties and all associated context views.
-
-
View and interact with the data on the Weaknesses tab:
-
View key context on vulnerability and misconfiguration weaknesses to make the most impactful remediation decisions.
-
-
View and interact with the data on the Software tab:
-
Gain full visibility of the software deployed across your business and better understand the associated risks.
-
Identify what software may be out of date, and which pieces of software may soon be End of Life (EoL).
-
-
View and interact with the data on the Findings tab:
-
View instances of weaknesses (vulnerabilities or misconfigurations) appearing on an asset, identified uniquely by plugin ID, port, and protocol.
-
Review insights into those findings, including descriptions, assets affected, criticality, and more to identify potential security risks, visibility on under-utilized resources, and support compliance efforts.
-
-
-
Access the Attack Path page, where you can optimize risk prioritization by exposing risky attack paths that traverse the attack surface, including web apps, IT, OT, IoT, identities, ASM, and prevent material impact. Streamline mitigation by identifying choke points to disrupt attack paths with mitigation guidance, and gain deep expertise with AI insights (Not supported in FedRAMP environments).
-
View the Dashboard tab for a high-level view of your vulnerable assets such as the number of attack paths leading to these critical assets, the number of open attack techniques and their severity, a matrix to view paths with different source node exposure score and ACR target value combinations, and a list of trending attack paths.
-
Review the Top Attack Path Matrix and click the Top Attack Paths tile to view more information about paths leading to your “Crown Jewels”, or assets with an ACR of 7 or above.
You can adjust these if needed to ensure you’re viewing the most critical attack path data.
-
-
On the Top Attack Techniques tab, view all attack techniques that exist in one or more attack paths that lead to one or more critical assets by pairing your data with advanced graph analytics and the MITRE ATT&CK® Framework to create attack techniques, which allow you to understand and act on the unknowns that enable and amplify threat impact on your assets and information.
-
On the Top Attack Paths tab, generate attack path queries to view your assets as part of potential attack paths:
Then, you can view and interact with the Attack Path Query and Asset Query data via the query result list and the interactive graph.
-
Interact with the MITRE ATT&CK Heatmap tab.
-
-
View and interact with the data in the Tags page:
-
Create and manage tags to highlight or combine different asset classes.
-
View the Tag Details page to gain further insight into the tags associated with your assets.
-